


Valentine Pocket with HeatnBond Interfacing
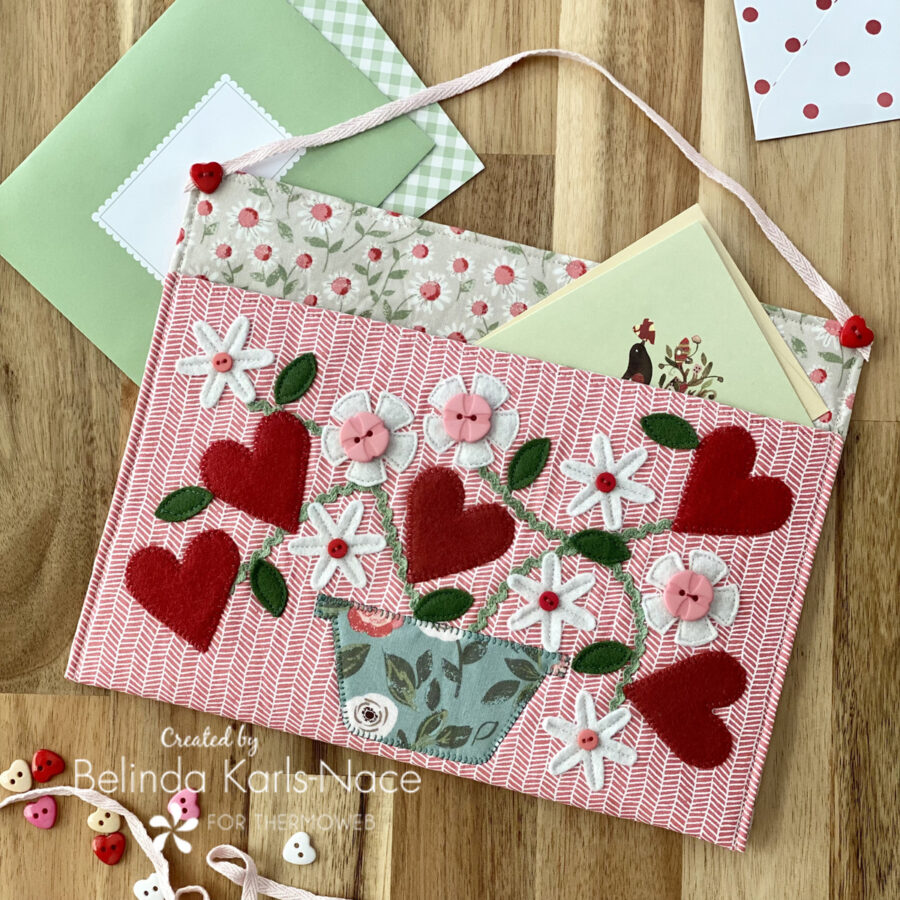
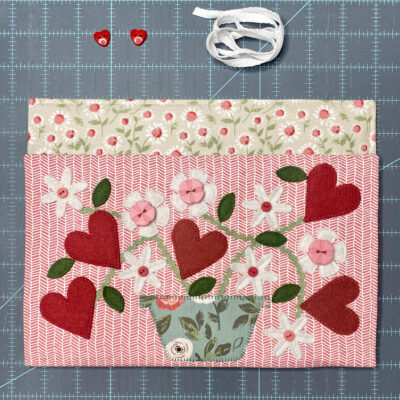
Greetings all – I’m Belinda Karls-Nace from Blue Ribbon Designs and I’m new to the Therm O Web blog. I have an enormous passion for needle and thread and look forward to sharing some of my creative ideas with you! Today, I am excited to share my Growing Hearts Valentine Pocket. This heartfelt design is fun and easy to put together and is great for using scraps and snippets. This Valentine Pocket is perfect for hanging on a doorknob, hook, or hanger and can be used for stationery, Valentines, mail or notes (add some candy for a sweet gift!).
Let’s get creative! Just gather the materials/supplies listed below, then download the PDF with the appliqué templates and placement guides.
What you need:
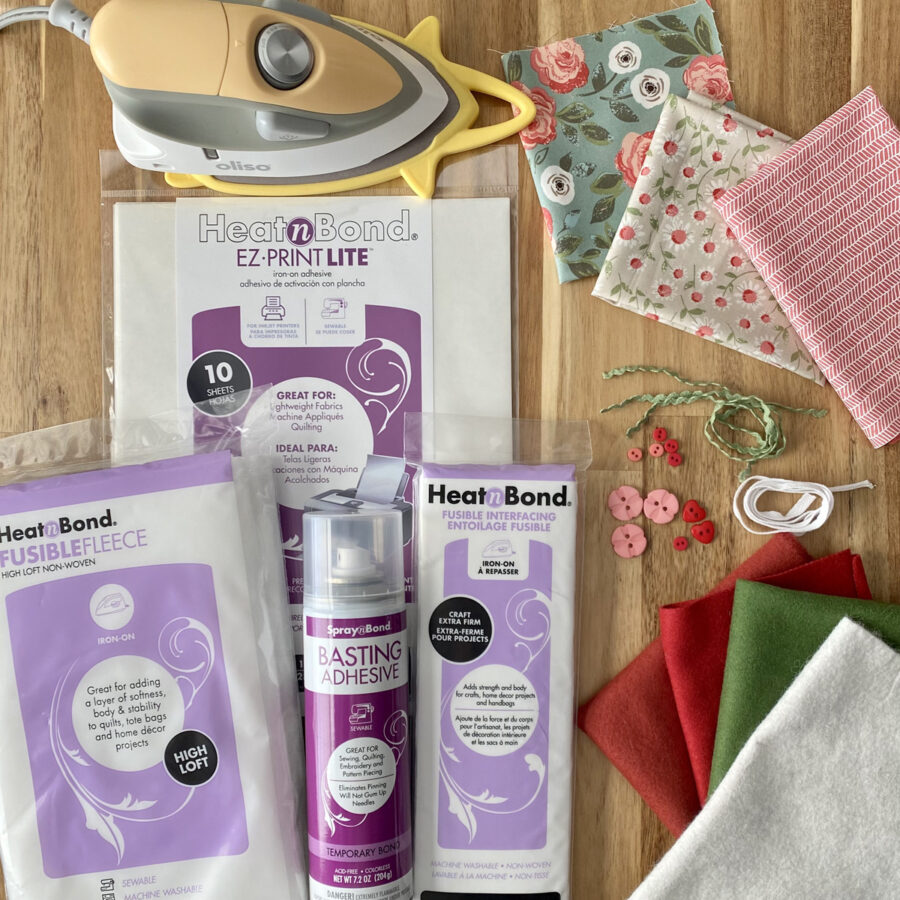
- HeatnBond Lite EZ-Print Iron-On Adhesive
1 Sheet - HeatnBond Craft Extra Firm Non-Woven Fusible Interfacing
10 ½” x 14 ½” - HeatnBond Fusible Fleece
10 ½” x 14 ½” - SpraynBond Basting Adhesive Fabric Spray
- 3 Coordinating Cotton Fabrics (model uses Love Note by Lella Boutique for Moda Fabrics)
Outer fabric – 11” x 15”
Lining fabric – 11” x 15”
Basket applique – 5” x 3” - Wool Felt
Coordinating scraps of red, green and white - Buttons
5 – ¼” Round (model uses Little Buttons from Lori Holt of Bee in my Bonnet)
3 – ¾” Floral Round (model uses Little Buttons from Lori Holt of Bee in my Bonnet)
2 – ½” Heart (model uses cute hearts I found on Amazon) - Mini Rick Rack
½ Yard (model uses Hand-Dyed Rick Rack – Grace Green – 7/32″ from Lady dot Creates) - ¼” Twill Tape or Ribbon
½ Yard (model uses Hand-Dyed Twill Tape – Old Tutu – ¼” from Lady Dot Creates) - Sewing Machine
- Oliso Iron
- Basic Sewing and Cutting Supplies/Tools (rotary cutter, small sharp scissors, light pad/box or window, rulers, sewing thread, etc.)
How to Make a Valentine Pocket
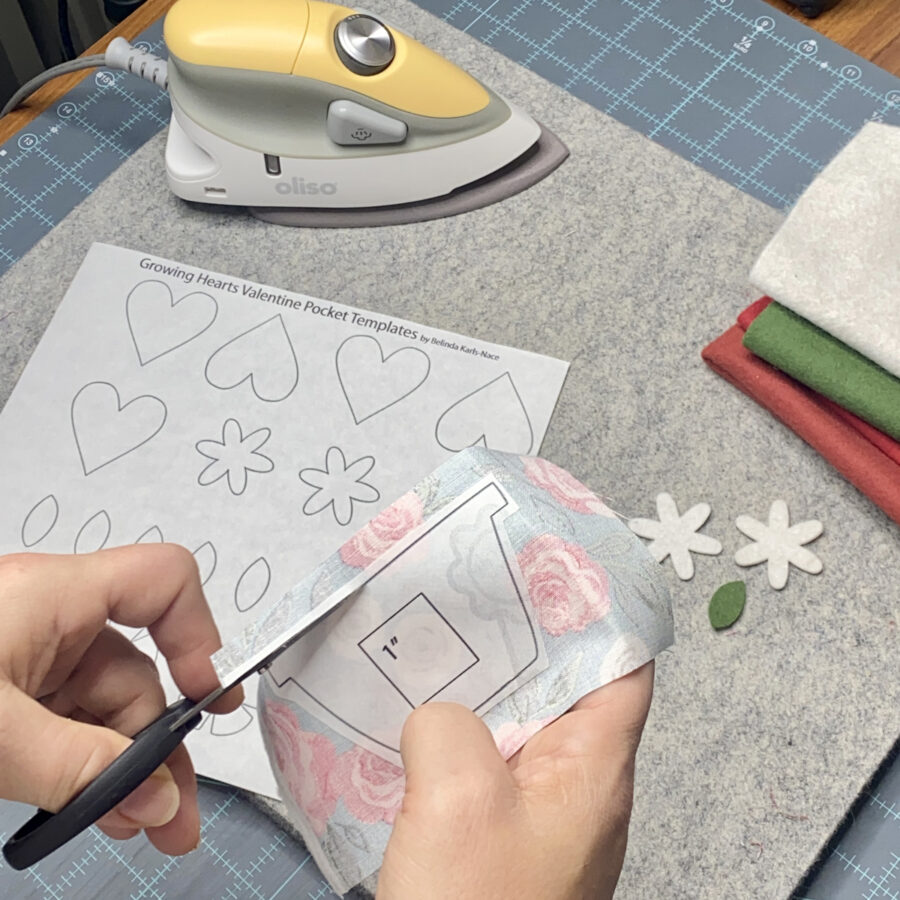
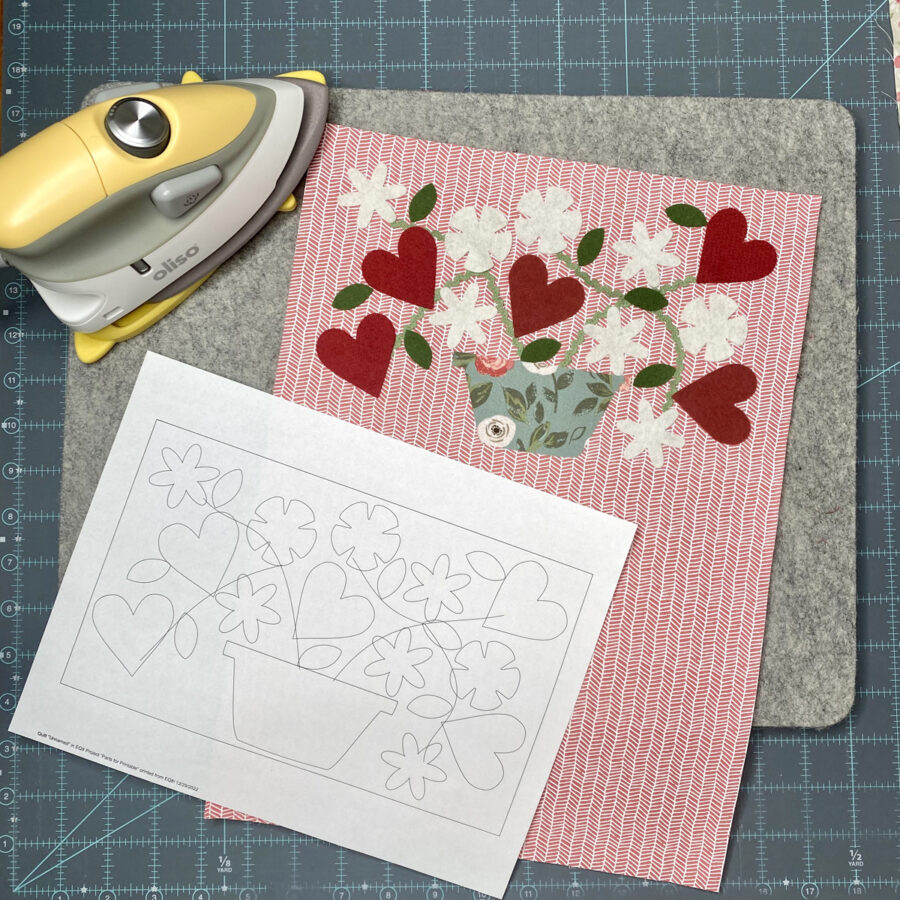
1. Download and Print the Growing Hearts Valentine Pocket PDF.
Growing Hearts Valentine Pocket – A Project for the Therm O Web Blog
Print actual size – do NOT “fit to page” or “shrink to fit.” Print page one (appliqué templates) on one sheet of HeatnBond Lite EZ-Print Iron-On Adhesive (Inkjet printer friendly – no tracing required). Print pages two and three on regular printer paper.
2. Loosely cut apart the applique templates and apply to the backs of desired fabric(s) and wool felt, following the package instructions. I used cotton quilting fabric for the basket and wool felt for all other shapes (flowers, leaves, hearts). Cut out all shapes on the solid lines using small sharp scissors, leaving the paper in place.
3. Center and fuse the 10 ½” x 14 ½” piece of HeatnBond Craft Extra Firm Non-Woven Fusible Interfacing to the wrong side of the 11” x 15” lining fabric, following the package instructions.
4. Place the 11” x 15” piece of outer fabric on top of the Rick Rack (Stem) Placement Guide printout, lining up the sides and top. Using a light pad/box or window, trace the stem lines onto the right side of the fabric, using a pencil (note – do not use a Frixion pen, as the lines will disappear when you apply the fusible fleece with heat). You may choose to omit this step and place your rick rack stems organically. Once the placement lines are drawn, center and fuse the 10 ½” x 14 ½” piece of HeatnBond Fusible Fleece to the wrong side of the outer fabric, following the package directions.

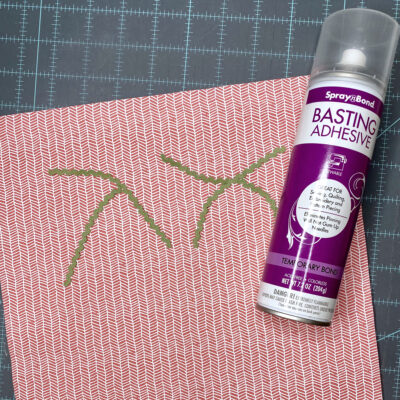
5. Cut the mini rick rack to fit the placement lines and use SpraynBond Basting Adhesive Fabric Spray to hold the pieces in place. Using a coordinating thread, sew the pick rack in place.
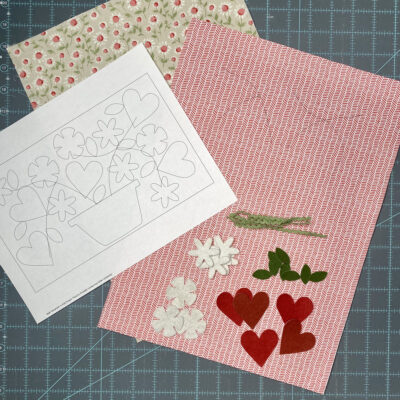
6. Using the Appliqué Placement Guide, remove the paperbacks on the cut shapes and fuse into place. Be sure to leave a ½” seam allowance on both sides and the top for constructing the pocket.
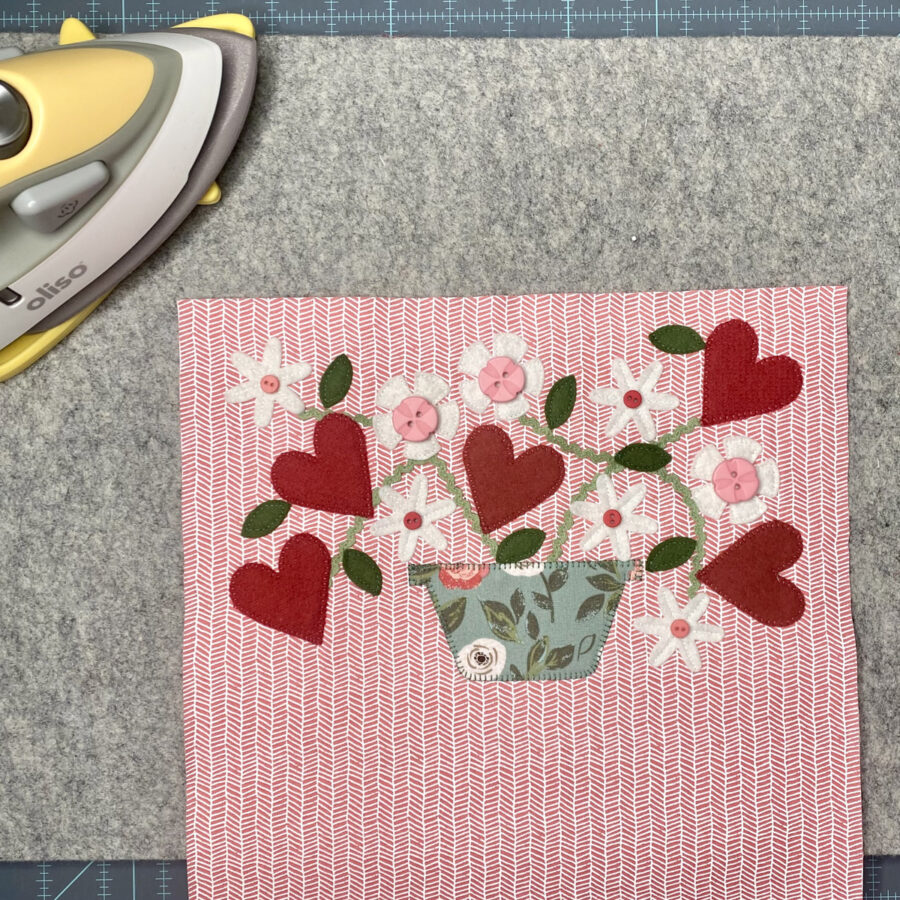
7. Using your favorite appliqué stitches, sew the shapes in place (or leave them without sewing for a fast project! – the HeatnBond fusible adhesive will hold them in place). I chose to use a blanket stitch for the basket and the hearts and straight stitches for the flowers.
8. Sew ¼” round and ¾” floral round buttons in the flower centers.
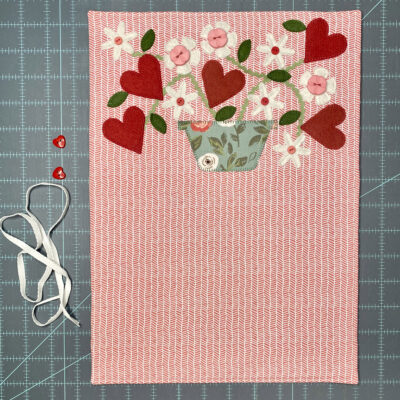
9. Place the lining fabric and the outer fabric with appliqué right sides together and sew around all four sides with a ¼” seam allowance, leaving an opening for turning. Clip corners, turn right side out and press. Top stitch around the entire perimeter, using a 1/8” or 3/16” seam allowance.
10. Place your piece lining side up on ironing board and fold the applique to the front to create a pocket. I folded up 6 ¼”, leaving approximately 1 ¾” of lining showing. Press the fold. Sew up the sides to create the pocket, sewing over your top stitches from step 8.
Pro Tip: start at the fold and sew towards the top. Reinforce the stitching at the top of the pocket.
11. Attach the twill tape or ribbon hanger. I cut 14” of twill tape and sewed it in place by adding a ½” heart button in both top corners. Lay it out flat first, making sure not to have a twist in your twill tape and leaving a bit of extra twill tape on the ends. Hand stitch through the button, twill tape and fabric pocket – traveling through all layers several times, making sure your hanger is secure. Trim the ends of the twill tape.
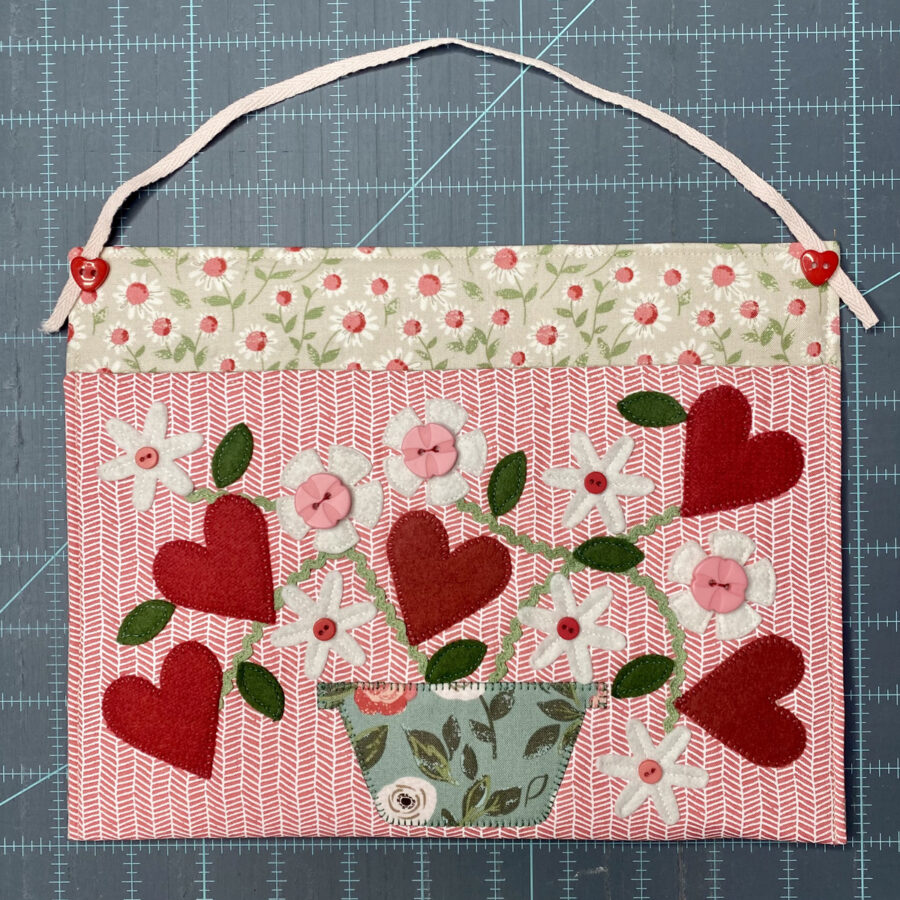
12. Your Growing Hearts Valentine Packet is now complete. Fill will valentines, stationery or goodies and enjoy!
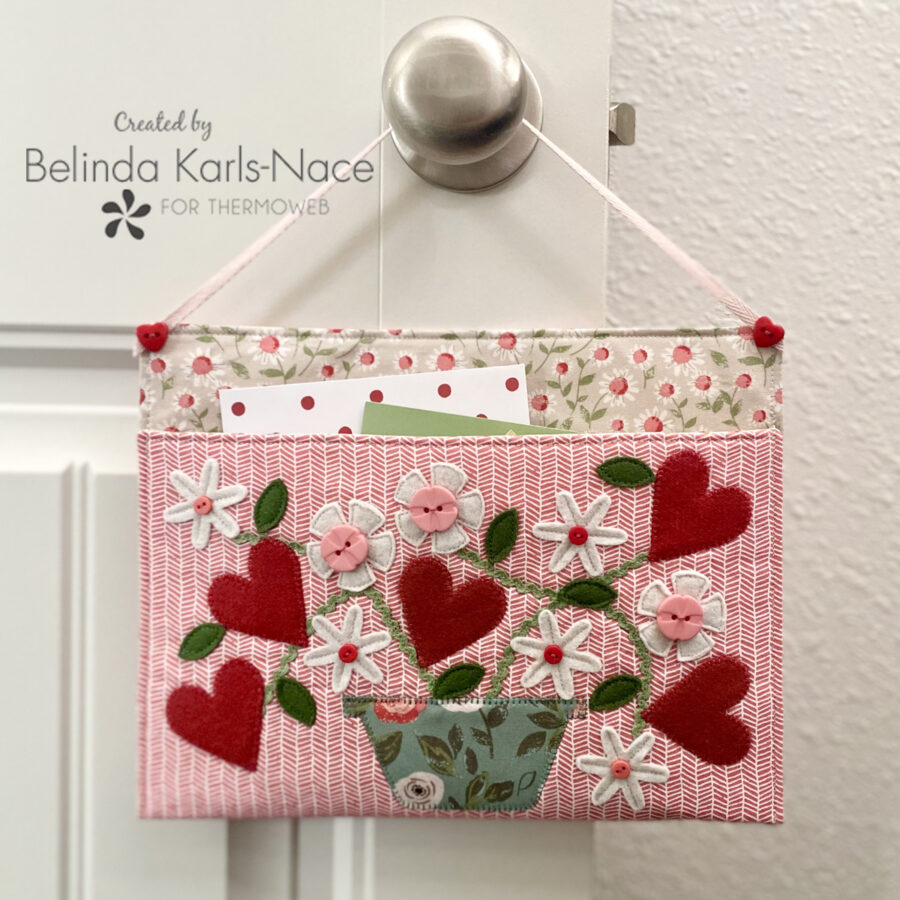
Thank you for joining me today for my first Therm O Web blog tutorial! I hope you feel creative and inspired. To see more of my needle and thread projects, stop by my blog, website or Instagram – I would love to visit with you.
9 Comments on Growing Hearts Valentine Pocket with HeatnBond
1Pingbacks & Trackbacks on Growing Hearts Valentine Pocket with HeatnBond
-
[…] Get a head start on Valentine crafting with this heart pocket tutorial. […]
Ruth D
January 4, 2023 at 7:56 pm (1 year ago)Awesome design and stellar instructions. I think I can actually do this – thank you!!
Belinda Karls-Nace
January 5, 2023 at 11:27 am (1 year ago)Thank you so much Ruth – I hope you make one for yourself!
Catherine Laurent
January 5, 2023 at 7:15 am (1 year ago)Beautiful design easy instructions, I want to buy all the HeatNBond products to experiment with.
Thank-you
Catherine
Belinda Karls-Nace
January 5, 2023 at 11:35 am (1 year ago)Thanks Catherine! – HeatNBond products are the best – I will be doing more tutorials and sharing my tips and tricks for using them in the future.
Robin in Virginia
January 5, 2023 at 10:36 am (1 year ago)What a beautiful card pocket you have created! Awesome directions to go with the pictures. Thank you!
Belinda Karls-Nace
January 5, 2023 at 11:29 am (1 year ago)Thank you so much for the comment Robin – I am pleased you are happy with my directions and photos.
Nina G Mitchell
January 13, 2023 at 4:18 pm (1 year ago)Thank you for the pattern. Super cute
Belinda Karls-Nace
January 13, 2023 at 8:31 pm (1 year ago)Thank you Nina – I hope you will make the time to create one. Happy sewing!