


For the next few weeks, the Therm O Web Design Team will be sharing projects created with NEW Treasured Threadz™ Fabric Panels. Here’s some information about this fun new collection we know you’ll love . . .
Treasured Threadz Fabric Panels are designed especially for sewing, quilting and embellishing projects. Curated and designed by Amy Barickman using her collection of rare vintage art, textiles and quilts, Treasured Threadz Fabric Panels are a shortcut to creating your own unique style. Upcycle thrift-shop finds, refresh favorites from your closet or make entirely new clothing, accessories and home décor.
Panels are 100% cotton, measure 14”x44” and feature faux patchwork and original collaged art ideal for applique and small projects, plus embroidery, quilting, stitching and collage techniques. Every panel purchase includes exclusive QR Code Content: three original PDF patterns, video tutorials and a digital Look Book that features 25+ pages of project ideas and creative inspiration. Treasured Threadz Favorite Fusible Stabilizer, a low-loft fusible batting designed for hand quilting and embroidery projects, adds extra stability and dimension to projects; purchase includes PDF instructions and video tutorials for Amy’s signature applique techniques. Treasured Threadz products are distributed by Colonial Patterns.
To learn more about Amy and her story, check out her conversation with Brandy Maslowski of the Quilter on Fire Podcast, episode #155; search your favorite podcast app or listen here.
Now, on to today’s Treasured Threadz + Therm O Web Design Team Tour, featuring a beautiful Patchwork Pocket Organizer by Belinda Karls-Nace. Read all about the exciting giveaways happening this month and enter for a chance to win at the end of this post.
______________________________________
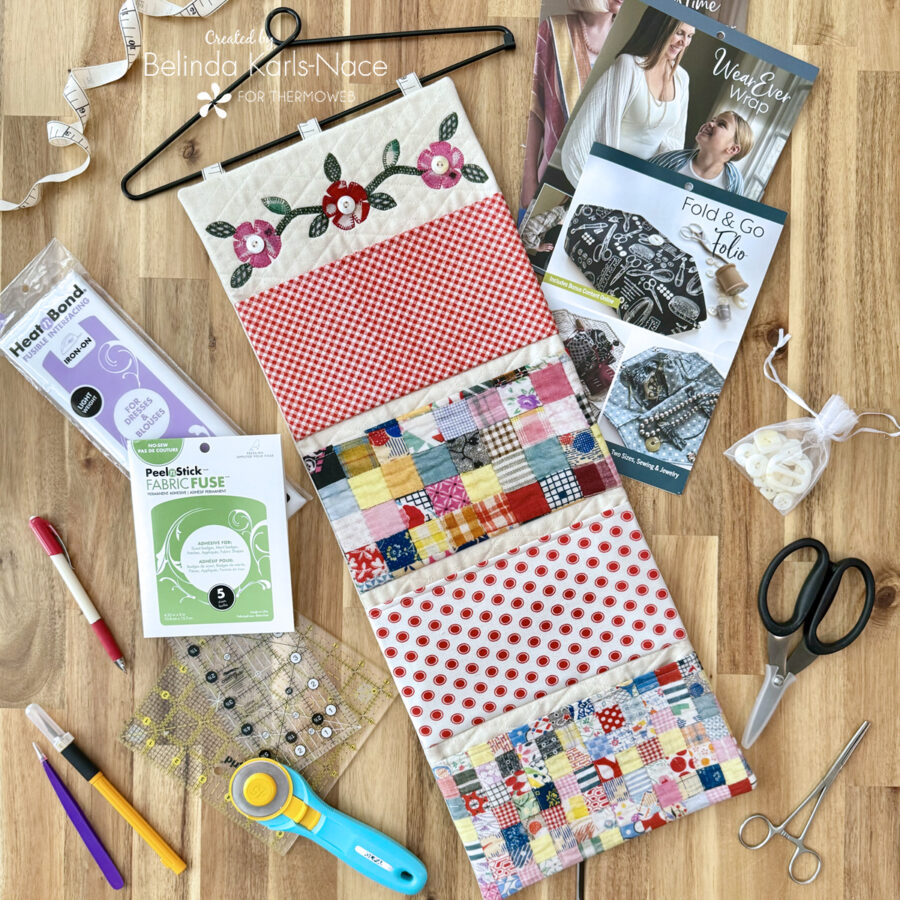
Patchwork Pocket Organizer with Treasured Threadz
Greetings friends! It’s Belinda Karls-Nace from Blue Ribbon Designs, sharing a brand new pattern tutorial. Today, I am excited to share my “Patchwork Pocket Organizer” with you. This pretty and practical organizer features HeatnBond and Treasured Threadz and is the perfect project for an afternoon of sewing.
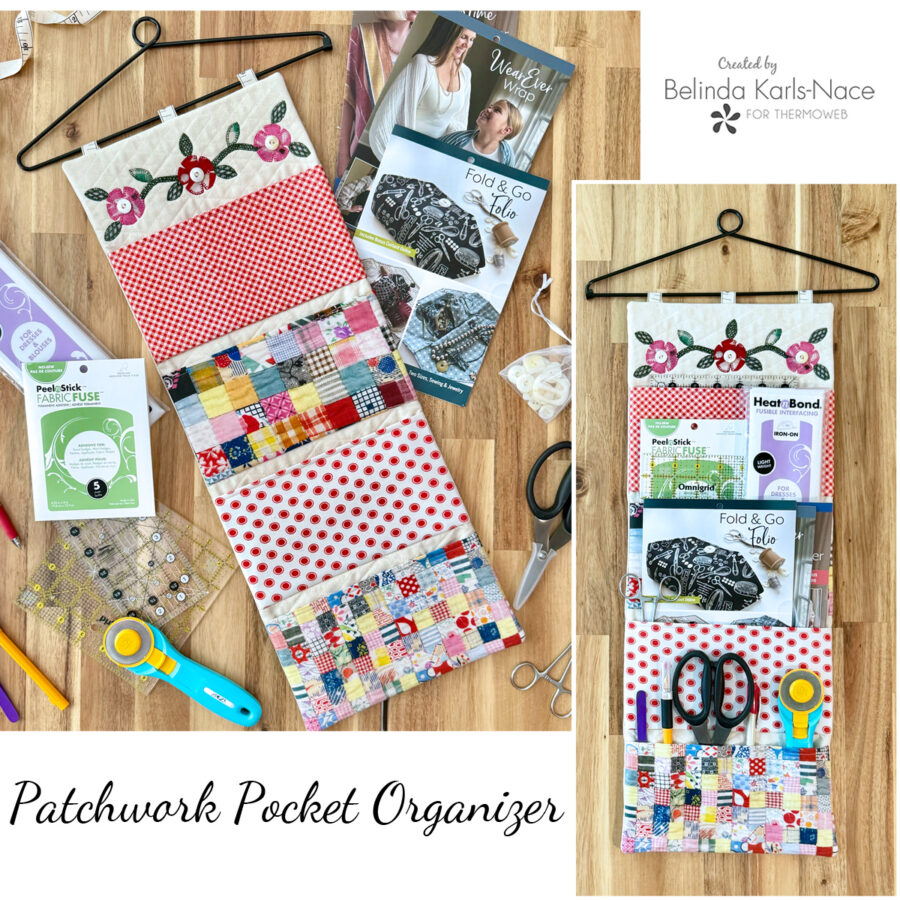
I always enjoy creating with new products and I couldn’t wait to play with a Quilt Block Fabric Panel from Treasured Threadz. I chose the Postage Stamp Retro Fabric Panel, which features digital reproductions of vintage fabrics and patchwork, including over 150 unique feed sack prints. This stunning panel is 100% cotton and has the highest quality feel. I just knew it would be perfect for a new home décor project with a touch of appliqué.
Let’s get creative! Simply gather the materials/supplies listed below, then download the pattern with the PDF templates.
*NOTE*: This tutorial requires basic sewing knowledge. If you need additional assistance, search the Internet, or look at a basic sewing book to learn the fundamentals.
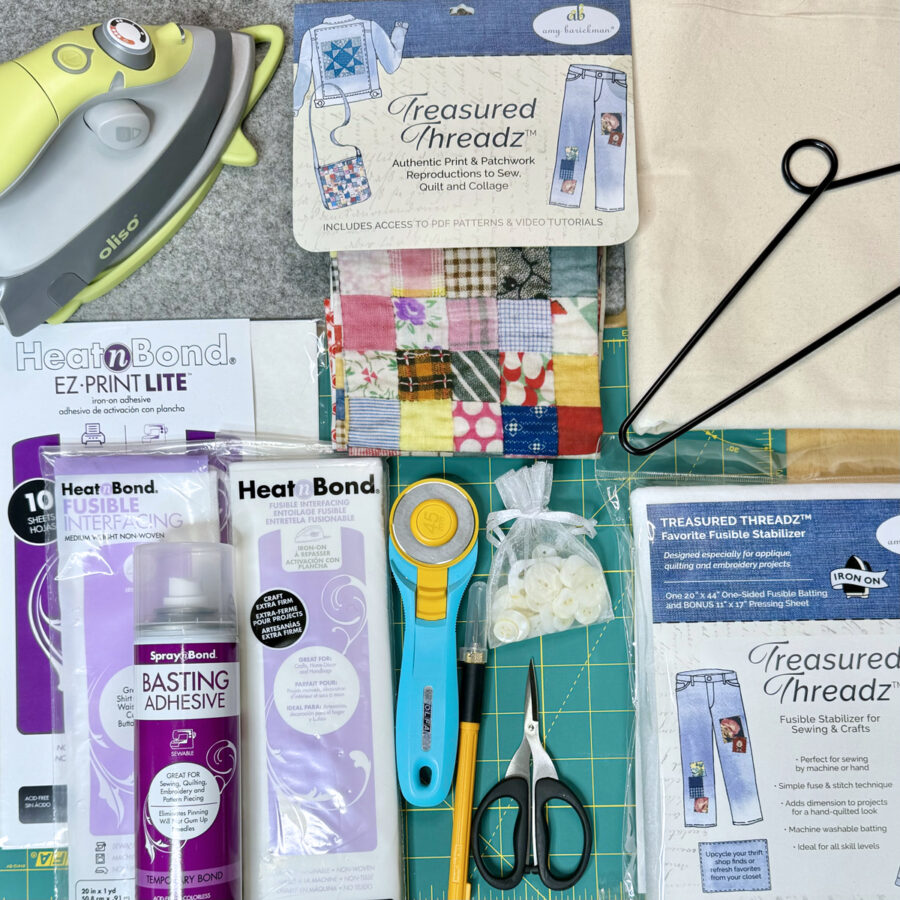
What you need:
- Treasured Threadz Fabric Panel
- 1 – Quilt Block Fabric Panel – Postage Stamp Retro (or your favorite Treasured Threadz fabric panel)
- Treasured Threadz Favorite Fusible Stabilizer
- 1 – 9 ½” x 24 ½”
- 4 – 10” x 5”
- HeatnBond Craft Extra Firm Non-Woven Fusible Interfacing
- 1 – 9 ½” x 24 ½”
- HeatnBond Medium Weight Non-Woven Fusible Interfacing
- 4 – 10” x 10”
- HeatnBond Lite EZ-Print Iron-On Adhesive Sheets
- 1 Sheet
- Optional: HeatnBond Hem Regular Weight Iron-On Adhesive Tape, 3/8 in
- Approximately 4”
- Coordinating Canvas Fabric
- 2 – 10” x 25”
- Three coordinating buttons (model used ½” round)
- ⅝” Twill Tape
- 3 – 2” pieces
- Small Quilt Hanger
- Hand sewing needle and thread
- Oliso Iron
- Olfa Cutting Tools (cutting mat, rotary cutter)
- Sewing Machine
- Basic Sewing Supplies/Tools (small sharp scissors, rulers, sewing thread, pencil, pins, etc.)
How to make a Patchwork Pocket Organizer
9 ½” W x 24 ½” H
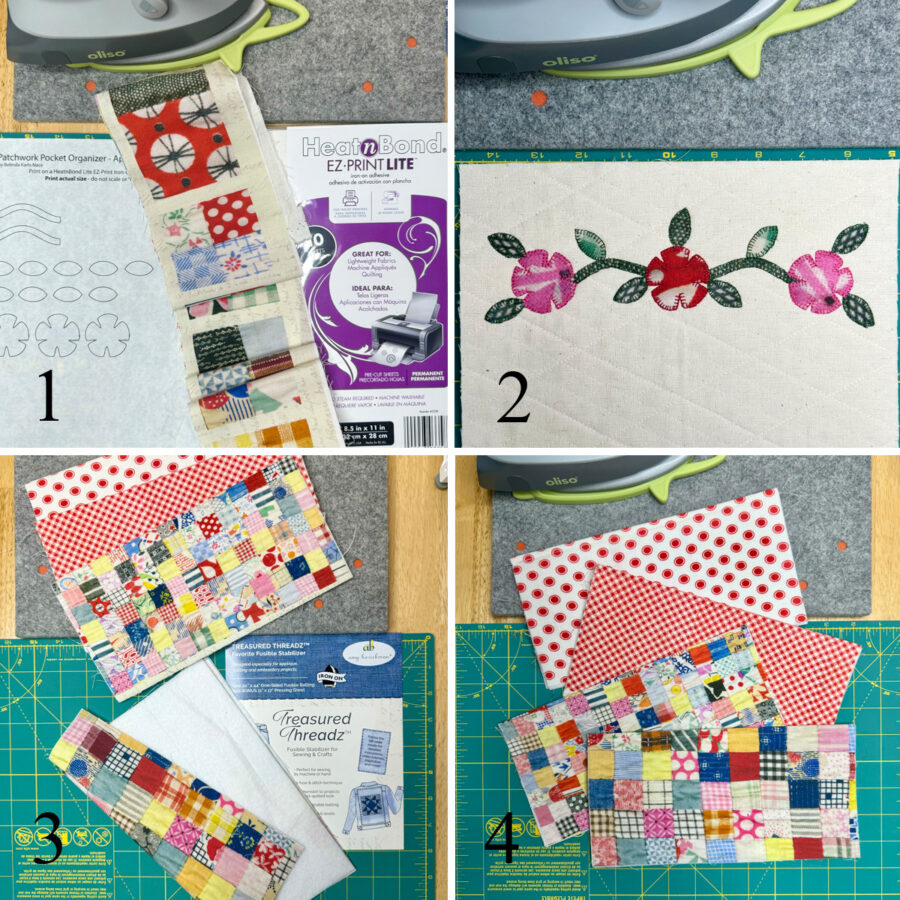
1. Download and print the Patchwork Pocket Organizer PDF.
Patchwork Pocket Organizer – A Project for the Therm O Web Blog
Print actual size – do NOT “fit to page” or “shrink to fit.”
Print page one on regular printer paper.
Print page two on one HeatnBond Lite EZ-Print Iron-On Adhesive Sheet.
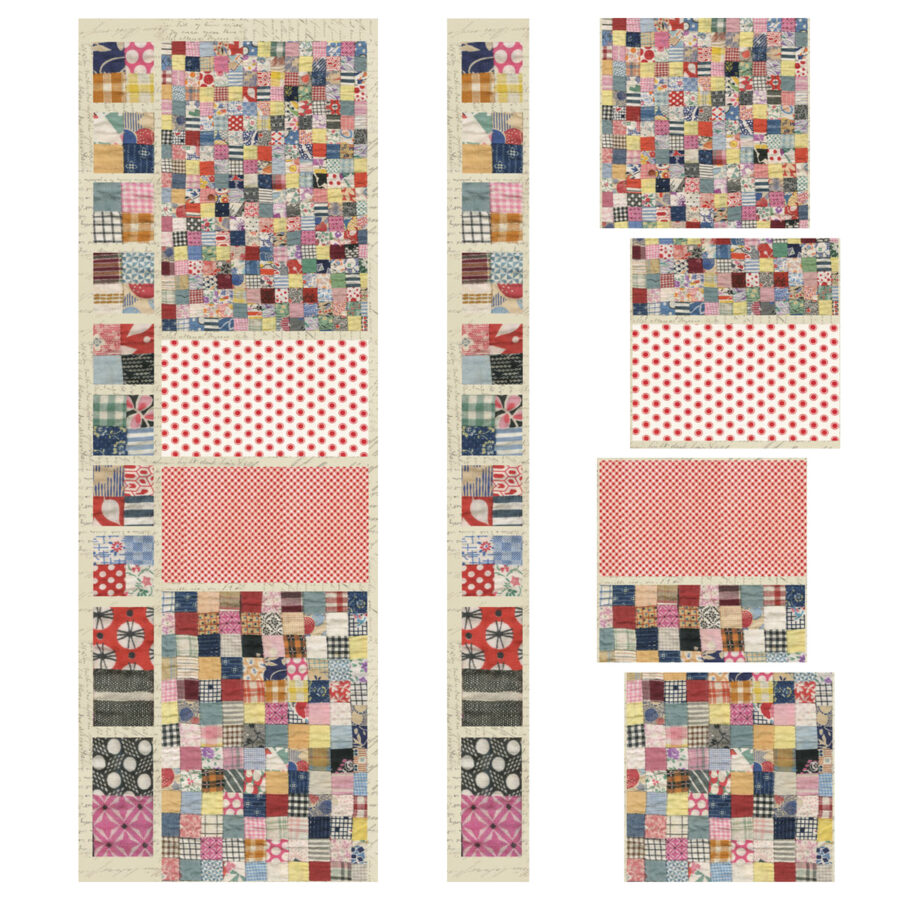
2. Cut Treasured Threadz Fabric Panel
- You will need to cut FOUR 10” x 10” squares for the pockets and all applique pieces from the Treasured Threadz Fabric Panel. See image below. I divided the right side into four 10” x 10” squares, so that when folded in half, each pocket would feature a different print. The appliqué pieces were cut from the left side. I chose prints that I thought would work well for the flower appliqué.
3. Prepare Organizer Base
- Center and fuse the 9 ½” x 24 ½” piece of Treasured Threadz Favorite Fusible Stabilizer to the wrong side of the 10” x 25” piece of canvas fabric that will be on the front of your organizer, following the package instructions.
- Pre-heat iron to high/cotton setting, no steam.
- Center the rough (fusible) side of the fusible stabilizer on the wrong side of the canvas.
- Cover with a non-stick pressing sheet (included in stabilizer package). Press and hold the iron with medium pressure for 10-15 seconds. Repeat by lifting the iron to a new area and pressing, overlapping slightly, until entire surface is bonded.
- Allow it to cool.2.
- Quilt if desired. I did crosshatch quilting.
- Center and fuse the 9 ½” x 24 ½” piece of HeatnBond Craft Extra Firm Non-Woven Fusible Interfacing to the wrong side of the 10” x 25” piece of canvas fabric that will be used for the back of the organizer, following the package instructions.
- Pre-heat iron to high heat (cotton setting), no steam.
- Place the rough side of the interfacing onto the back (wrong side) of the canvas.
- Cover with a light, dry pressing cloth. Press and hold the iron with medium pressure for 10-15 seconds. Repeat by lifting the iron to a new area and pressing, overlapping slightly, until entire surface is bonded.
- Allow it to cool.
4. Create Appliqué
- Loosely cut out the floral appliqué template(s) printed on HeatnBond Lite EZ-Print Iron-On Adhesive and apply to the back of selected panel areas, following the package instructions. (Step 1 in image below.)
- Loosely cut out all floral shapes, leaving the paper in place.
- Pre-heat iron to medium heat, no steam.
- Place loosely cut apart floral shapes on the wrong side of selected panel fabrics (printed paper, smooth side, should be face up).
- Place and hold the iron on the paper for 2-3 seconds. Repeat, overlapping slightly, until entire surface is bonded.
- Allow it to cool.
- Cut or trim the piece(s) on the solid lines printed on the paper to create the desired shape. Leave paper in place until ready to fuse in place.
- Center and fuse floral shapes into place on front 10” x 25” canvas piece (backed with Treasured Threadz Favorite Fusible Stabilizer), following the package instructions. I measured down 1 ¼” from the top of the canvas and ¾” from each side when laying out the shapes. See image on pattern for placement.
- Pre-heat iron to medium heat, no steam.
- Peel off paper.
- Center, adhesive side down on top of the 10” x 25” canvas front.
- Press and hold iron for 6 seconds on each section, overlapping slightly, until the pieces are bonded.
- Using your favorite appliqué stitch (machine or hand) and coordinating sewing thread, sew the pieces in place. I chose to use a machine blanket stitch. (Step 2 in image below.)
5. Create Pockets
- Center and fuse a 10” x 10” piece of HeatnBond Medium Weight Non-Woven Fusible Interfacing to the wrong side of each 10” x 10” fabric panel square, following the package instructions.
- Pre-heat iron to high heat (cotton setting), no steam.
- Place the rough side of the interfacing onto the back (wrong side) of the fabric square.
- Cover with a light, dry pressing cloth. Press and hold the iron with medium pressure for 10-15 seconds. Repeat by lifting the iron to a new area and pressing, overlapping slightly, until entire surface is bonded.
- Allow it to cool.
- Repeat this step for all four 10” x 10” squares.
- Fold each 10” x 10” fabric panel square in half, right sides out, and press.
- Place one 10” x 5” piece of Treasured Threadz Favorite Fusible Stabilizer inside the fold on each pocket. Fuse in place, following package instructions (and instructions listed in Step 3, #1). (Step 3 in image above.)
- Finish the pocket by top-stitching ¼” from the fold. Repeat for all four pockets. (Step 4 in image above.)
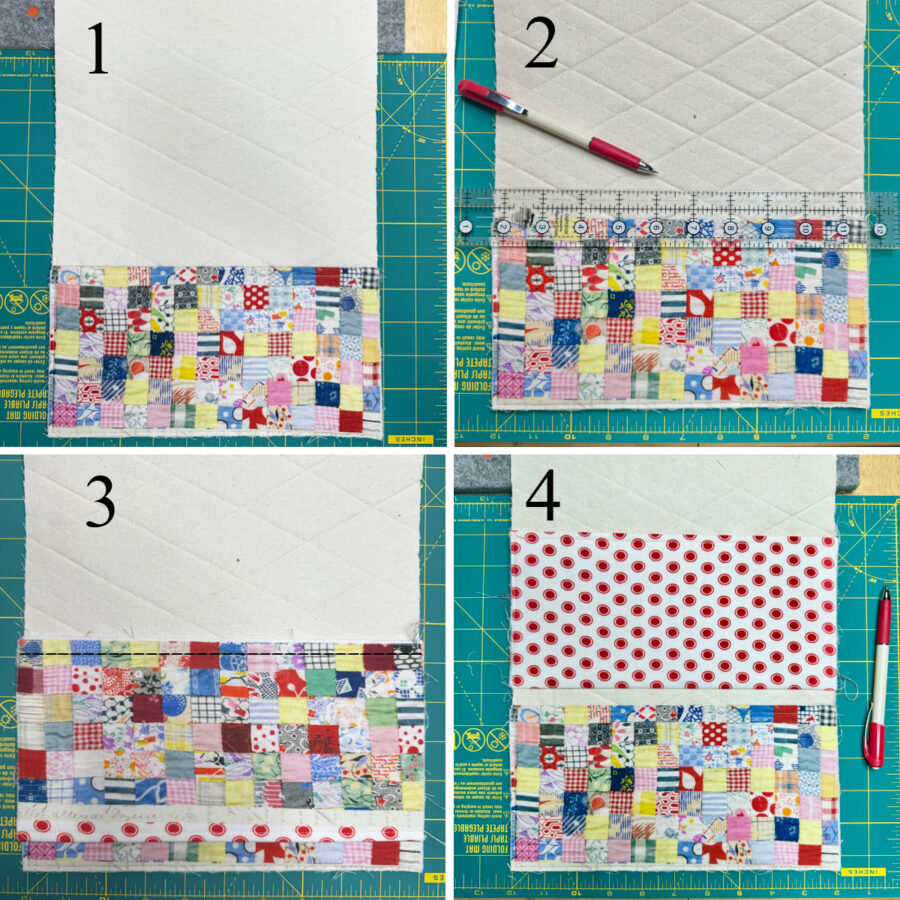
6. Attach Pockets
- Line up the bottom pocket on the bottom of the front canvas piece – raw edges to raw edges. Baste in place. (Step 1 in image above.)
- Measure ¾” above the top of the bottom pocket and draw a line. (Step 2 in image above.)
- Line up the bottom (raw edge) of the next pocket with the drawn line. Right sides together. Sew in place ¼” from the raw edge. (Step 3 in image above.)
- Fold pocket up. Baste sides in place. (Step 4 in image above.)
- Repeat steps 2 through 4 to attach the last two pockets, measuring up ¾” from the last added pocket and drawing a line.
- Divide pockets with straight sewing lines, if desired. I divided the bottom pocket to hold sewing tools.
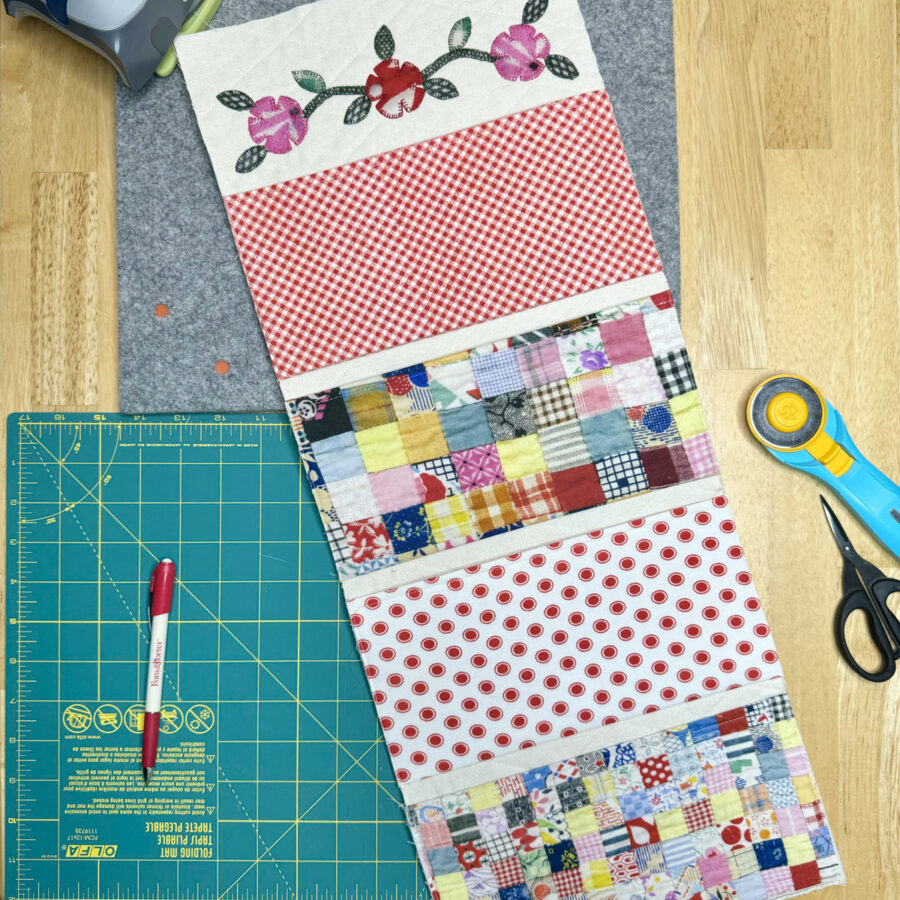
7. Finish the Organizer
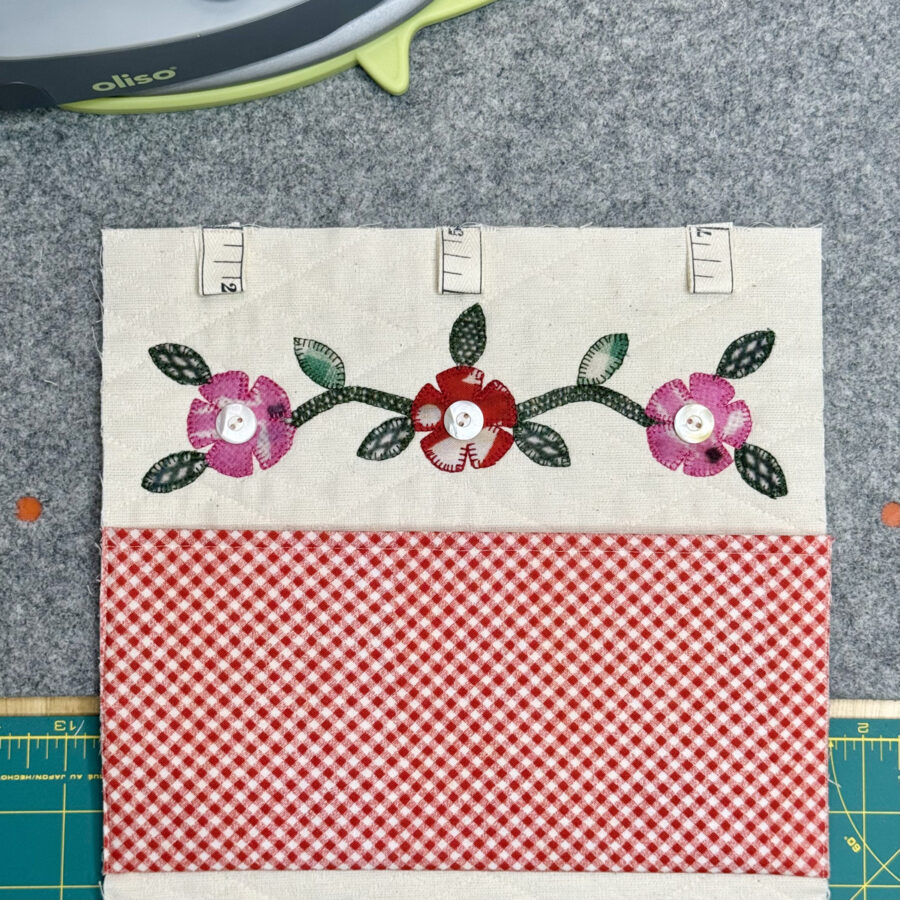
- Using sewing thread and a sharp hand sewing needle, attach the buttons to the center of the flowers.
- Fold each of the three 2” twill tape pieces in half, right sides out and press.
- Place the twill tape pieces, raw edges to raw edges at the top of the front canvas with pockets and baste in place. I placed one in the top center and one approximately 1½” in on each side.
- Place the front canvas with pockets/appliqué and the back canvas right sides together and sew around the entire perimeter with a ¼” seam allowance, leaving a 3” – 4” opening for turning.
- Clip corners and turn right side out through opening. Push out corners and press.
- Sew the opening closed by hand OR use HeatnBond Hem Regular Weight Iron-On Adhesive Tape, 3/8″ to fuse the opening closed.
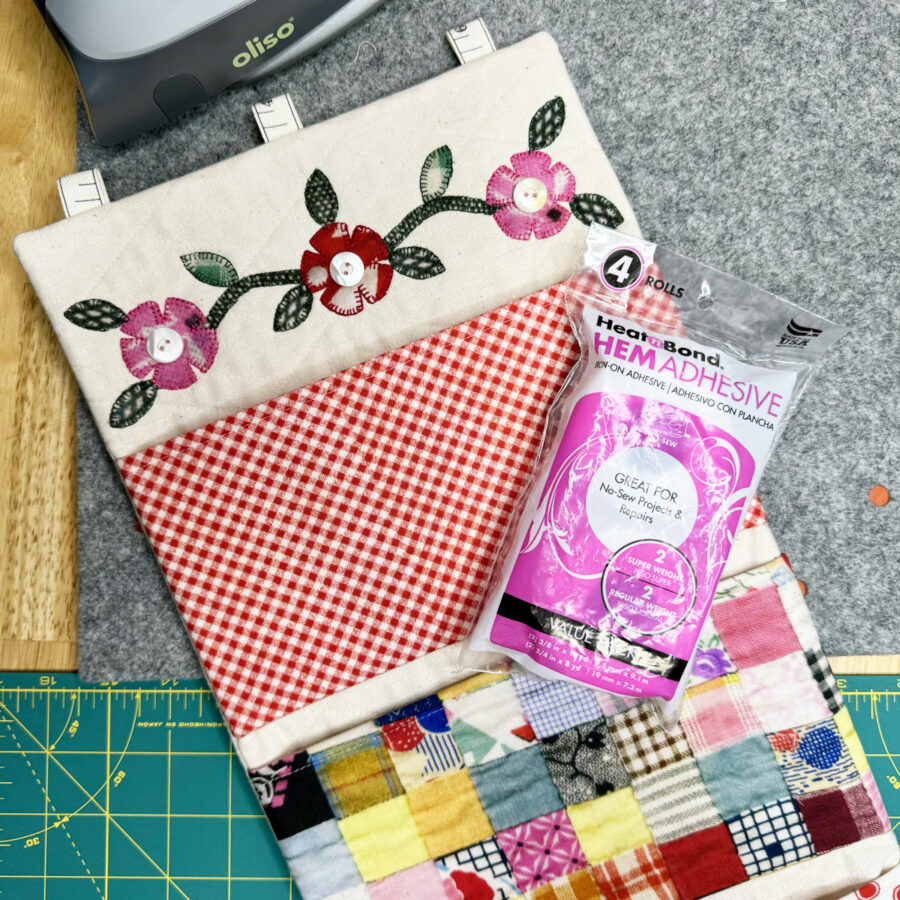
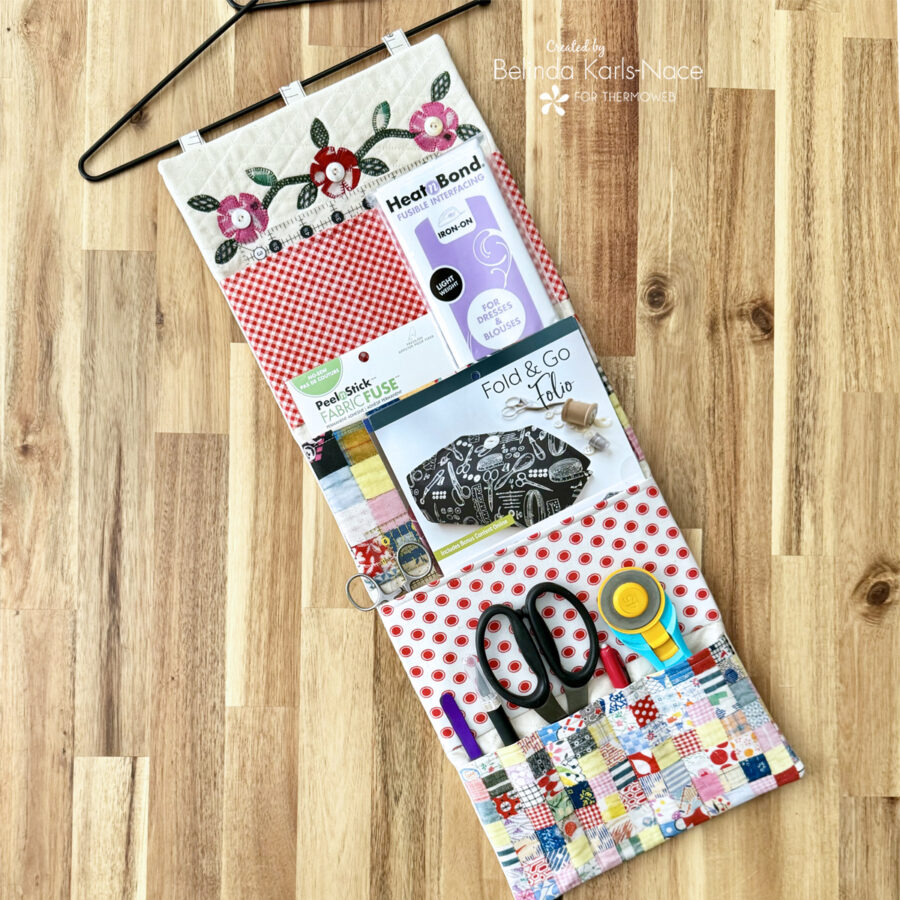
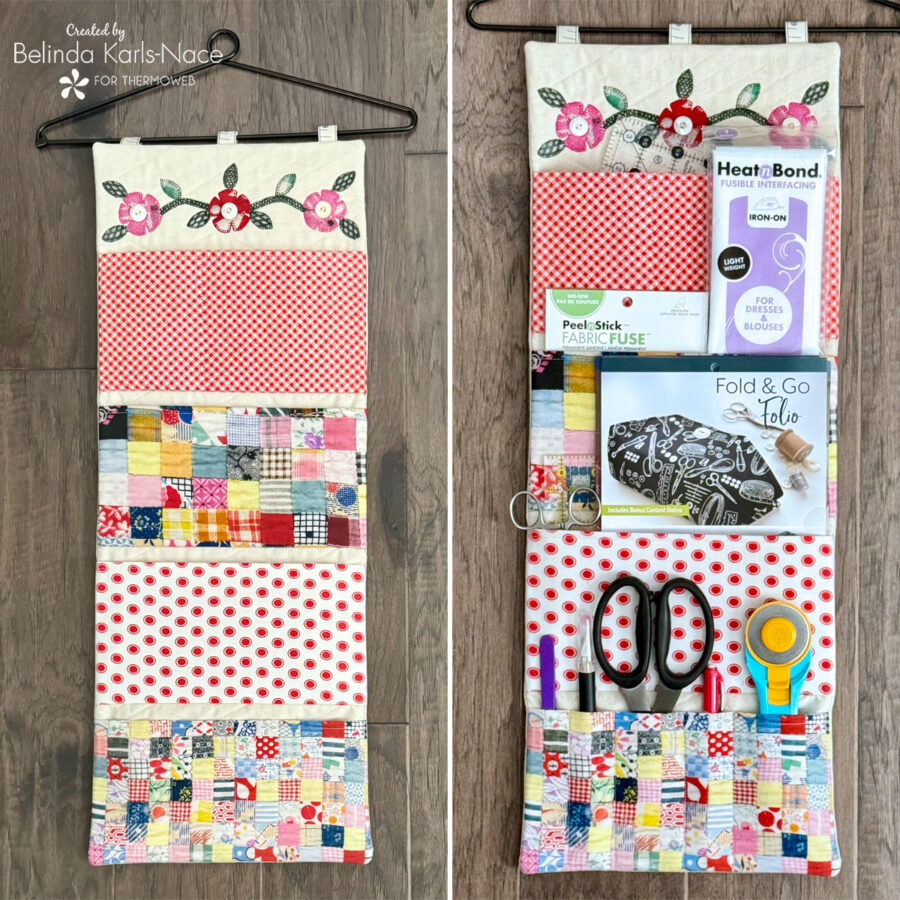
Your Patchwork Pocket Organizer is complete. The HeatnBond Craft Extra Firm Non-Woven Fusible Interfacing will give your organizer good structure without making it too stiff. Use a small quilt hanger to hang your organizer. Use it to organize items at your sewing station (as shown below) or items in your office (mail/stamps/envelopes/stationery).
Thank you for joining me today for my Therm O Web blog tutorial. I hope this post inspires you to create an organizer using a lovely Treasured Threadz Fabric Panel. To see more of my projects and patterns, stop by my blog, website, and/or Instagram – I would love to visit with you and see what you create!
ENTER OUR GIVEAWAY!
Would you like to win a $25 gift card to shop your favorite Therm O Web adhesives, interfacings and specialty sewing products in our online store PLUS a vintage-inspired sewing book written by Amy Barickman, the creator of this amazing Treasured Threadz™ product line? Click the link and enter your email address for a chance to win one of six $25 Therm O Web gift cards and one of six copies of Amy’s inspiration-packed sewing books, including Denim Redesign, Vintage Notions, Stitched Style and many more. Limited to one entry per email address; your name will be included in all available remaining prize drawings.
http://www.thermoweb.com/#TreasuredThreadzTOW (link is case sensitive)
We have our third giveaway winner! Congratulations, ascheno121! We will be sending you a $25 digital gift card to shop http://www.thermoweb.com as well as one of Amy Barickman’s wonderful, vintage-inspired sewing resources. Please watch your in-box for a confirmation email. Thanks for entering the Treasured Threadz + Therm O Web Design Team Tour Giveaway. Enjoy your new creative goodies!
Winners will be announced here on our blog every Monday, Wednesday and Friday from Friday, April 12th, through Wednesday April 24th, so be sure to visit the blog each day for a brand-new post and winner announcement. Our final winner will be announced here on the blog on Wednesday, April 24th, so enter now. Good Luck & Happy Creating!

Zsuzsanna
April 19, 2024 at 7:35 am (3 months ago)Excellent tutorial! Thanks
Belinda Karls-Nace
April 19, 2024 at 10:51 pm (3 months ago)I am so happy you found it helpful – I hope you make time to create a fabric organizer of your very own!