


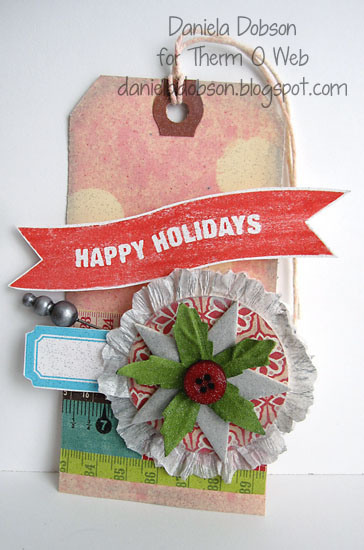
 Happy Holidays Tag by Daniela Dobson
Therm O Web Supplies:
Therm O Web Zots Small
Therm O Web Zots Medium
Therm O Web Sticky Strip Runner
Therm O Web 3D White Foam Sticky Strips 1/2 in
Therm O Web Glitter Dust Silver
Other Supplies:
Avery Tag Echo Park
Patterned Paper
Technique Tuesday stamps (Tis The Season Banners by Ali Edwards)
and chipboard star Making Memories flower and button Martha Steward tag
Maya Road pin Crepe paper streamer
Decorative edge scissors 1″ circle punch
Faber-Castell Design Memory Craft Gelatos,
PITT Big Brush Pen
Directions:
1. Punch (5) 1″ circles and arrange them randomly on the tag. Spray the tag with a spray created with water and Silver Metalic Gelatos and Rose Metal Gelatos. Let dry.
2. Create a flower with crepe paper streamer and a 2″ die cut circle using Therm O Web Sticky Strip Runner. Mix Metallic Silver Gelatos with water and paint the white edges. 
3. Cover a chipboard star with metallic Silver Gelatos. Adhere a strip of patterned paper to the bottom part of the tag using Therm O Web Sticky Strip Runner. Adhere chipboard star to the crepe paper flower with Therm O Web Zots Medium. Adhere a green flower with a button using Therm O Web Zots Small . Tuck a blue tag and a pin on the left side. Note: to adhere the pin wrap it into a Therm O Web Zots Medium.

4. Stamp Happy Holidays banner on white cardstock and cut out. Adhere to the tag using Therm O Web 3D White Foam Sticky Strips 1/2 in.

5. Spray everything with Therm O Web Glitter Dust Silver.

 We’re back with another one of our favorite recipes for the holidays!

Cookie Cutter Peppermint Bark
*Recipe note: I halved this recipe to make 6 small snowflakes. Following the full recipe for 1 full sheet of bark or 12 regular sized shapes.
Recipe adapted from: allrecipes
Ingredients:
8oz brown chocolate (your favorite)
8oz white chocolate
2 tsp vegetable oil, divided
1/2 tsp peppermint extract, divided
candy canes or peppermint candies, crushed

If making one sheet of bark, line a rimmed baking sheet with parchment paper. Smooth out any wrinkles. Prepare candy canes by unwrapping and tossing in a plastic bag. Smash with a meat tenderizer, rolling pin or other heavy object. Don’t pulverize the candies but do make sure any huge chunks are broken down. Over a bowl, transfer contents of plastic bag to a mesh strainer. Gently tape and shake the strainer. The purpose of this is to remove any candy cane dust, only leaving the chunks to be used for the bark.

In a heat safe bowl, add brown chocolate and half of the vegetable oil. I used candy melts because it’s what I had on hand. Melt chocolate at 50% power in 30 second intervals. Stir well after each heating. When fully melted, stir in half of the peppermint extract. Pour milk chocolate (or whichever variety you’ve chosen) onto prepared pan and spread out evenly. Alternately, divide equally among molds or cookie cutters. I used a small cookie scoop to divide among my snowflake cavities. Sprinkle with a small amount of candy cane pieces, preferably some of the smaller pieces. Transfer to the fridge for 30-60 minutes or until fully set and hardened.

Repeat melting process with white chocolate: white chocolate plus 1 tsp vegetable oil in a heat safe bowl. Heat at 50% power in 30 second intervals, stiring well each time. Add the remaining 1/4 tsp peppermint extract, stir well. Pour over brown chocolate, or divide equally among molds or shapes. Tap tray or mold to spread chocolate out. Sprinkle with remaining candy cane pieces. Transfer to the fridge for an additional 30-60 minutes or until fully hardened.

Break sheet bark with a heavy object or carefully remove chocolate from molds. If using silicone molds, they should easily pop out or peel away. Store in the fridge in an airtight container.
These are perfect for packaging up and gifting during the holidays. ENJOY!
Happy 12/12/12!

Flo
December 12, 2012 at 3:09 pm (11 years ago)Those snowflake chocolates are really cute. Great ideas for gift giving.