


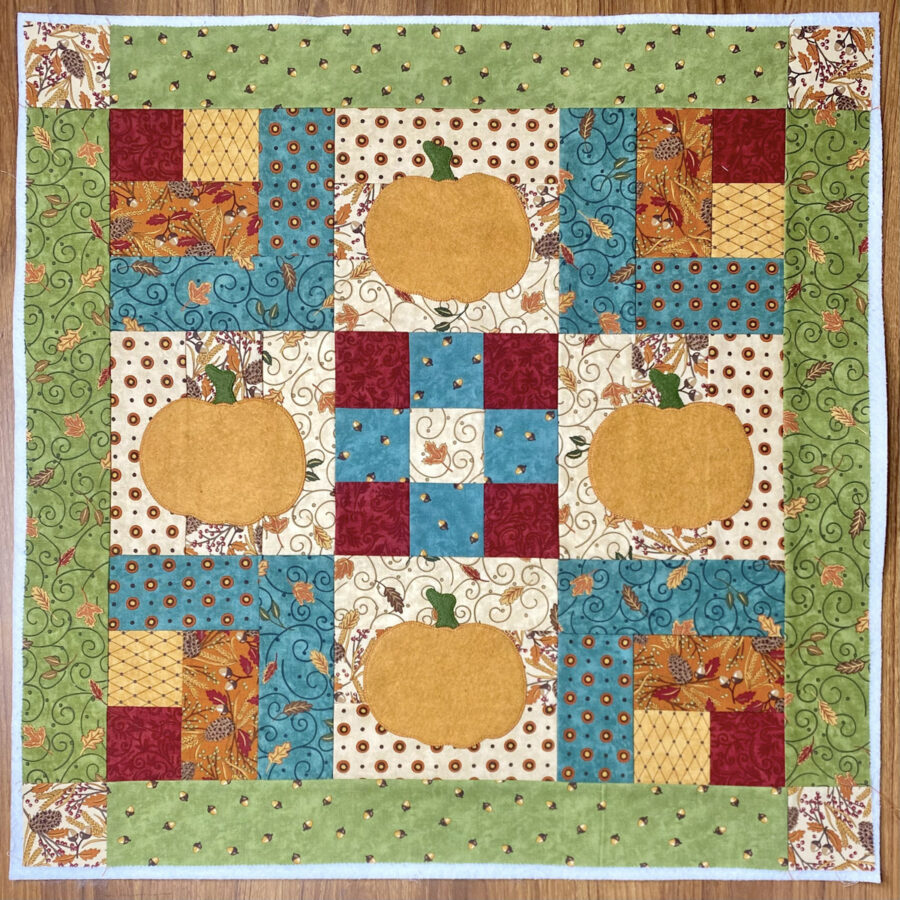
2-in-1 Pumpkin Patch Wall Hanging featuring StitchnSew
Greetings! It’s Belinda Karls-Nace from Blue Ribbon Designs, here today with a brand new project tutorial featuring an assortment of my favorite Therm O Web products. Today, I am excited to share my “2-in-1 Pumpkin Patch Wall Hanging” with you.
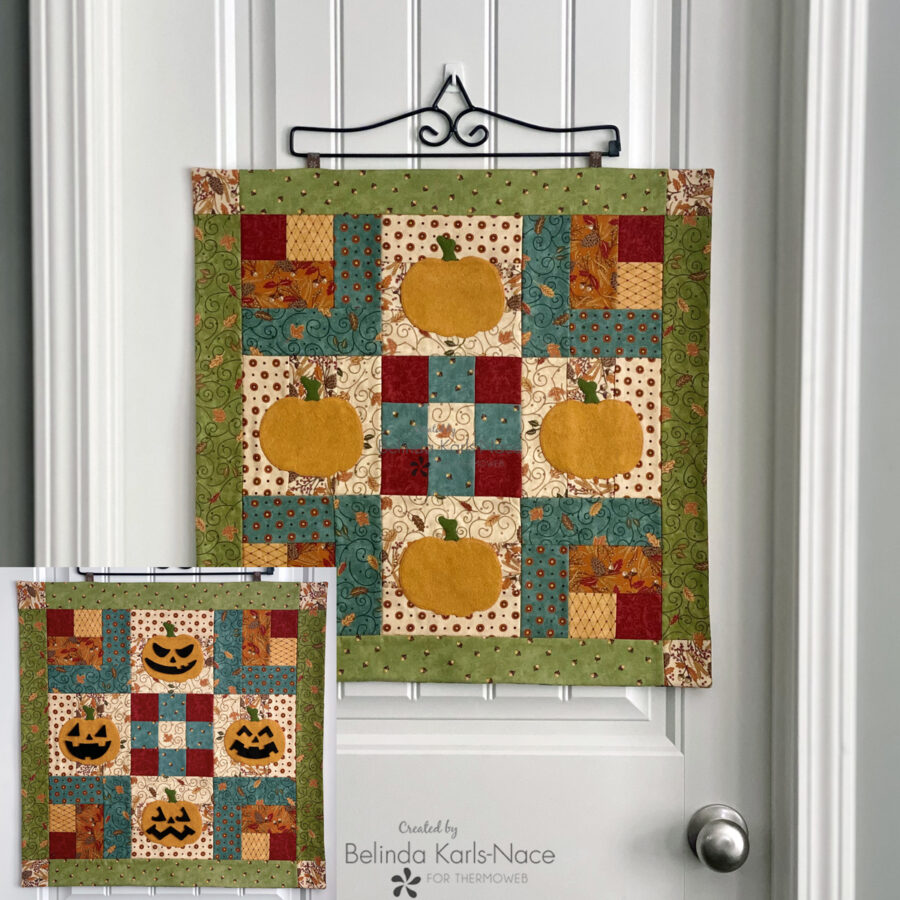
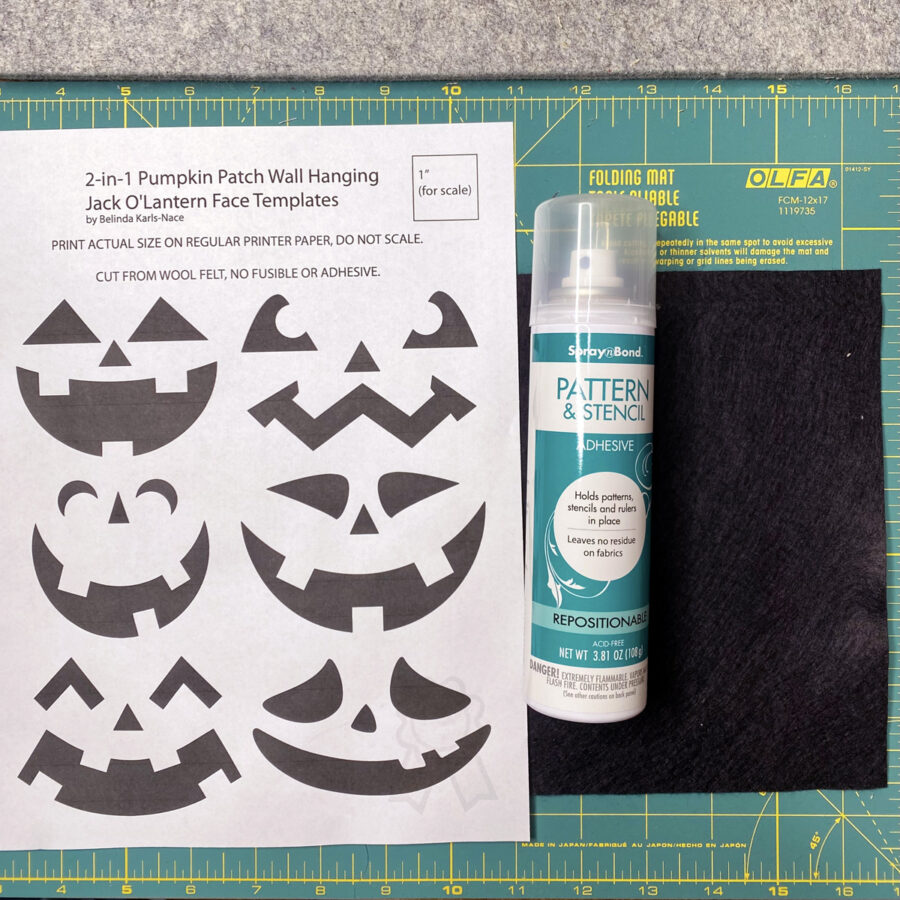
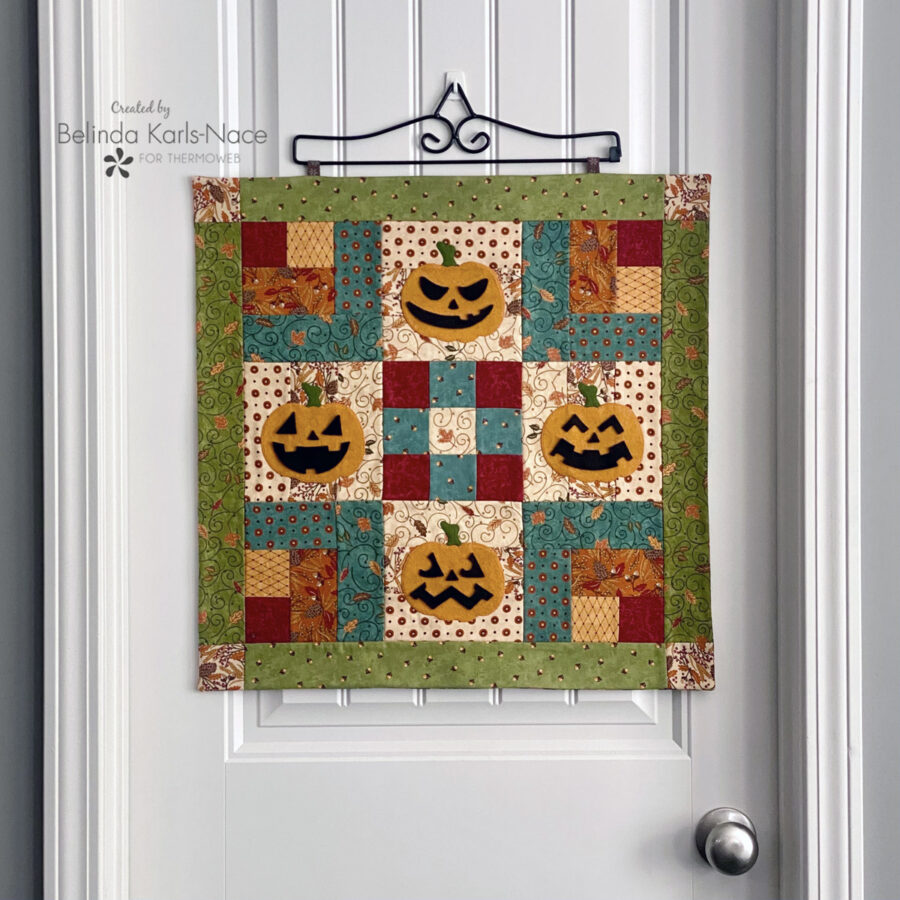
This month is a fun project, featuring a bit of magic…allowing it to be used for fall AND Halloween decorating. Yes, you can easily transform this project from Halloween to fall in just a few seconds. The applique pumpkins are wool felt…and (in case you didn’t know) wool felt easily adheres to itself. The jack-o-lantern faces are cut from wool felt and can be placed on the pumpkins for Halloween decorating, then simply removed for autumn décor. This is a great project for children, as they can play with the different face pieces, sticking them on each pumpkin. I have included pieces in the pattern to cut six different faces and each facial feature is interchangeable.
Let’s get creative! Simply gather the materials/supplies listed below, then download the PDF templates and layout diagrams.
*NOTE*: This tutorial requires basic quilting knowledge and basic foundation piecing knowledge. If you need additional assistance to piece your quilt, search/visit the Internet, or look at a basic quilting book to learn the fundamentals of quilting and foundation piecing.
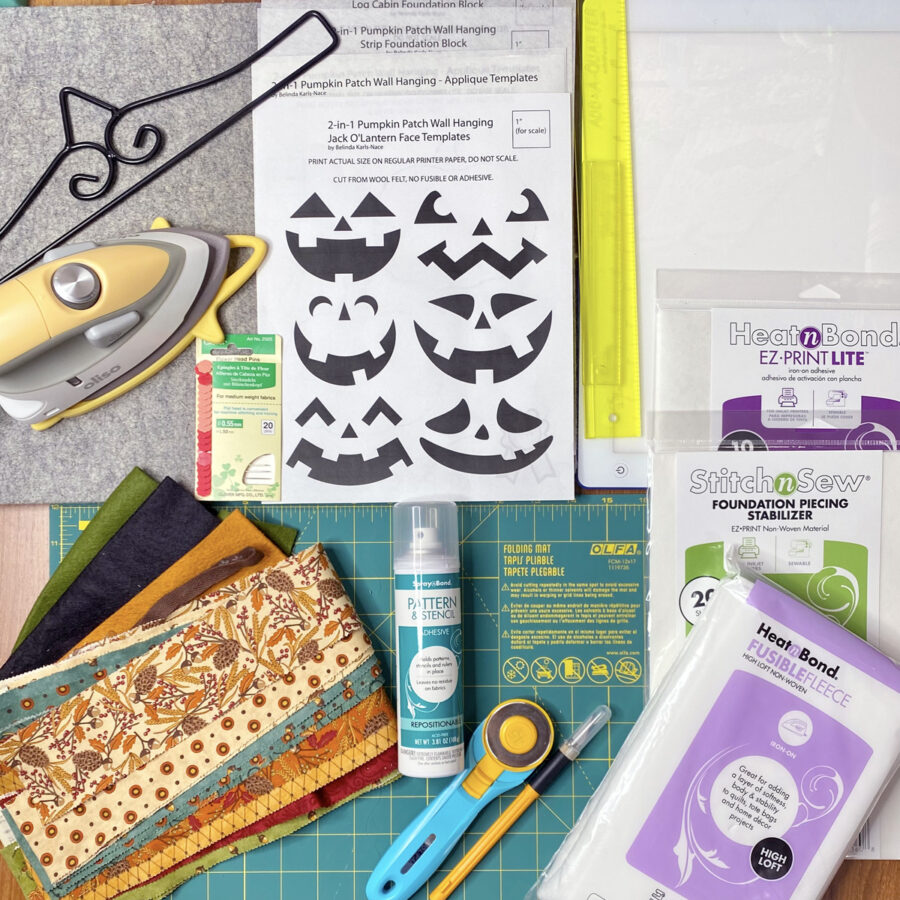
What you need:
- HeatnBond Lite EZ-Print Iron-On Adhesive Sheet, 8.5 in x 11 in
- 1 sheet
- HeatnBond Fusible Fleece
- 1 – 23” x 23”
- StitchnSew EZ Print Quilt Block Sheets, Transparent
- 8 sheets
- SpraynBond Pattern & Stencil Spray
- Pressing Paper Fabric and Craft Sheets (optional)
- 1 Sheet
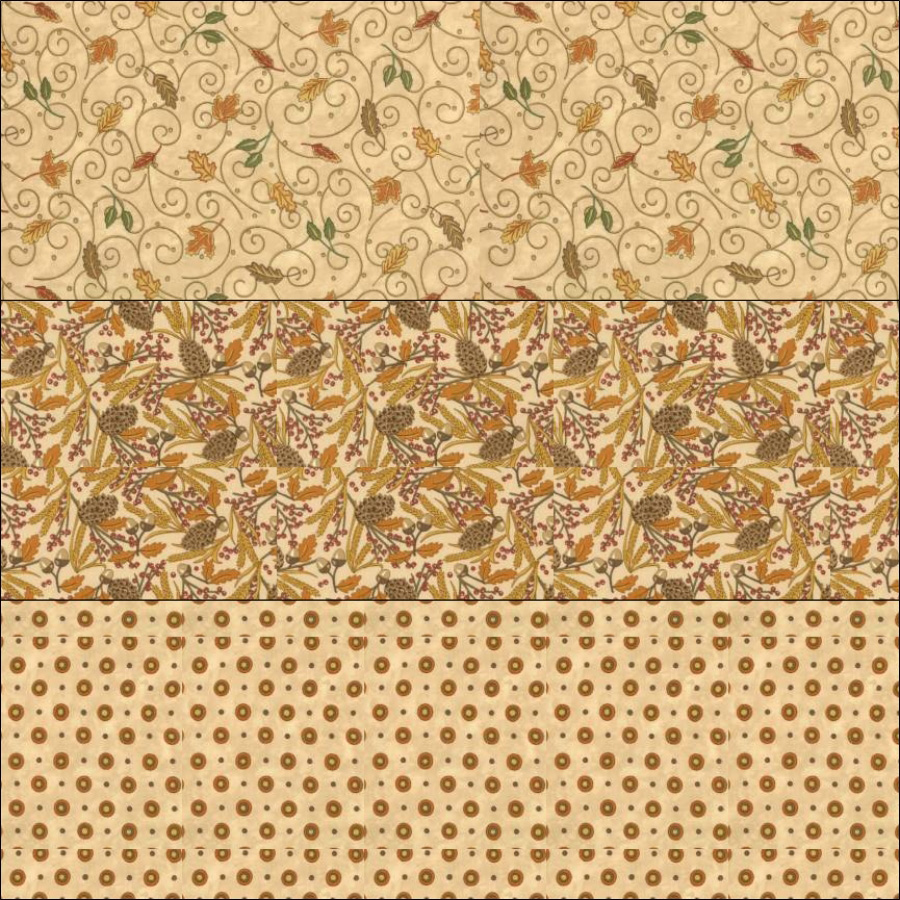
- Cotton Fabrics: model uses Fabulous Fall by Deb Strain for Moda (note, this is an older collection, but this project is perfect for scraps and small pieces of fall colored fabrics you have on hand) – I encourage you to use your favorite fabrics!
*PRO TIP – A partial jelly roll will work well. I used eleven jelly roll strips to cut all block pieces.- Dark Red
- 4 – 2½” squares (nine patch center block)
- 4 pieces/scraps AT LEAST 2½” x 2½” (log cabin foundation blocks)
- Gold Lattice
- 4 pieces/scraps AT LEAST 2½” x 2½” (log cabin foundation blocks)
- Orange Fall
- 4 pieces/scraps AT LEAST 2½” x 4½” (log cabin foundation blocks)
- Teal Dot
- 4 pieces/scraps AT LEAST 2½” x 4½” (log cabin foundation blocks)
- Teal Leaf
- 4 pieces/scraps AT LEAST 2½” x 6½” (log cabin foundation blocks)
- Teal Acorn
- 4 – 2½” squares (nine patch center block)
- Beige Leaf
- 1 – 2½” squares (nine patch center block)
- 4 pieces/scraps AT LEAST 2½” x 6½” (strip foundation blocks)
- Beige Dot
- 4 pieces/scraps AT LEAST 2½” x 6½” (strip foundation blocks)
- Beige Fall
- 4 pieces/scraps AT LEAST 2½” x 6½” (strip foundation blocks)
- 4 – 2½” squares (cornerstones)
- Green Acorn
- 2 – 2½” x 18½” strips (top and bottom border)
- Green Leaf
- 2 – 2½” x 18½” strips (left and right border)
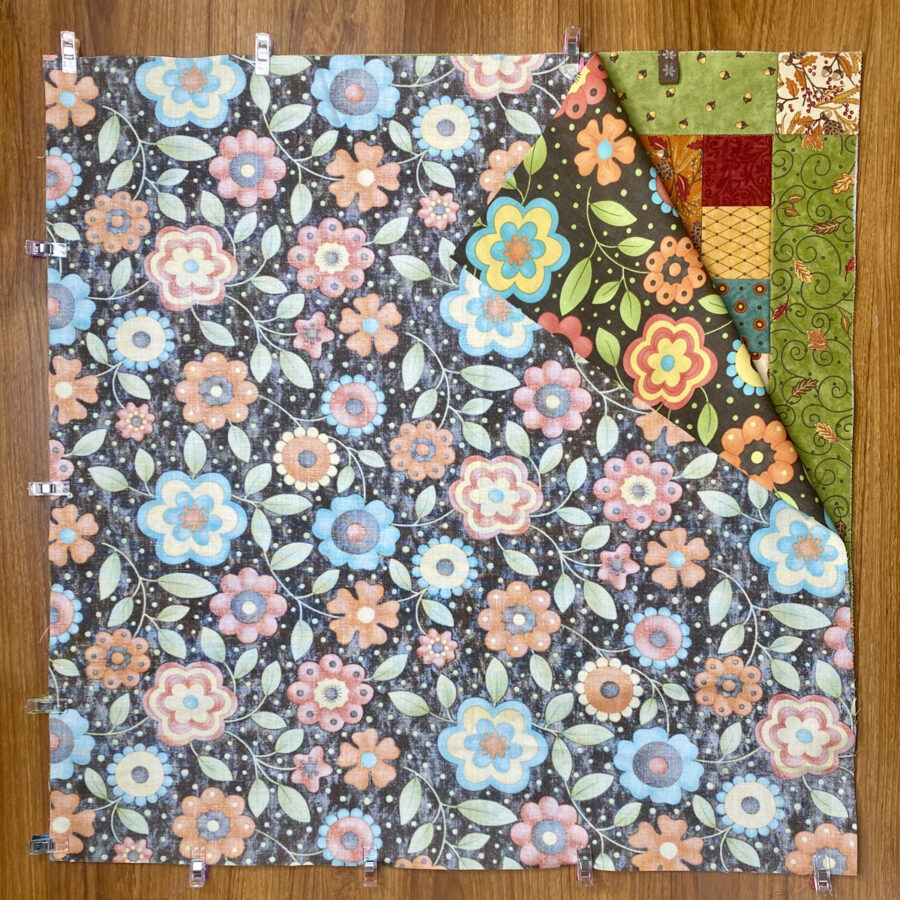
- Backing fabric – 22½” x 22½”
- Dark Red
- Wool Blend Felt from Benzie Design
- Twill Tape or Ribbon
- 2 – 2” pieces (hanging tabs)
- Quilt Hanger (model used a wrought iron flag hanger)
- Add-A-Quarter Ruler (optional, but extremely helpful)
- Flathead Pins
- Fabric Glue Stick/Pen
- Postcard or Piece of Cardstock
- Oliso Iron
- Olfa Cutting Tools (cutting mat, rotary cutter)
- Sewing Machine
- Basic Sewing Supplies/Tools (small sharp scissors, rulers, sewing thread, wonder clips, pencil, light pad, etc.)
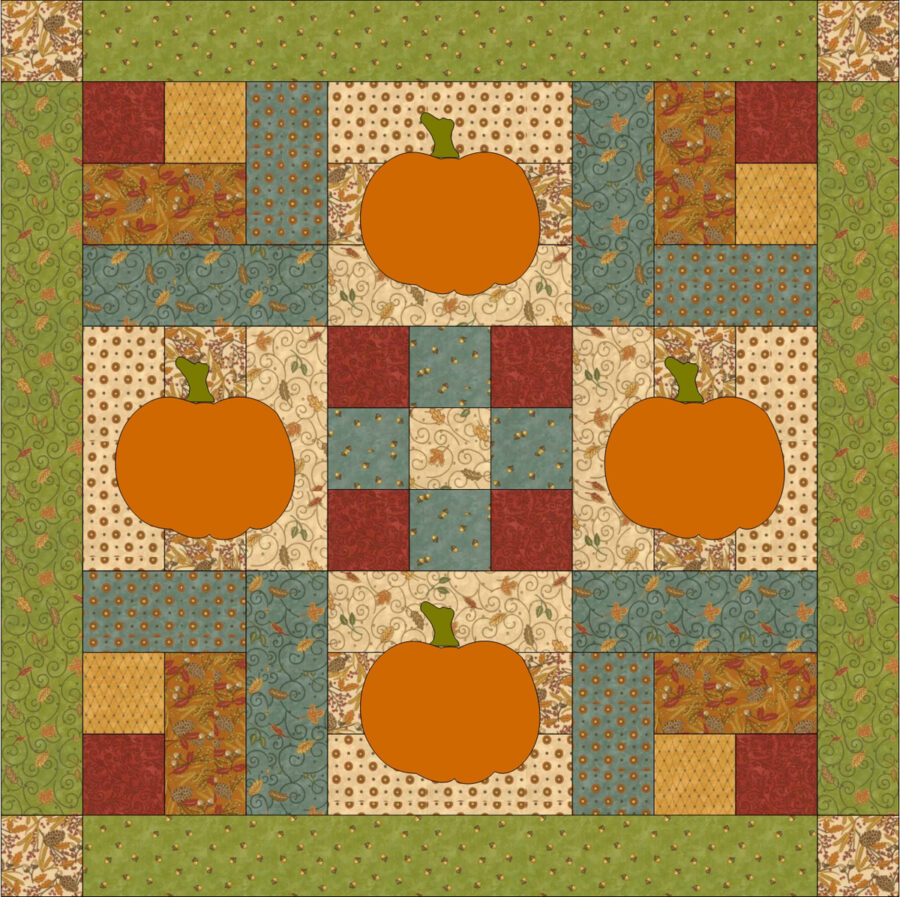
How to Make a 2-in-1 Pumpkin Patch Wall Hanging
(22” W x 22” H)
- Download and Print the 2-in-1 Pumpkin Patch Wall Hanging PDF.
2-in-1 Pumpkin Patch Wall Hanging – A Project for the Therm O Web Blog
Print actual size – do NOT “fit to page” or “shrink to fit.”
- Print page 1 (cover/quilt layout) on regular printer paper.
- Print page 2 (jack-o-lantern faces) on regular printer paper.
- Print pages 3 – 4 (applique templates on HeatnBond Lite EZ-Print Iron-On Adhesive (Inkjet printer friendly – no tracing required).
- Print page 5 (block layout) on regular printer paper.
- Print pages 6 – 9 (strip block foundations) on StitchnSew EZ Print Quilt Block Sheets.
- Print page 10 (block layout) on regular printer paper.
- Print pages 11 – 14 (log cabin block foundations) on StitchnSew EZ Print Quilt Block Sheets.
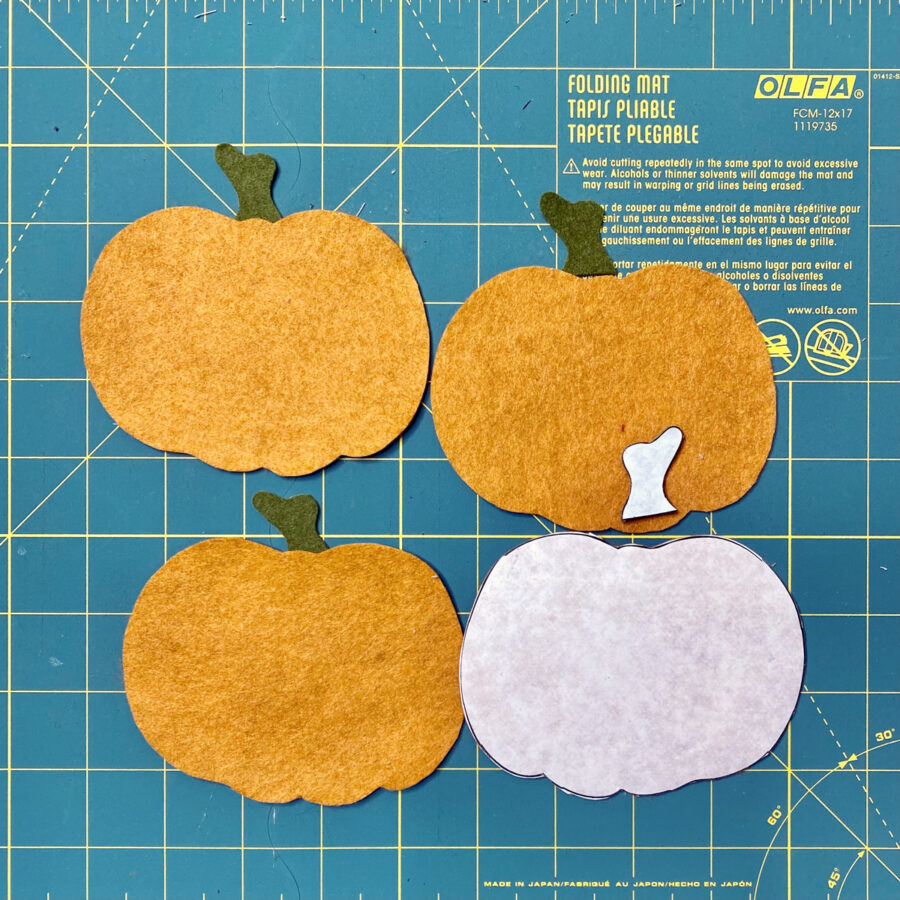
2. Prepare the applique pieces.
- Loosely cut apart the applique templates printed on HeatnBond Lite EZ-Print Iron-On Adhesive and apply to the back of selected orange and green wool felt following the package instructions.
-
- Loosely cut out all shapes, leaving the paper in place.
- Pre-heat iron to medium heat, no steam.
- Place loosely cut apart template(s) on the wrong side of selected cotton fabric (printed paper, smooth side, should be face up).
- Place and hold the iron on the paper for 2 seconds. Repeat, overlapping slightly, until entire surface is bonded.
- Allow it to cool.
- Cut or trim on the solid lines printed on the paper to the desired shape. Leave paper in place until ready to fuse in place.
- Set aside.
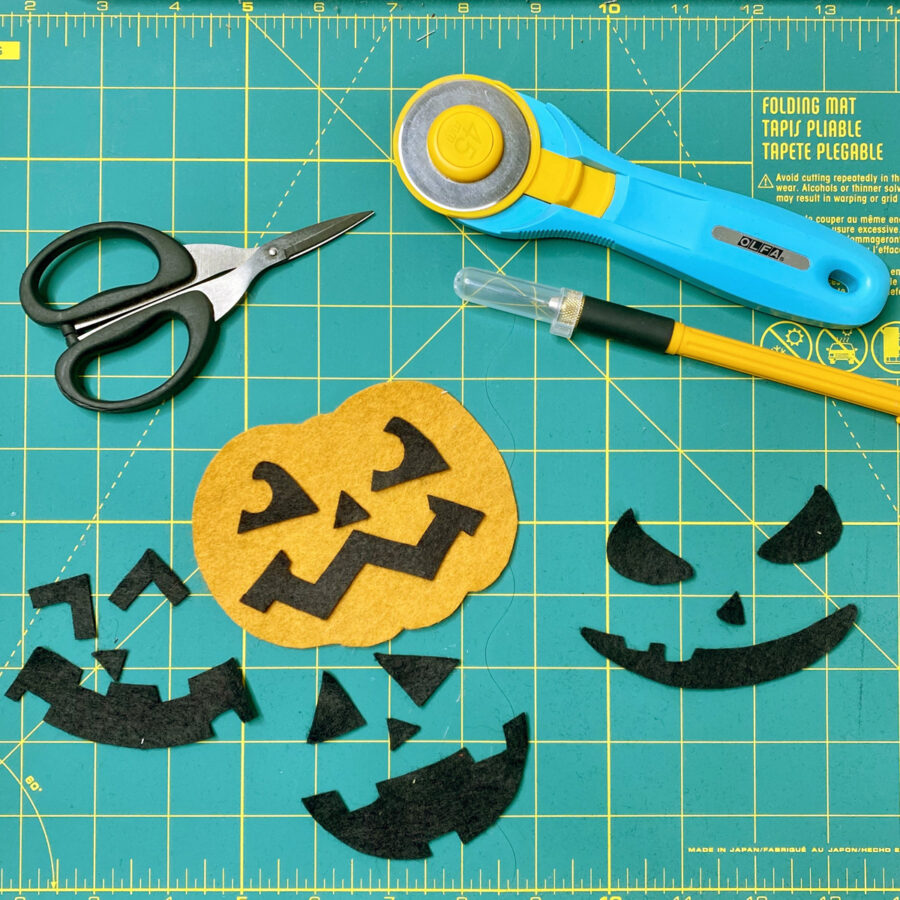
3. Prepare the jack-o-lantern faces.
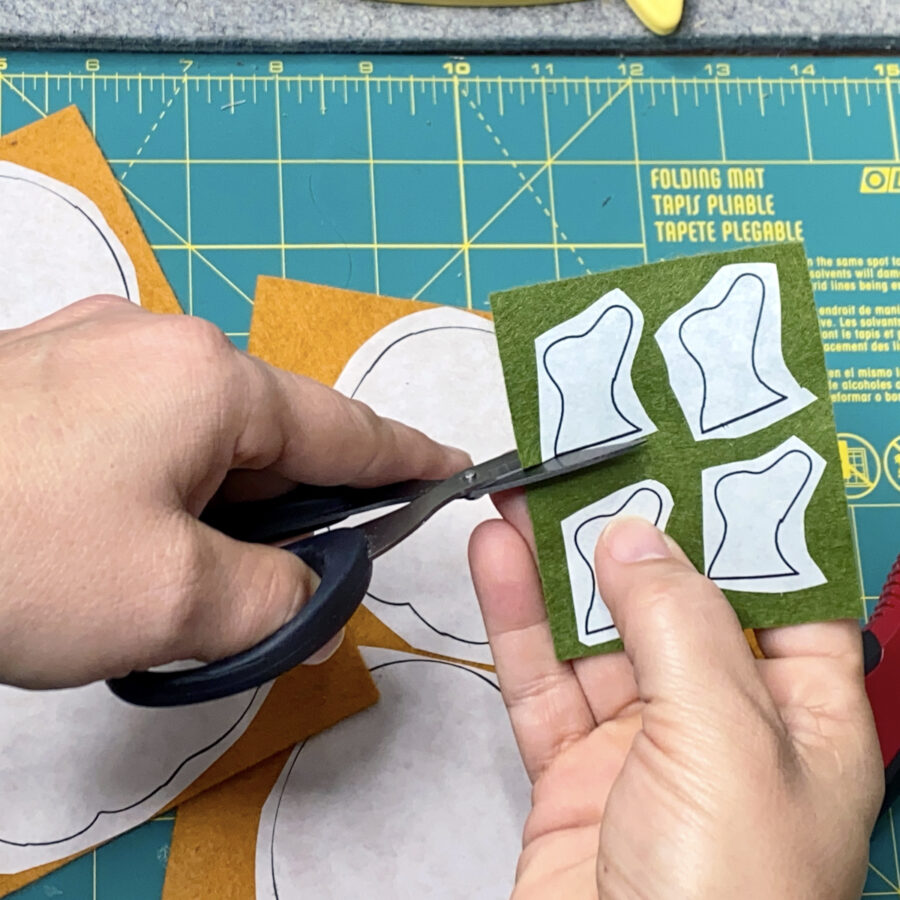
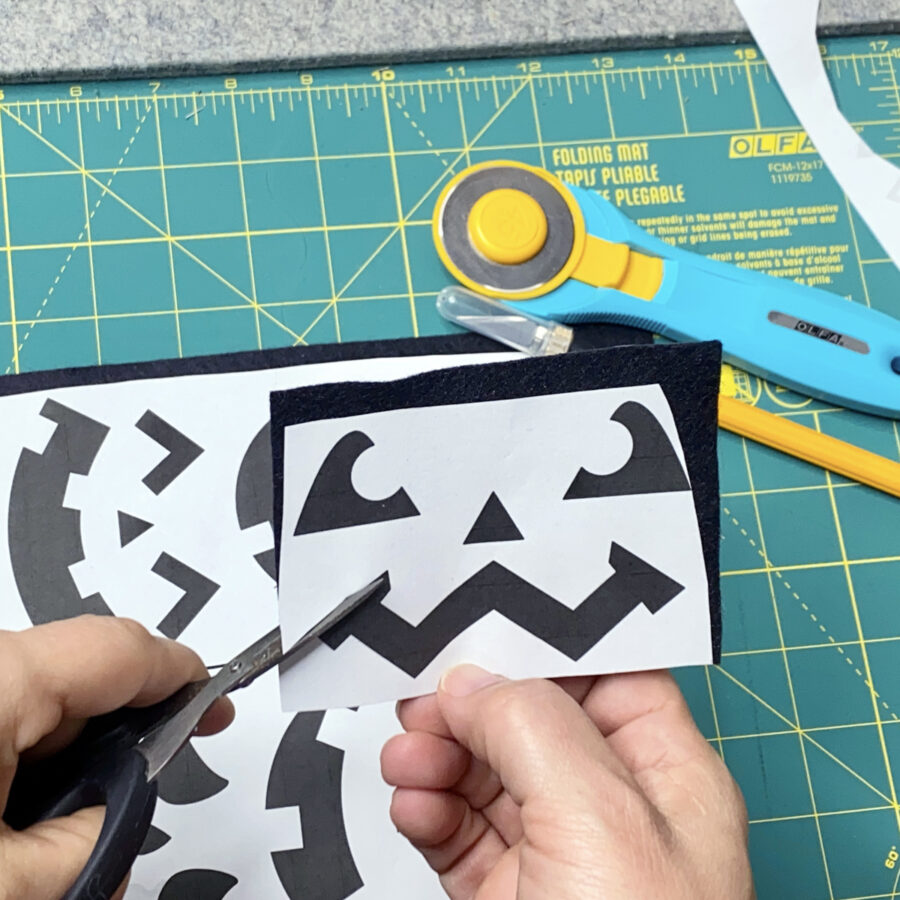
- Loosely cut apart the face templates printed on regular printer paper. Apply to black wool felt using SpraynBond Pattern & Stencil Spray.
- Shake can well. Hold can upright, 12” from paper template(s). Press nozzle and apply adhesive using a sweeping motion to lightly cover paper template(s).
*PRO TIP: Place a Pressing Paper Fabric and Craft Sheet under pattern pieces to protect your work surface from the adhesive spray. - Let dry for 1 minute then press paper template to wool felt.
- Shake can well. Hold can upright, 12” from paper template(s). Press nozzle and apply adhesive using a sweeping motion to lightly cover paper template(s).
- Cut out face templates.
- Remove template papers and set aside.
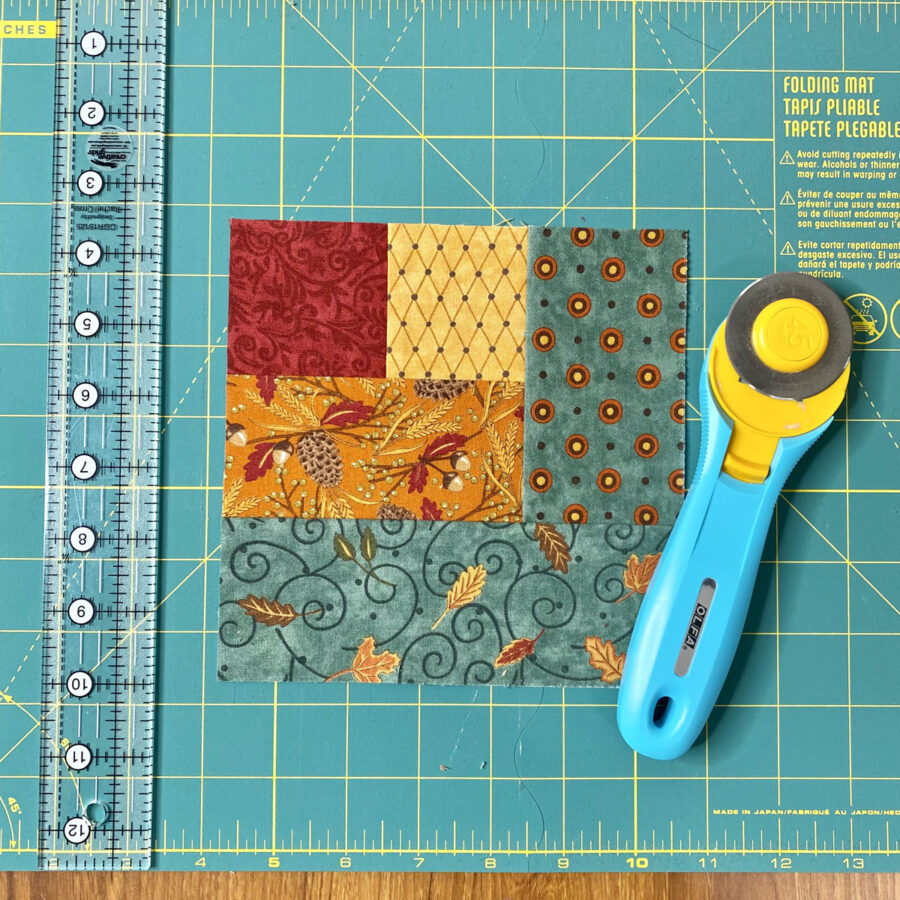
4. Create Strip Foundation Blocks.
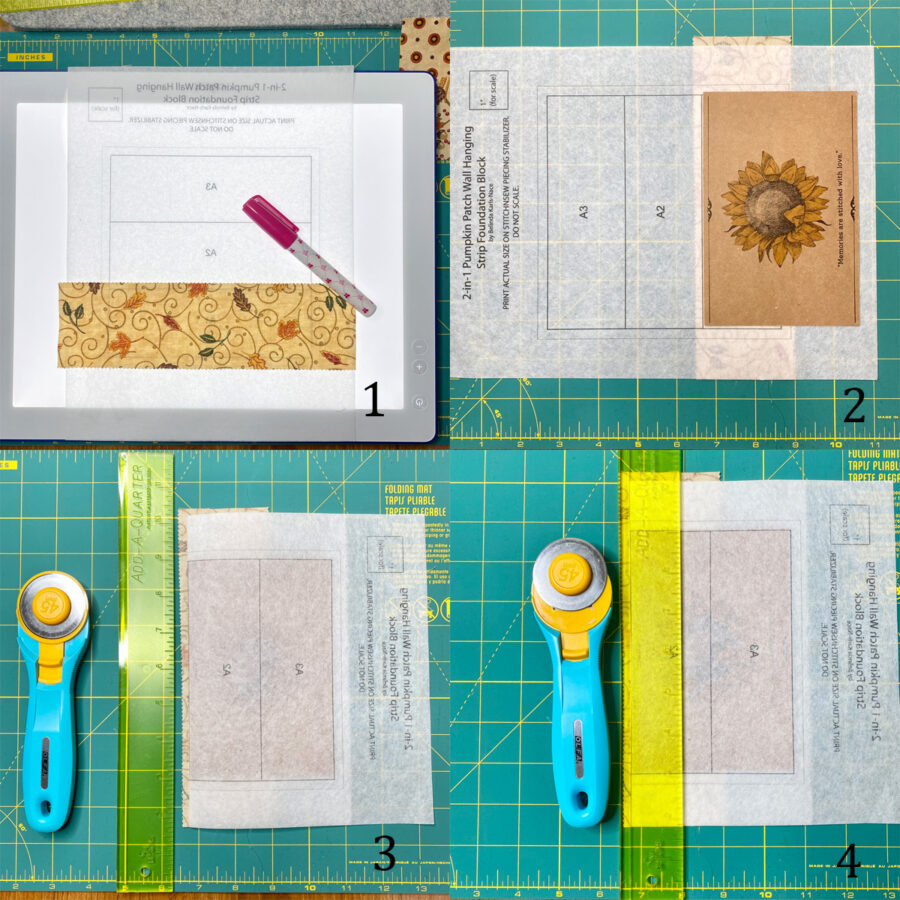
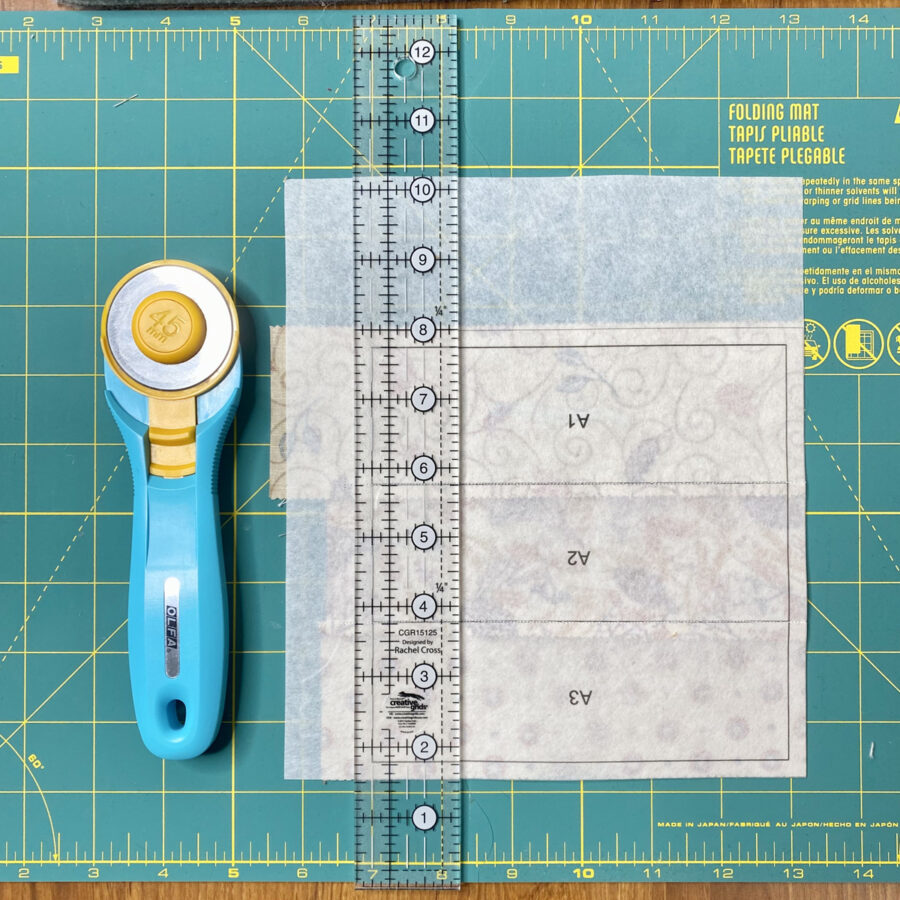
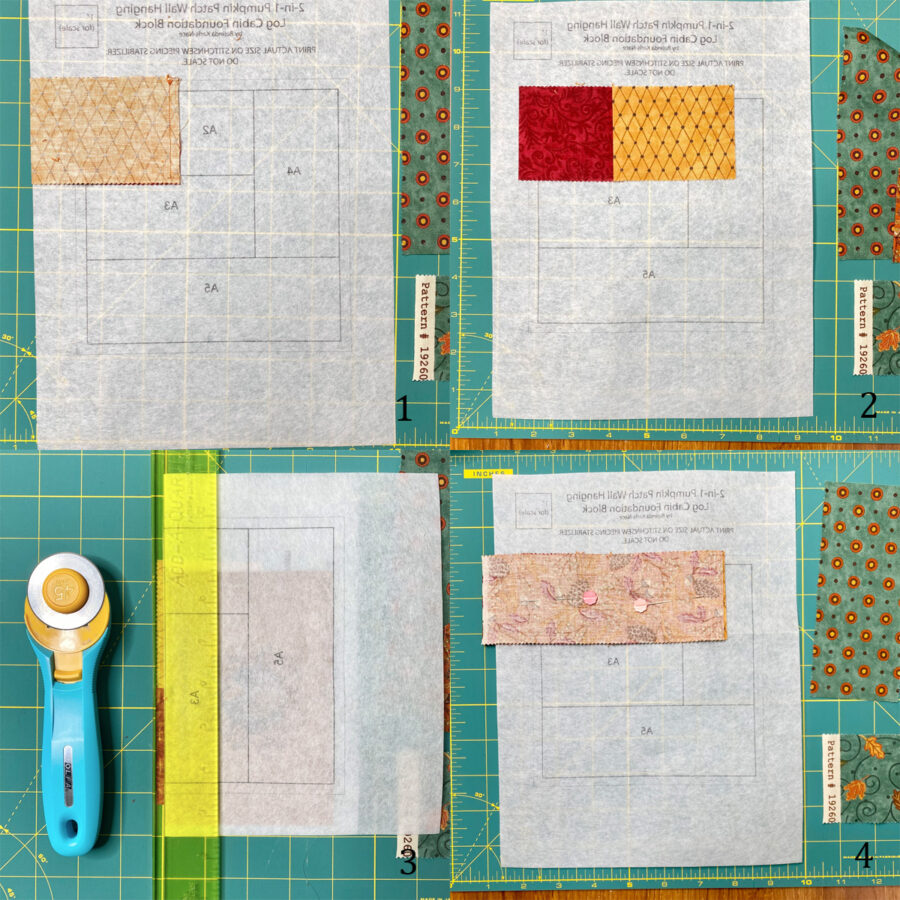
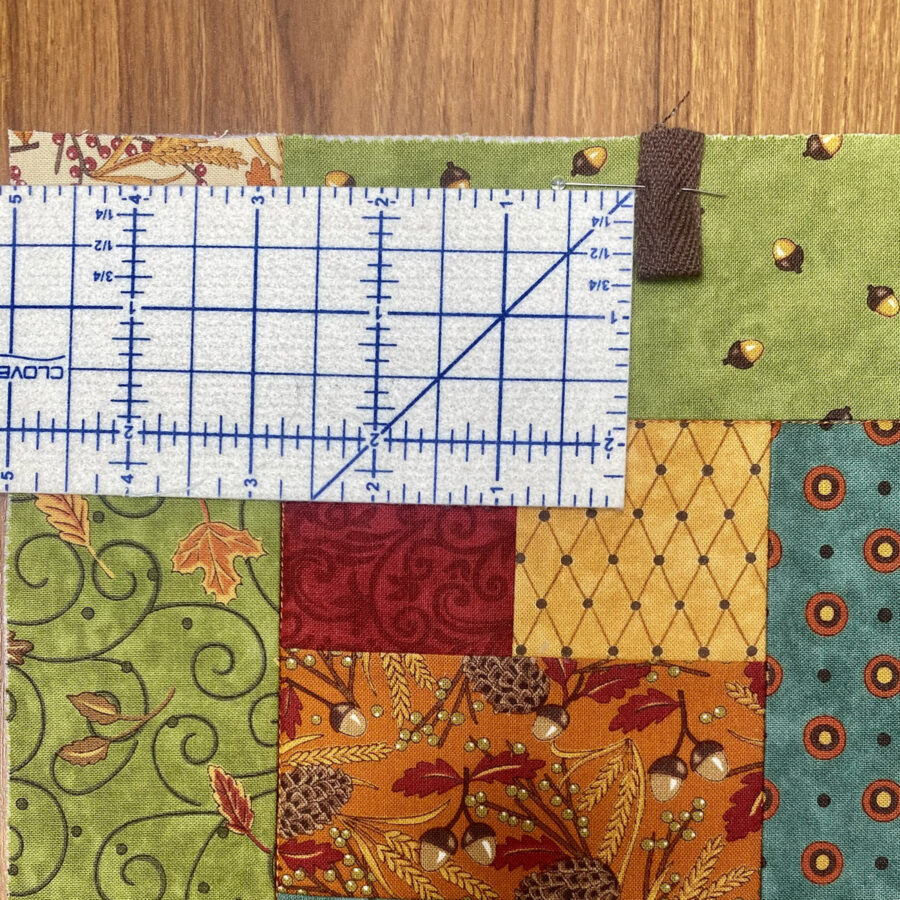
- Gather printed foundation block sheets for the strip blocks (4), fabric pieces, flathead pins, Add-A-Quarter Ruler (or ruler with a ¼” line), rotary cutter, cutting mat, postcard or cardstock, light pad (a window will work) and an iron. (Image Step 1)
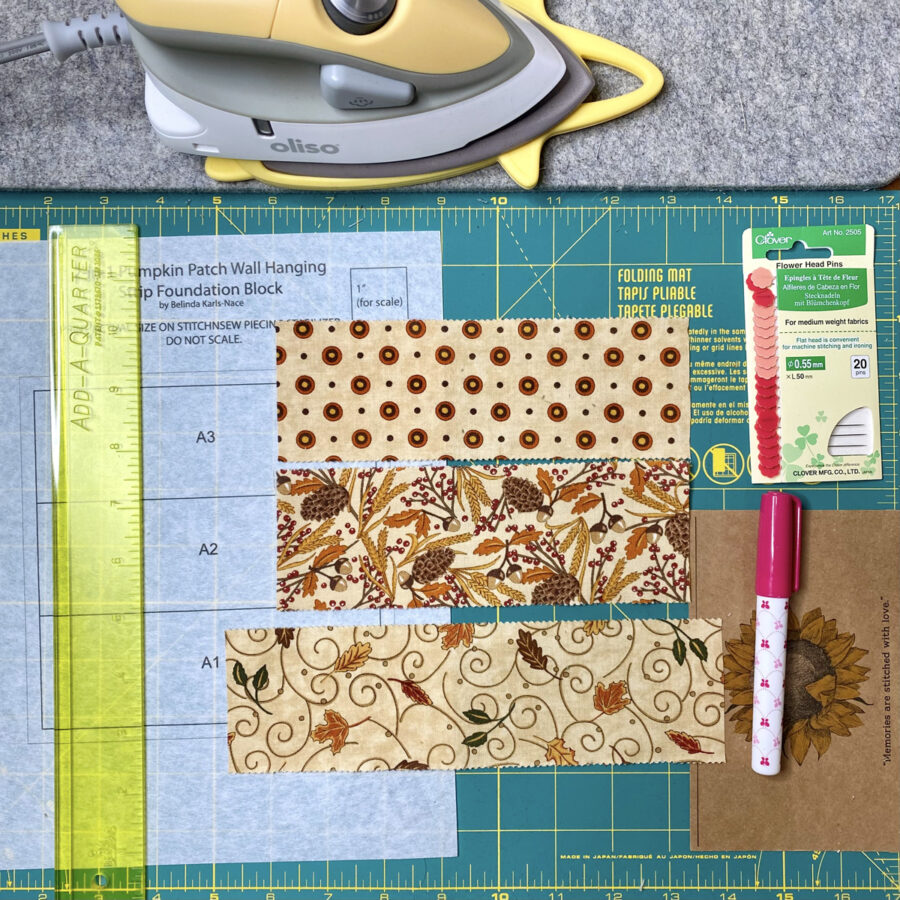
- Place Section A1
- Place the fabric for section A1 over section A1 of the template, so the wrong side of the fabric touches the wrong side of the template (back of foundation block sheet) – a light pad will help with this (or hold up to window or light). Make sure your fabric is larger than the section 1 outlines and seam allowance. Pin with flathead pin or secure the fabric using a fabric glue pen. (Image Step 1)
*PRO TIP: Using a fabric glue pen for this step will hold the piece securely and help with keeping a pin out of the way for the next step.
- Place the fabric for section A1 over section A1 of the template, so the wrong side of the fabric touches the wrong side of the template (back of foundation block sheet) – a light pad will help with this (or hold up to window or light). Make sure your fabric is larger than the section 1 outlines and seam allowance. Pin with flathead pin or secure the fabric using a fabric glue pen. (Image Step 1)
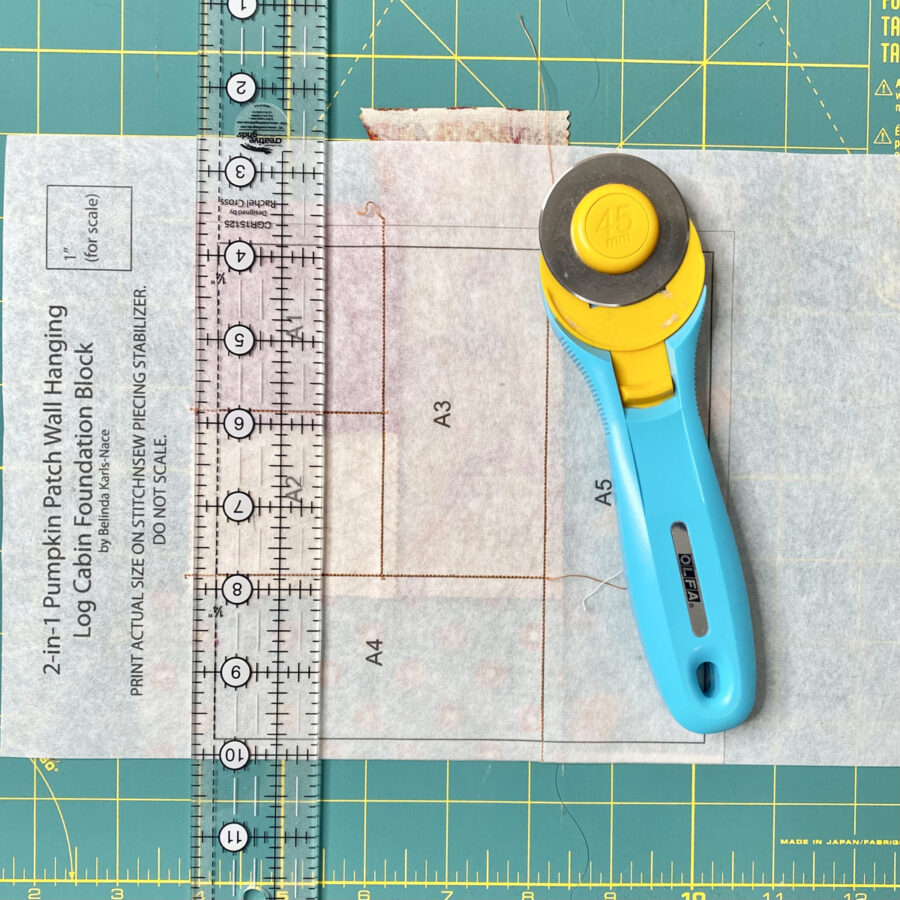
- Trim the Excess Fabric
- Fold the foundation block sheet along the line between A1 and A2.
*PRO TIP: Use a postcard or piece of cardstock to help fold a precise line. (Image Step 2 and 3) - Measure ¼” from the fold and trim the excess fabric – an Add-A-Quarter Ruler is quite helpful for this step. The Add-A-Quarter Ruler has a slight lip at the ¼” and it will line up perfectly with the postcard/cardstock. (Image Step 4)
- Fold the foundation block sheet along the line between A1 and A2.
- Place Fabric A2
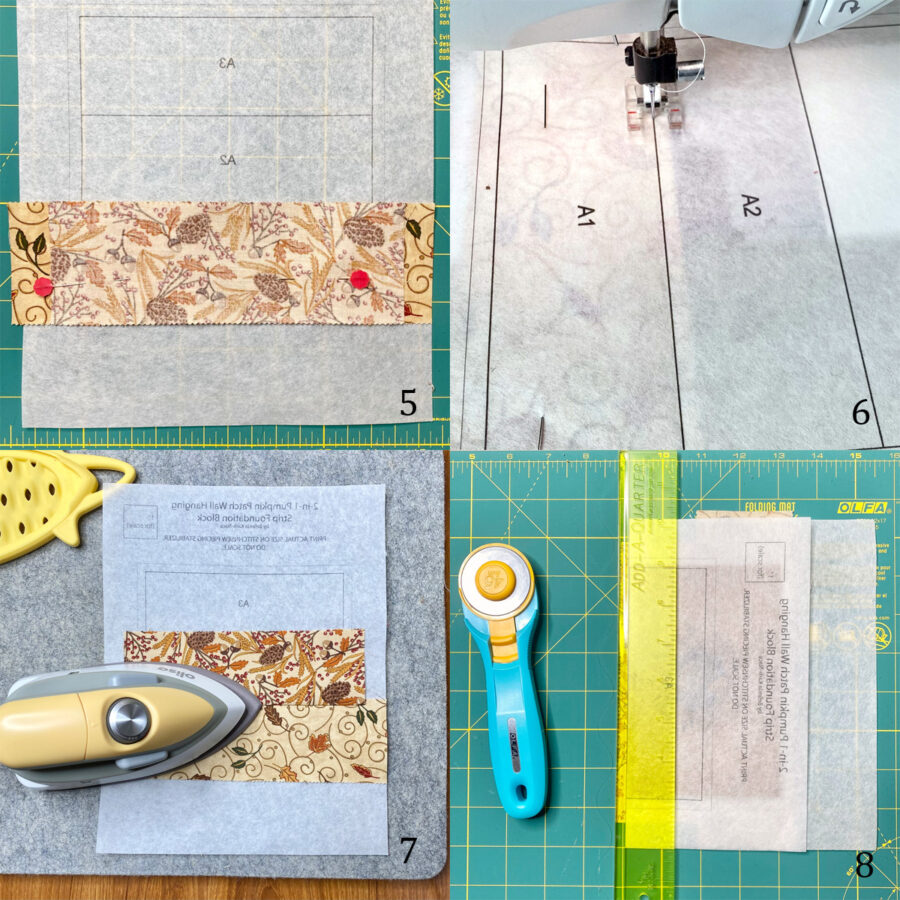
- With the fabric side of your template facing you, place fabric A2 on top of fabric A1, right side down (the right sides of both fabrics should face each other). Check on the foundation block side of your template to make sure one straight edge of the new fabric overlaps the line that separates sections A1 and A2, and that the fabric for section 2 covers the section and seam allowances entirely. Pin in place with a flathead pin being careful not to place the pin through your sewing line (a flathead pin is necessary to keep the foundation flat for sewing). (Image Step 5)
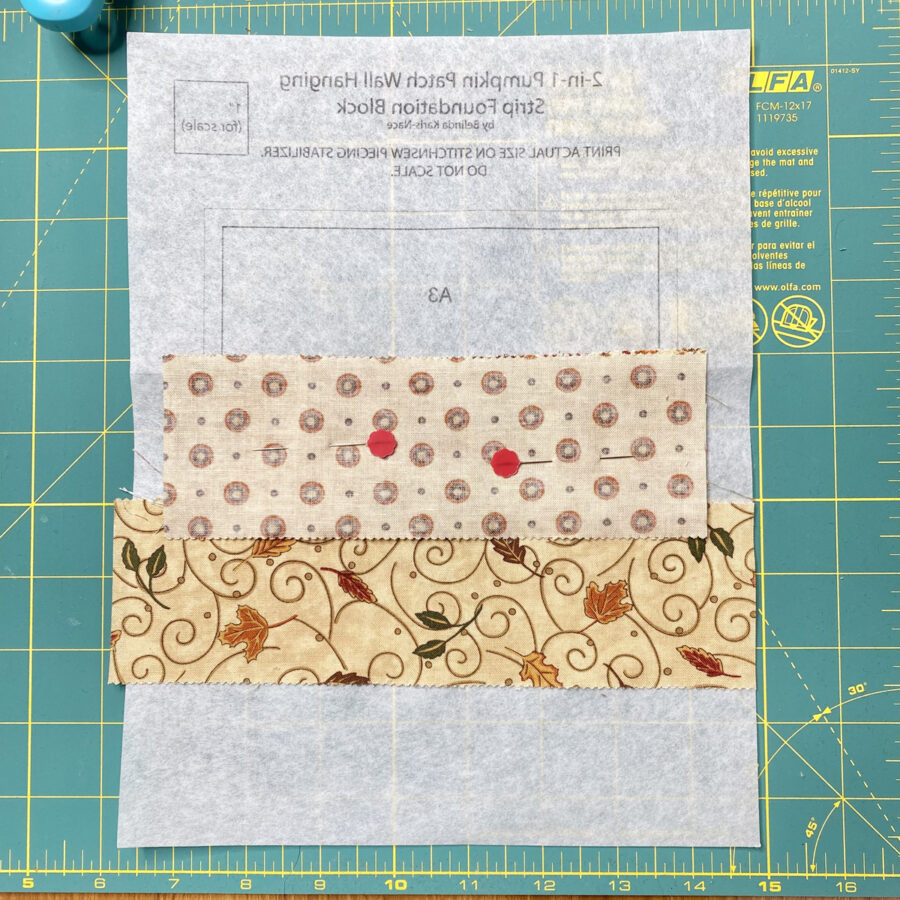
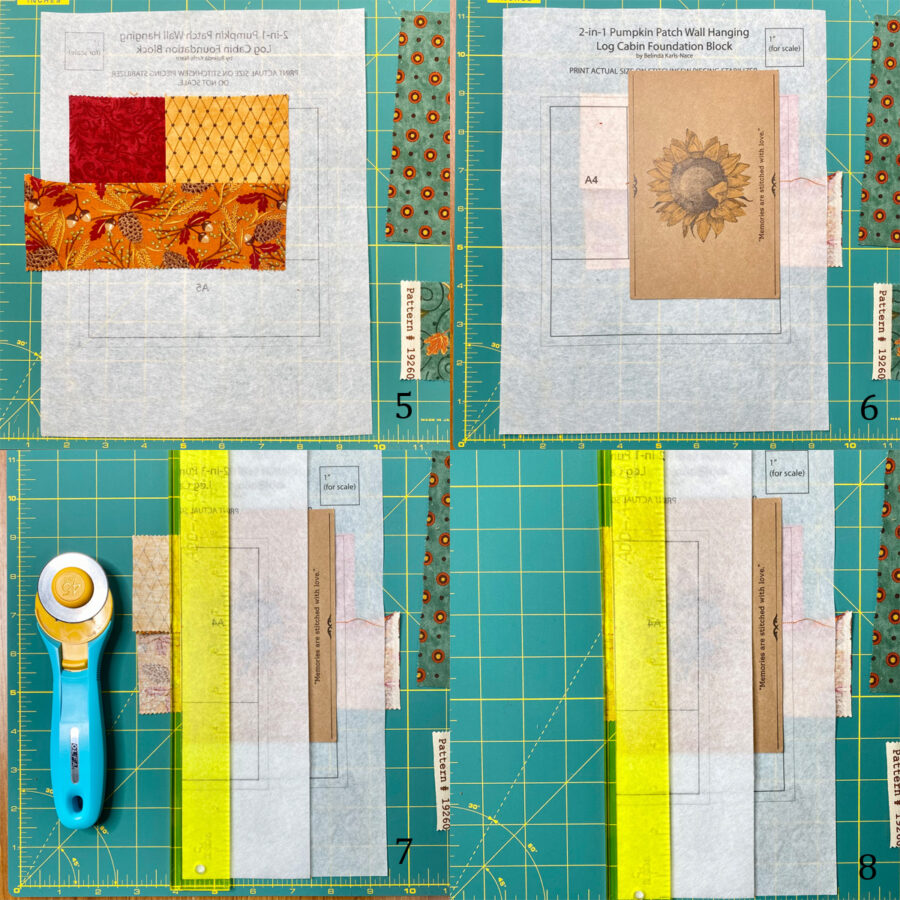
- Stitch the First Line
- Shorten your stitch length to 1.0 – 1.5. (This will make it easier to pull the foundation block sheet off your block later.) Stitch along the line between sections A1 and A2, beginning and ending a few stitches beyond the line. (Image Step 6)
*PRO TIP: When your stitch line ends at a seam allowance, continue sewing through the seam allowance to the outside of the block (this will be trimmed off later).
- Shorten your stitch length to 1.0 – 1.5. (This will make it easier to pull the foundation block sheet off your block later.) Stitch along the line between sections A1 and A2, beginning and ending a few stitches beyond the line. (Image Step 6)
- Press
- Flip the block over so the fabric is on top. With a dry, hot iron, press the second fabric into place. You may want to use a dab of glue to hold fabric A2 in place — as you work on section A3, you don’t want this fabric flapping around. (Image Step 7)
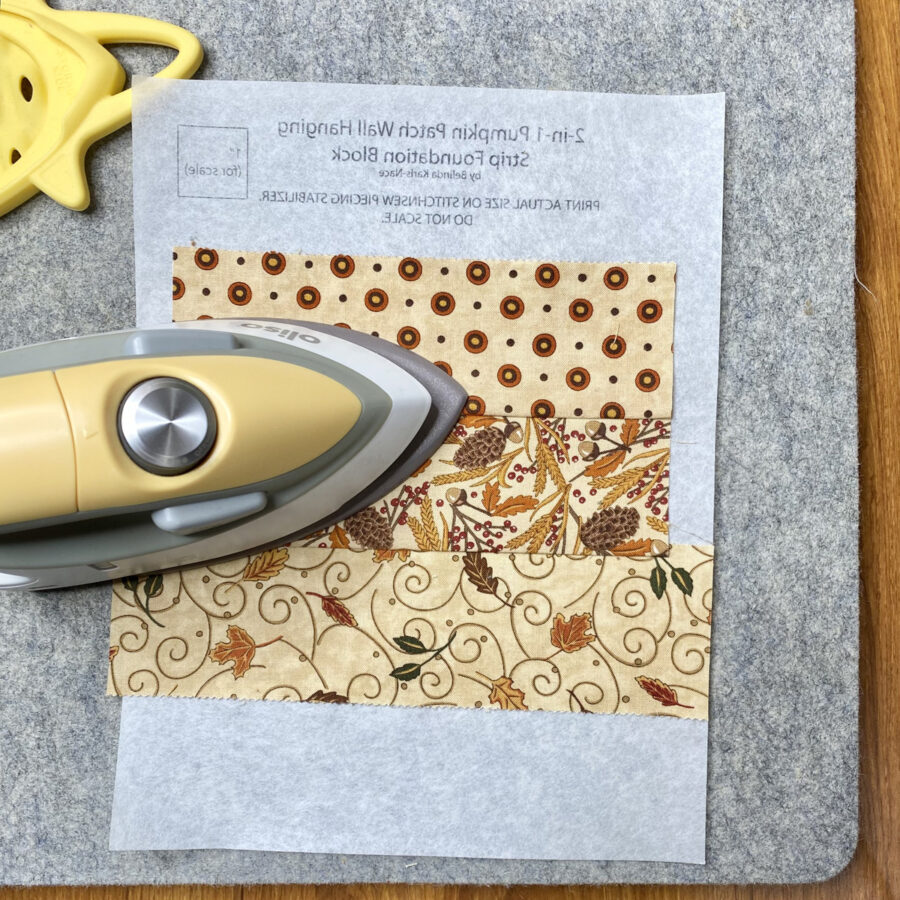
- Trim the Excess Fabric
- Fold the foundation block sheet along the line you just stitched (folding away from the fabric).
*PRO TIP: Use a postcard or piece of cardstock to help fold a precise line.
Measure ¼” from the fold and trim the excess fabric – an Add-A-Quarter Ruler is quite helpful for this step. The Add-A-Quarter Ruler has a slight lip at the ¼” and it will line up perfectly with the postcard/cardstock. (Image Step 8)
- Fold the foundation block sheet along the line you just stitched (folding away from the fabric).
- Place Fabric A3
- Place your fabric for section A3 on top of your block so that the right sides of fabrics A2 and A3 are facing each other (and the wrong side of the new fabric is facing you).
- Hold the foundation block sheet up to a light source and make sure that one straight edge of fabric A3 slightly overlaps the line on your pattern between sections A2 and A3. (When you stitch along this line later and fold back fabric A3, it should more than cover section A3 and the seam allowance.)
- Stitch along the line between sections A2 and A3. As you did earlier, press fabric A3 into place, then fold back the foundation block sheet and trim off the excess seam allowance. (You may want to use a dab of glue to position the new fabric in place against the foundation paper, so it doesn’t get in the way when you trim the block).
- Trim the Block
- Use a rotary cutter to trip off the foundation paper and excess fabric along the seam allowance (outer square) on the pattern.
- Leave foundation block sheet on the block until sewn into your project.
- Make all four blocks.
5. Fuse and Applique the Pumpkins.
- Remove the paper backs from appliqué pieces (1 pumpkin and 1 stem). Center and fuse into place on one strip foundation block, following the package instructions.
-
- Pre-heat iron to medium heat, no steam.
- Peel off paper.
- Place fabric shape, adhesive side down on top of front quilt block.
- Press and hold iron for 6 seconds on each section, overlapping slightly, until the entire piece is bonded.
-
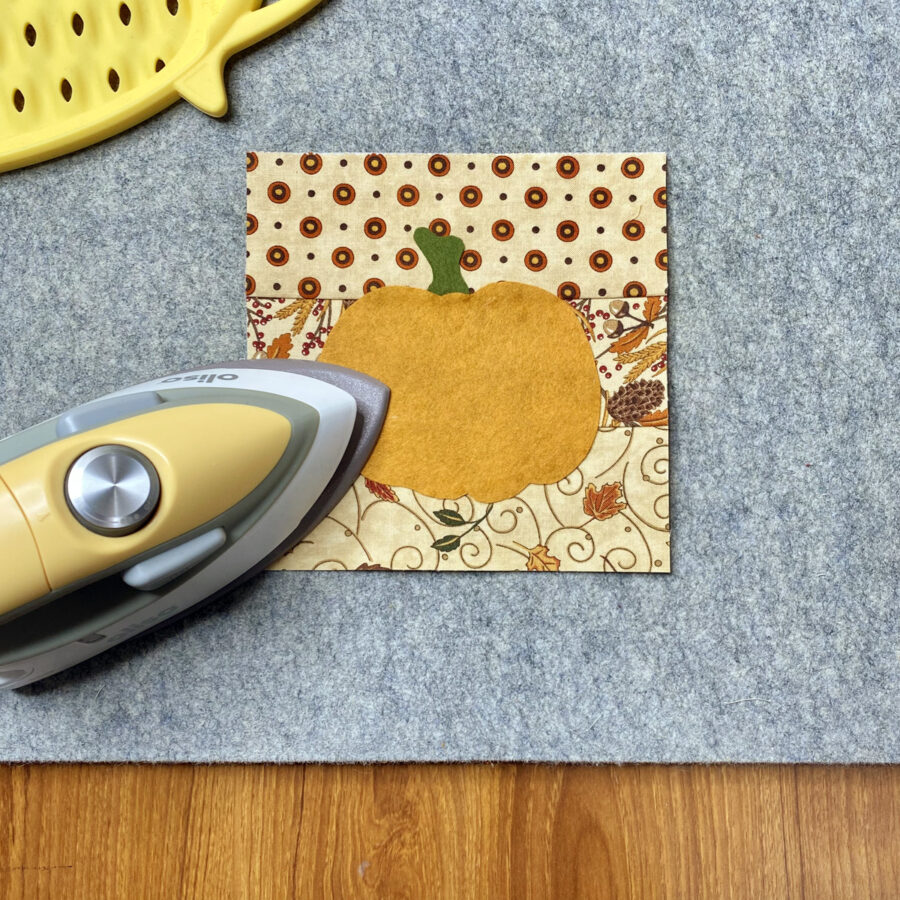
- Using your favorite appliqué stitch (machine or hand) and coordinating sewing thread, sew the pieces in place. I chose to use a machine blanket stitch. The StitchnSew Foundation Quilt Block Sheet is an excellent stabilizer and will keep your block nice and flat without puckering.
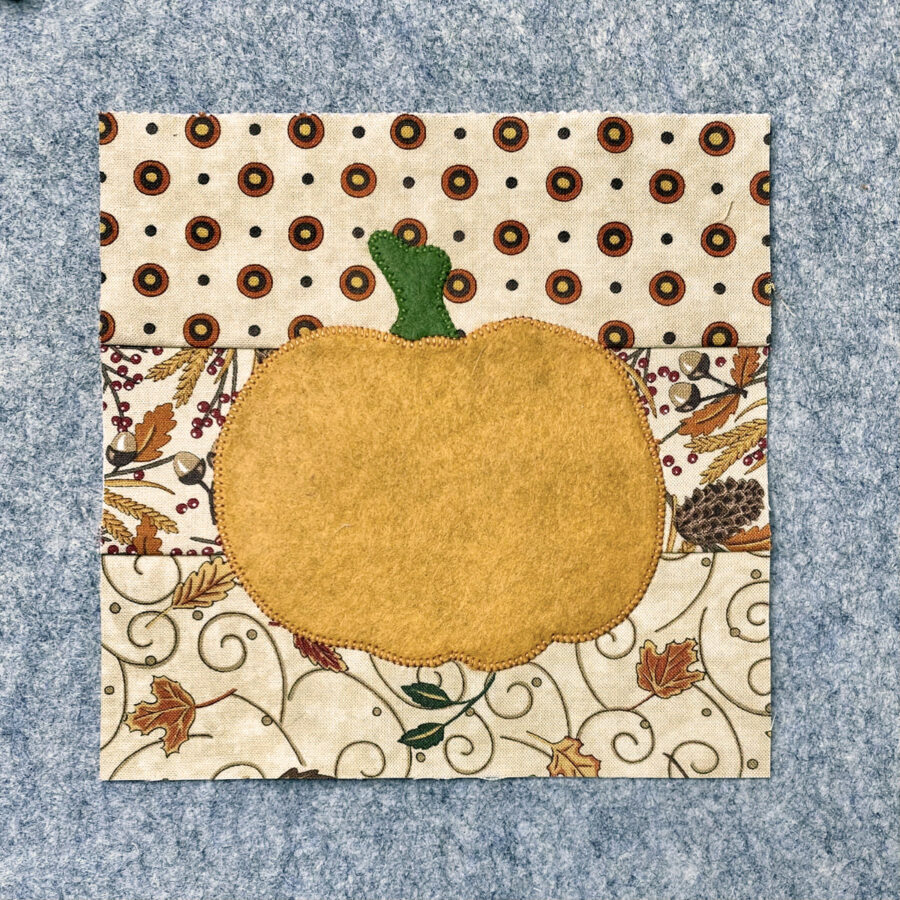
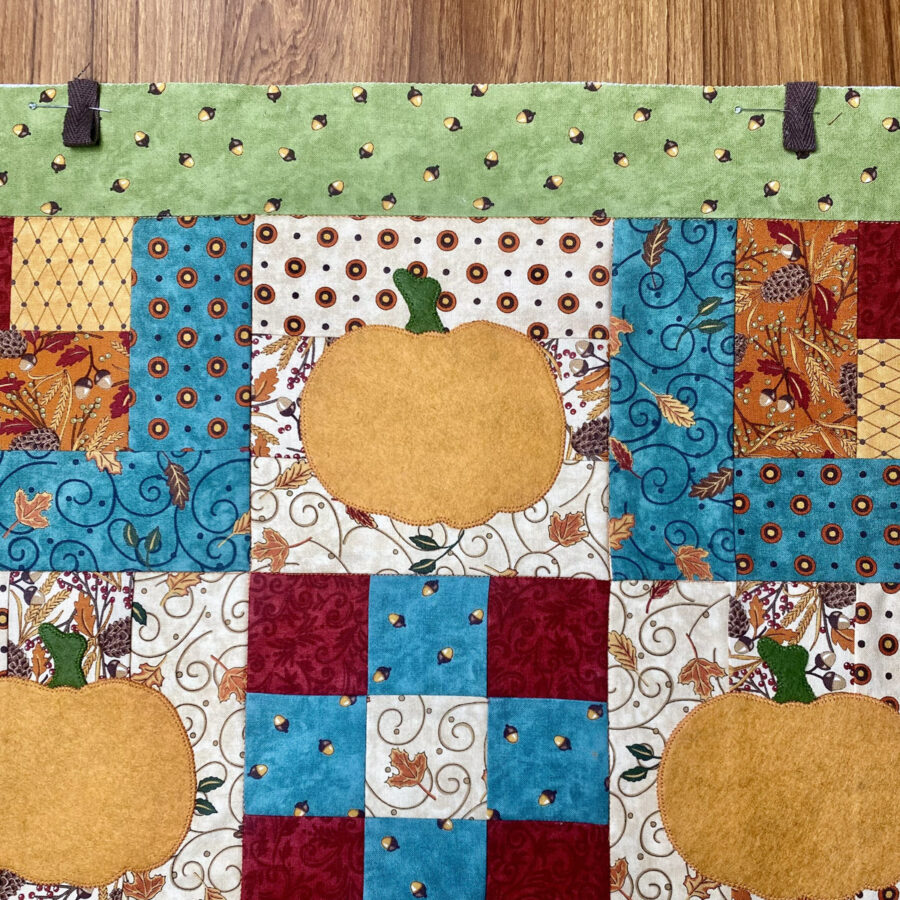
- Add pumpkins to all four strip foundation blocks, using the layout diagram (page 1 PDF) to ensure correct orientation of each applique.
- Set aside.
6. Create Log Cabin Foundation Blocks.
The log cabin blocks are created in the same way as the strip foundation blocks. See detailed steps in Step 5, if needed.
- Place section A1.
- Place fabric A2. (Image Step 1)
- Stitch the first line.
- Press. (Image Step 2)
- Trim the excess fabric.
- Place fabric A3. (Image Step 4)
- Stitch the second line.
- Press. (Image Step 5)
- Trim the excess fabric. (Image Step 6, 7, 8)
- Place fabric A4. (Image Step 9)
- Stitch the third line.
- Press (Image Step 10)
- Trim excess fabric.
- Place fabric A5. (Image Step 11)
- Stitch the fourth line.
- Press. (Image Step 12)
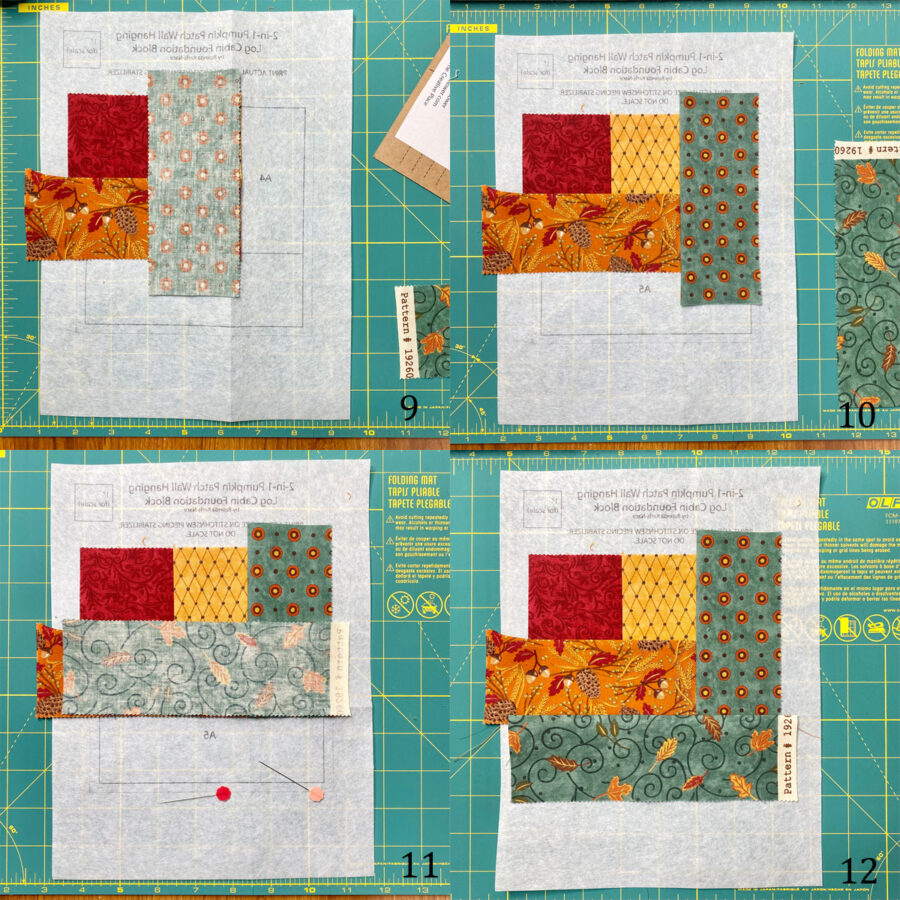
- Trim the block – leave foundation block sheet on the block until sewn into final project.
- Make all four blocks. Set aside.
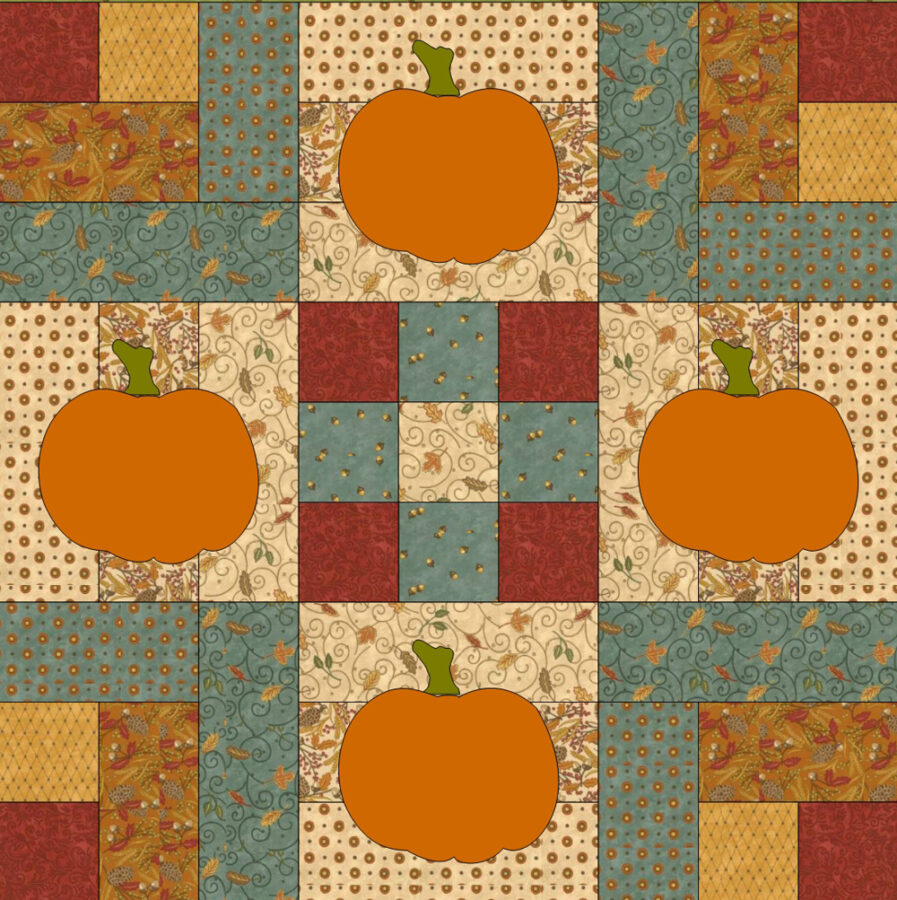
7. Create center Nine-Patch block.
- Use the remaining 9 – 2½” squares (4 red, 4 teal acorn, 1 beige leaf) to create a standard nine-patch block. Use a ¼” seam allowance. Press toward the teal acorn squares.

8. Create quilt top.
- Lay out pin and sew nine block units in three rows of three, according to layout diagram (page 1 PDF). Use a ¼” seam allowance. Press toward the log cabin blocks.
- Layout pin and sew three row units to complete the center of the quilt. Use a ¼” seam allowance. Press toward the added rows.
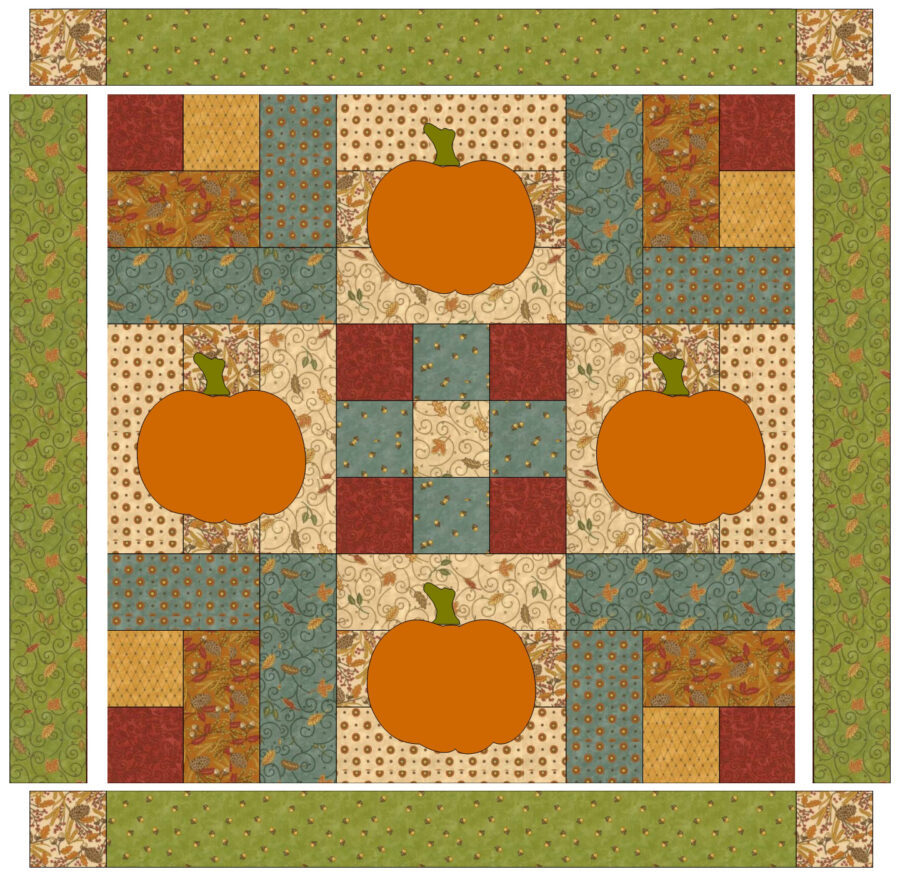
- Sew one 2½” cornerstone square on either end of the 2½” x 18½” green acorn border strips.
- Sew one 2½” x 18½” green leaf strip on the left side of the center quilt unit.
- Sew one 2½” x 18½” green leaf strip on the right side of the center quilt unit.
- Sew one green acorn border strip with cornerstones to the top of the quilt top center.
- Sew one green acorn border strip with cornerstones to the bottom of the quilt top center.
- Remove all foundation block sheets.
- Center and fuse the 23” x 23” piece of HeatnBond Fusible Fleece to the wrong side of the 22 ½” x 22½” quilt top, following the package instructions.
- Pre-heat iron to a medium setting, no steam.
- Place the rough side of the Fusible Fleece on the wrong side of the quilt top unit. Place it so there is a ¼” seam allowance on all four sides.
- Cover with a lightweight, dry pressing cloth.
- Press and hold iron with medium pressure for 10-15 seconds. Repeat by lifting iron to new area, slightly overlapping previous area until the entire surface is bonded.
- Allow it to cool.
- Quilt as desired.
- Trim to 22½” x 22½”.
- Fold both pieces of twill tape in half. Line up the raw edges with the top of the quilt unit, 5” in on each side. Baste in place.
- Place the quilt top unit and the backing fabric right sides together. Pin or clip. Sew around the entire perimeter with a ¼” seam allowance, leaving an opening at the bottom for turning.
- Clip corners, turn right side out. Press.
- Sew opening closed.
- Place on hanger for display.
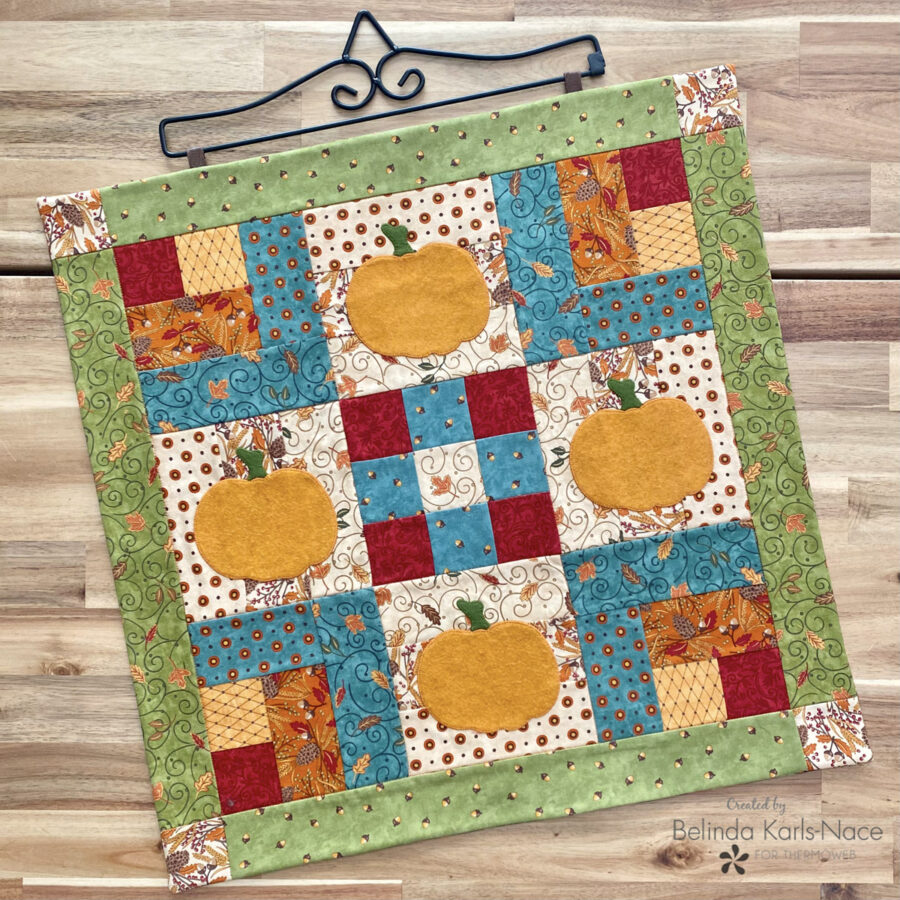
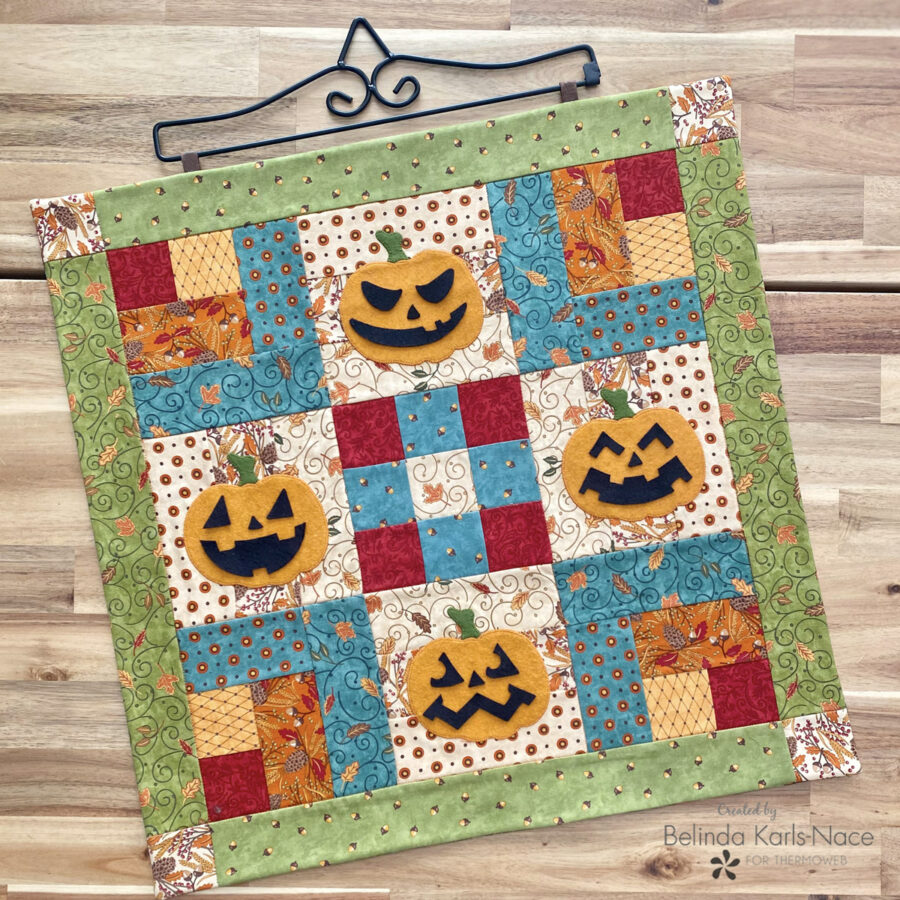
- Your 2-in-1 Pumpkin Patch wall Hanging is complete. Hang without jack-o-lantern faces for fall decorating. Place the jack-o-lantern faces on the pumpkins for Halloween. The wool felt will naturally adhere to wool felt to keep the faces in place. If you find the pieces are not sticking as nicely as you would like, try using a bit of SpraynBond Pattern & Stencil Spray to give them a stronger hold. I have had mine hanging for over a week and the faces have stayed nicely in place without any spray or adhesive.
*PRO TIP: Sew a small pocket on the back of your wall hanging to hold the jack-o-lantern face pieces. - Enjoy!
Thank you for joining me today for my Therm O Web blog tutorial. I hope this post inspires you to create a 2-in-1 Pumpkin Patch Wall Hanging that matches your personality and style, using materials you have on hand. To see more of my projects, stop by my blog, website, and/or Instagram – I would love to visit with you and see what you create!