


It’s the holiday season!
Time to dust off your favorite pile of holidays fabrics and make something special!
Whether it be for a gift or for your home….Therm O Web adhesives will have your decked out in style!
Designer Tammy Tutterow has the perfect idea not only for a bit of decor but also something to help keep all those treats…organized!
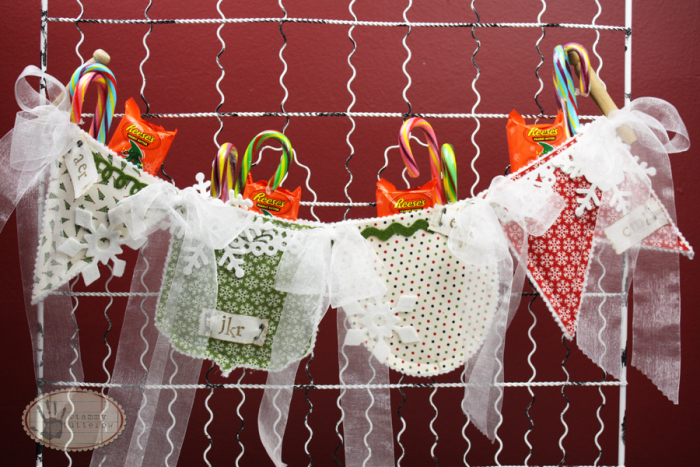 Holiday Pocket Banner by Tammy Tutterow
Combining fabric with great fusible adhesives can make holiday crafting quick and easy. Add in a time saver like die cutting and you can create a unique project like this hanging pocket banner in no time at all!
- Therm O Web: Heat n Bond Fusible Interfacing- Craft Extra Firm, Heat n Bond Ultrahold No Sew Iron-on Adhesive, Super Stik
- Sizzix dies: 657674 Jumbo Banners, A10984 Border Snowflake, 656542 Loops & Rick Rack, 657104 Lace Scallop, 657413 Vintage Lace Edging; Big Shot Pro
- Fabric: Sweetwater Countdown to Christmas; wool felt; cotton batting
- tools: grommets and setter; pinking shears; sewing machine; Crop-a-dile or fabric hole punch; iron and ironing surface
- misc.: thread; ribbon

Cut two pieces of fabric for each pocket (Sizzix 657654 Jumbo Banners), cutting the fabric slightly larger than the size of the design on the die. Cut a piece of Heat ‘n Bond Fusible Craft Interfacing for each piece of fabric. Use an iron to fuse the interfacing to the back side of each piece of fabric. Cut pieces of wool felt to fit the size of the desired die designs to be used as embellishments. Cut pieces of Heat ‘n Bond Ultra Hold Iron-on Adhesive to fit each piece of felt. Iron the adhesive onto the backside of the felt pieces.

Die cut the prepared fabric pieces with the desired dies. If using a thin wafer die like a Sizzix Sizzlit, place the felt piece fabric side down onto the die for the best cut.

After die cutting, the trim pieces can be peeled off of the backing paper and used like an iron-on embellishment. The adhesive backing is not tacky so scraps can be saved easily for use on future projects.

Apply Super Stik Glue Stick to the interfacing backs of each piece of fabric.

Place the fabric pieces interfacing side down onto cotton batting.

Sew along the top of each pocket.

Use pinking sheers to trim around the edges of each pocket piece.

Pin each matching pocket piece together, batting sides together.

Sew around the side and bottom edges of each pocket, about 1/4″ from the edge. Leave the top open.

Punch a hole in the pocket at the two top corners for placing grommets. Depending on the size of the grommets, you may need to punch a couple of holes at each corner to create a large enough opening.

Set a grommet in each hole according to the package instructions.

Tie each pocket together using ribbon. Pockets can be embellished as desired with additional die cuts. On the pockets shown, a fabric label with initials was attached to each pocket to serve as a mini Christmas stocking for members of the family. (See how I created the labels in this tutorial: Easy Holiday Fabric Tags.)


Be sure to join us tomorrow for our final holiday idea from Designer Andrea Budjack!
Also don’t forget in all the holiday shopping hustle and bustle…you can shop right from home for all your favorite Therm O Web products! Skip the crowds and we’ll ship it right to you!
[…] I have a tutorial on the Therm O Web Adhesives blog showing how to create this fun banner with pockets for holiday treats and goodies. You can find the tutorial here: http://thermoweb.wordpress.com/2012/12/07/die-cut-fabric-banner-pockets/. […]