This year, Halloween decorating is too much fun with all the vintage-inspired decor. Why not stitch up your own vintage-inspired Scary Cat. Carla at Creatin’ in the Sticks is on the blog today to share a free pattern for this scary but cute Halloween mini quilt.
![]()
SCARY CAT MINI QUILT
by Carla at Creatin’ in the Sticks
Unfinished Size: 9 ½” X 14 ½” Finished Size: 9” X 14”
please read through the complete instructions before starting.
![]()
SCARY CAT MINI QUILT Supplies:
![]()
Pattern: SCARY CAT Mini Quilt by Carla Henton at Creatin in the Sticks
HeatnBond EZ Print Lite iron-on adhesive – 3 sheets
HeatnBond fusible interfacing, lightweight
StitchnSew Sew-In fleece, High Loft – 11” x 16”
Cotton Fabric:
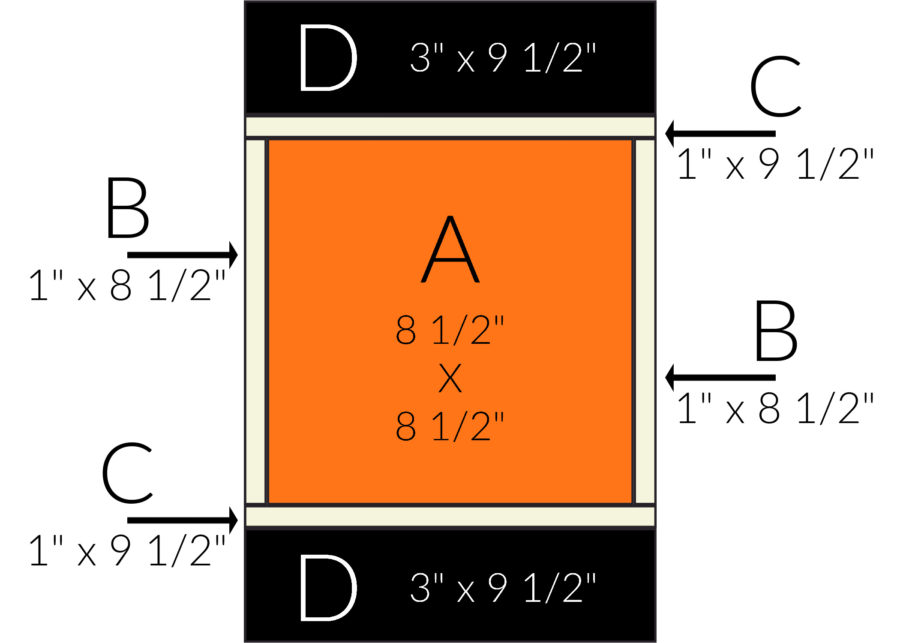
A: 1 background 8 ½” square (orange)
B: 2 – 1” X 8 ½” strips (off white)
C: 2 – 1” X 9 ½” strips (off white)
D: 2 – 3” x 9 ½” strips (black)
For applique: scraps of black, white, yellow, and orange
Applique letters: one fat quarter of off white
Quilt backing: 1 – 11 ½” x 16 ½”
Binding: 2 – 2 ¼” x Width of Fabric (black)
Other supplies:
Aurifil Thread #2311, #2021, and #2692
InkJet Printer, Iron (I love my Oliso), Sewing machine, Sharp scissors, and other basic sewing supplies. Optional: Embroidery floss.
SCARY CAT MINI QUILT Instructions:
(detailed instructions are in the downloadable pattern above)
Prepare Quilt top:
SCARY CAT Applique Instructions:
**All patterns have been reversed for EZ printing.
Prepare the applique patterns
![]()
Print the applique pattern pieces (the last 3 sheets of the pattern) onto HeatnBond EZ Print Lite sheets with your inkjet printer. Follow the package instructions for printing and bonding to the wrong side of the fabrics. NO TRACING! How awesome is that?
Tip: When a light-colored fabric is used as an applique on black fabric, prevent “show through” by bonding lightweight fusible interfacing on the wrong side of the fabric before bonding the HeatnBond Lite. Fuse the HeatnBond lite onto the interfacing and continue as with all appliques.
Cut out all applique pieces on the solid black lines, peel off the backing paper, and place applique with the adhesive side down on the prepared background fabric.
The applique template key is included in the pattern.
Carefully cut out letters, peel paper backing off, and place on background by referring to cover picture for placement.
Bond the Applique Pieces to the Background
![]()
Following the package instructions, work in sections to press the entire applique and letters to the background until the entire applique is fused.
Stitch around appliques and letters
![]()
Stitch around the letters with a blanket stitch using Aurifil 50 wt. #2311. Now, stitch around the teeth with a blanket stitch using Aurifil 50 wt. #2021. Use a straight stitch with Aurifil 50 wt thread #2692 to sew about 1/8” in from the edges of the SCARY CAT pieces. Stitch around each applique piece once or twice.
Stitch whiskers
Embroider or machine stitch the whiskers on the cat using the key as a guide.
Finish the quilt
![]()
Following package instructions, spray StitchnSew Sew-in fleece with SpraynBond basting spray and lay IT on top of the wrong side of quilt backing fabric. Smooth to remove wrinkles. Spray back of quilt top and lay on top of the fleece, gently smoothing out any wrinkles.
Quilt as desired, trim and add the binding with preferred method.
![]()
I really hope you enjoy creating my vintage-inspired SCARY CAT. I’ve been really getting my Halloween stitching on this year and this mini quilt is the perfect addition.

The doll is my HeatnBond Sweet Dolll Stuffy pattern made into a witch with a few modifications. Our family is all about Halloween decor this year. How about you?
Carla
Susan Nixon
October 8, 2020 at 3:11 pm (4 years ago)So, so cute, Carla! Thanks for the pattern and the instructions and tips.
Carla
October 10, 2020 at 8:28 am (4 years ago)Thank you, Susan. I’m so happy you like SCARY CAT!