


 Hello Crafty Friends!! We’re celebrating sunny days this week as it seems we can’t have enough of those lately with winter still poking its silly head in many locations.
![]() Sun Tidbit for today…Our Sun is a relatively medium-sized type of star. It has a radius of 432,168 mi / 695,508 km and a diameter of around 1.39 million kilometers / 864,000 miles. This is 109 times greater than the diameter of our planet. The Sun is quite small in comparison to other stars. For example, UY Scuti – a red supergiant star, has a radius of around 1,700 times greater than that of our Sun.
Sun Tidbit for today…Our Sun is a relatively medium-sized type of star. It has a radius of 432,168 mi / 695,508 km and a diameter of around 1.39 million kilometers / 864,000 miles. This is 109 times greater than the diameter of our planet. The Sun is quite small in comparison to other stars. For example, UY Scuti – a red supergiant star, has a radius of around 1,700 times greater than that of our Sun.
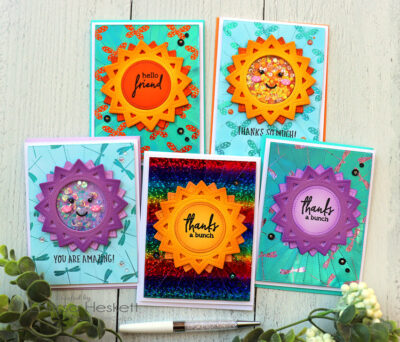
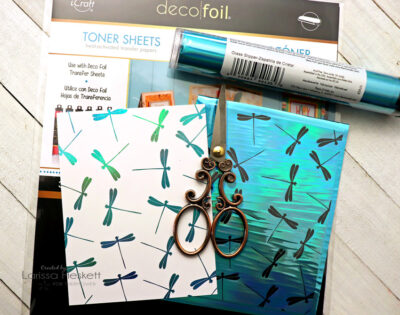
Larissa here today to share 5 Sunny Positive & Negative Deco Foil Toner Card Front Cards!! Have you played with the NEW Deco Foil Toner Card Fronts yet!!?? Today I’ll show you how to take the SAME Design and get MORE Bang for your Buck by using BOTH the Positive and Negative Pieces to create some AMAZING Cards!!
Sunshine Cards with Deco Foil Card Fronts and Foil Transfer Sheets

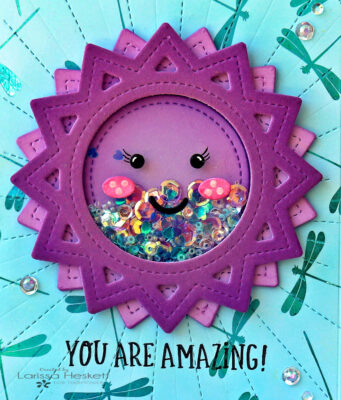
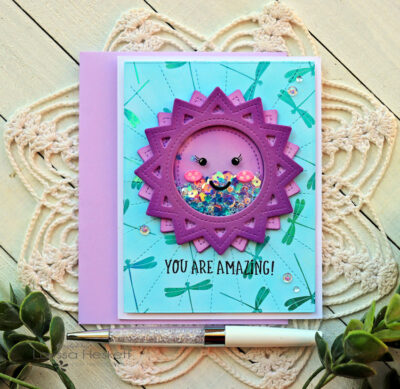
Thanks so Much Sunshine Shaker Card
I’m using the NEW Limited Edition Deco Foil Slimline Toner Card Fronts ~ Time To Fly for my first Card!! So let’s get started!!
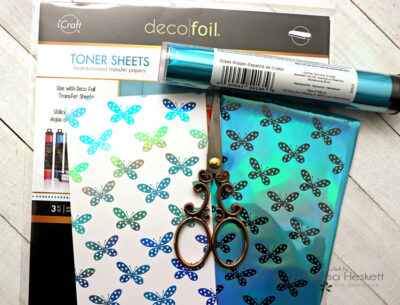
I cut a piece of Deco Foil in Glass Slipper large enough to cover the entire Card Front and then ran it through my Laminating Machine!! I removed the Negative Foil and I’ll save that to use for my second Card!! SWOON!! I just LOVE the Iridescent Shine!! Then I chose to Ink the Panel using some Tumbled Glass Distress Oxide Ink!!
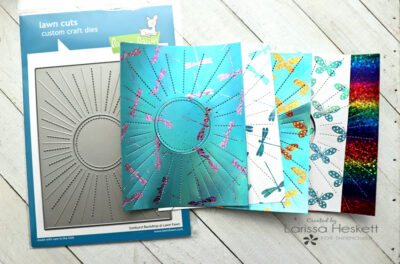
Next, I Die Cut the Foiled Toner Card Front using the Lawn Fawn Sunburst Backdrop Die!!
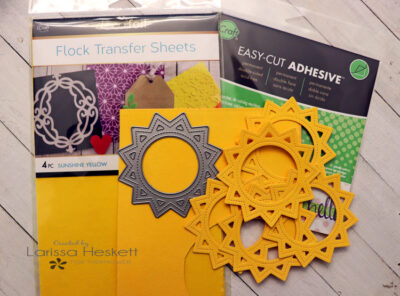
Then I created the SWEET Sun Images using some of the Deco Foil Flock Sheets in Sunshine Yellow!! Adhering it to a Yellow piece of Cardstock using some Easy-Cut Adhesive Sheets!! Then I ran it through my Laminating Machine to burnish it to the Cardstock!! Then I Die Cut the Sun Images using the Lawn Fawn Stitched Sun Frame Die!! To help make the Flock POP I added some Wild Honey & Vintage Photo Distress Oxide Ink to the edges of the Die Cut Sun Images!!
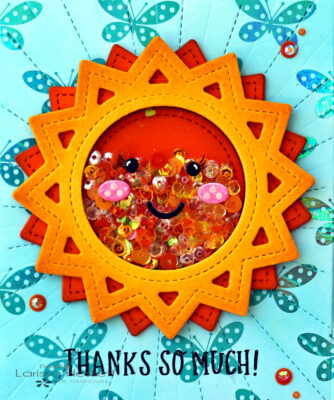
I Layered the Flocked Sun Image with a Lawn Fawn Sun Tan Cardstock Die Cut Sun and created a FUN Shaker Die Cut!! I Filled it with some Sequins, Beads, and Yellow Heart Confetti!! Then I added the SWEET Face from the same Die Set using some Ultra Bond Adhesive and then added some Gel Pen Highlights and some Copic Pen Eyelashes to add some personality to the Sun!!
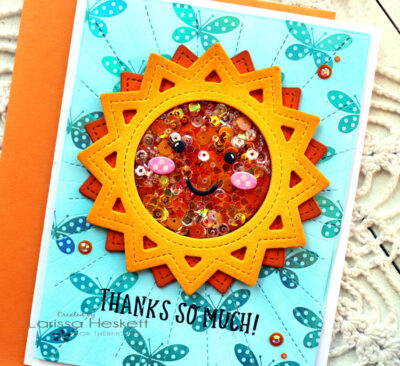
SQUEAL!! How CUTE is that Shaker!!?? I just LOVE the way those Shaker bits just Fill that Sun Face with some SPARKLE!! I Stamped the NND Sentiment using a Stazon Ink so it wouldn’t smear when Stamping over the Foil!!

I adhered to a few of the same Sequins and Rhinestones that were added to the Shaker to the Card Panel again using some Ultra Bond Adhesive!! So SWEET right!!?? Now let’s create another Card using the Negative Foil!!
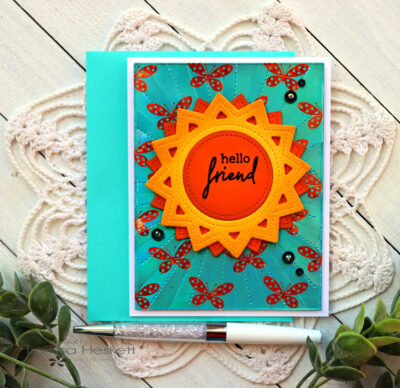
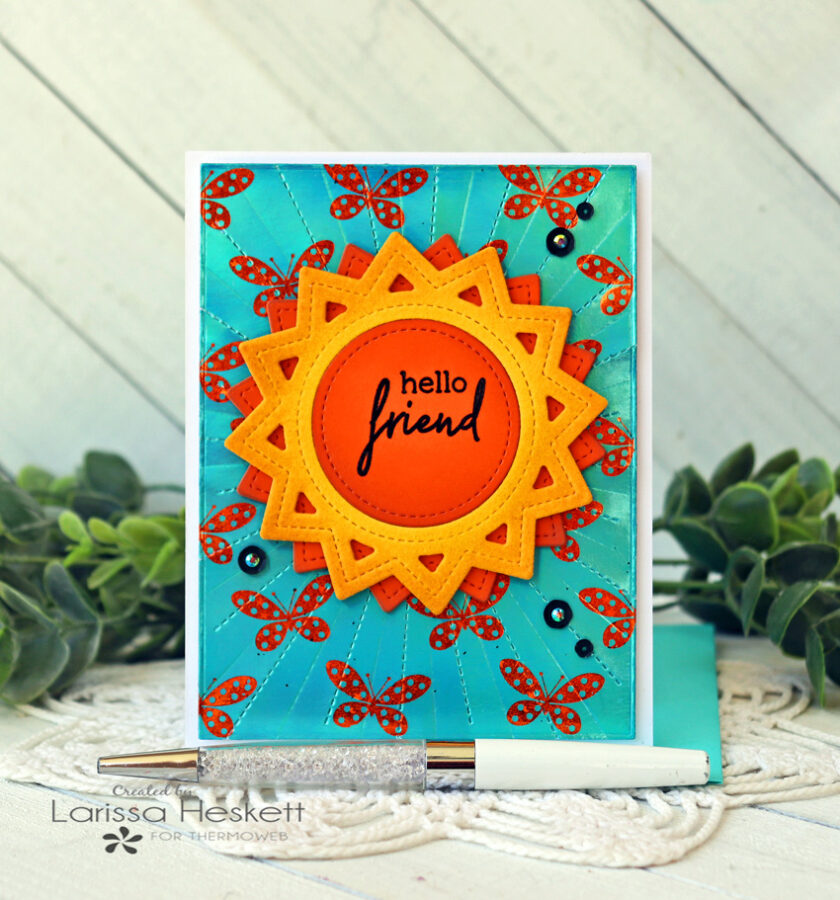 Hello Friend Sunshine Card made with Negative Foil Piece
I’ve created this 2nd Card using the Negative Foil and I LOVE the possibilities with being able to mix and match different color combinations!!

I Cut a Piece of the Deco Foil Toner Sheet larger enough to fit the Negative Deco Foil Sheet!! Then I ran it through my Laminating Machine to create my Foiled Sheet!!
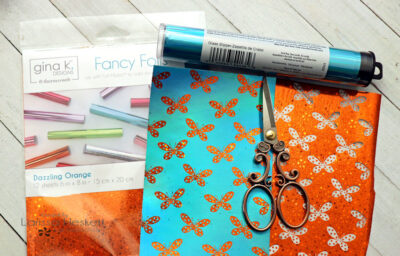
Next, I cut a piece of Gina K. Designs Dazzling Orange Fancy Foil large enough to cover the Foiled Toner Panel and ran it through my Laminating Machine!! SWOON!! You’re left with a STUNNING Two-Toned piece, that’s just so BEAUTIFUL in real life!!

Again I Die Cut the Foiled Panel using the Lawn Fawn Sunburst Backdrop Die!! Then I created the SWEET Sun Images using some of the Deco Foil Flock Sheets in Sunshine Yellow!! Adhering it to a Yellow piece of Cardstock using some Easy-Cut Adhesive Sheets!! Then I ran it through my Laminating Machine to burnish it to the Cardstock!! Then I Die Cut the Sun Images using the Lawn Fawn Stitched Sun Frame Die!! To help make the Flock POP I added some Wild Honey & Vintage Photo Distress Oxide Ink to the edges of the Die Cut Sun Images!!
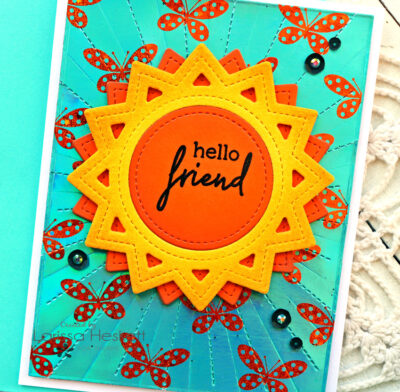
This time instead of creating a Shaker I just Stamped and Embossed a TE Sentiment!! There are so many possibilities with this design!!
To finish off the card I adhered to a few Sequins and Rhinestones that were added using some Ultra Bond Adhesive!! So SWEET right!!?? I really LOVE how FUN it is to create with Negative Foil pieces!! So many possibilities!!
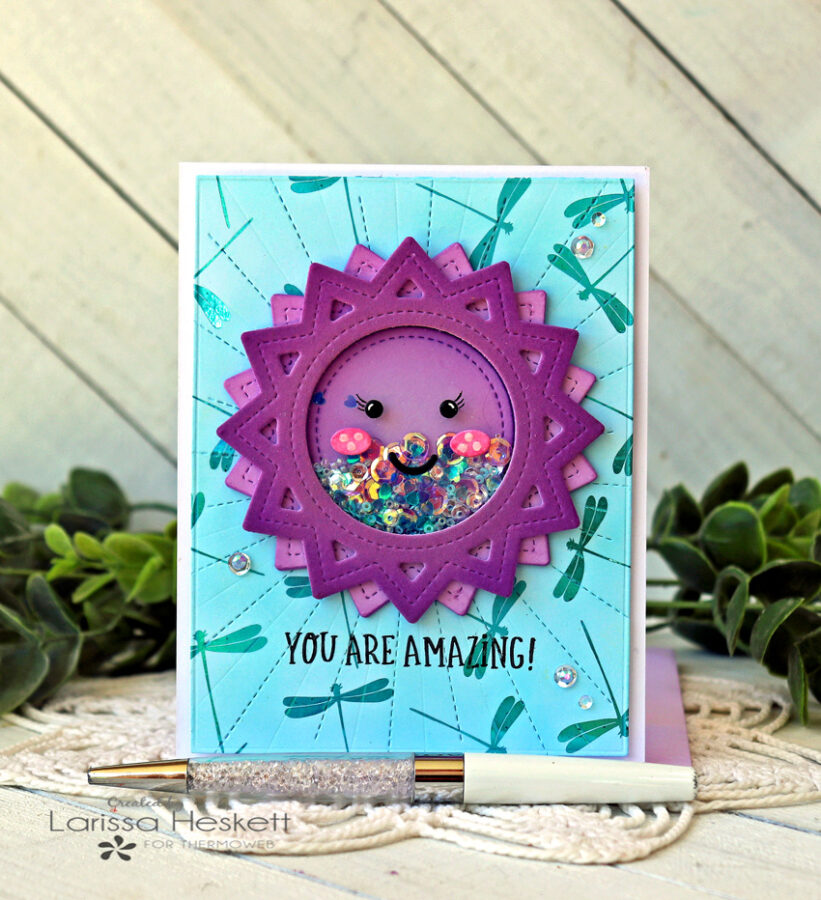
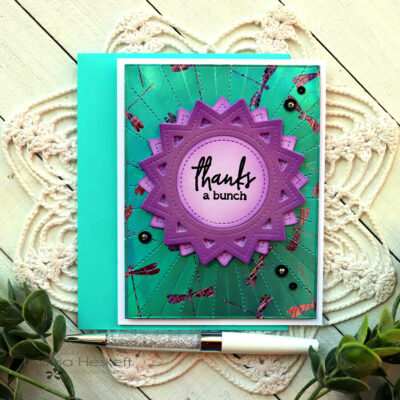
You’re Amazing Deco Foil Dragonfly Card
My 3rd Card again features the NEW Limited Edition Deco Foil Toner Card Fronts in ~ Time to Fly!! I’ve used the exact same Colors just to keep it cohesive, but the possibilities are ENDLESS as there are over 40 different Deco Foil Colors to choose from!!
Again after foiling with Deco Foil in Glass Slipper, I chose to Ink the Panel using Tumbled Glass Distress Oxide Ink!!
Then I created the SWEET Sun Images using some of the Deco Foil Flock Sheets in Purple Punch!! Adhering it to a Lavender piece of Cardstock using some Easy-Cut Adhesive Sheets!! Then I ran it through my Laminating Machine to burnish it to the Cardstock!! Then I Die Cut the Sun Images using the Lawn Fawn Stitched Sun Frame Die!! To help make the Flock POP I added some Wilted Violet Distress Oxide Ink to the edges of the Die Cut Sun Images!!
I Layered the Flocked Sun Image with a TE Lavender Glaze Cardstock Die Cut Sun and created a FUN Shaker Die Cut!! I Filled it with some Sequins, Beads, and Turquoise Heart Confetti!! Then I added the SWEET Face from the same Die Set using some Ultra Bond Adhesive and then added some Gel Pen Highlights and some Copic Pen Eyelashes to add some personality to the Sun!! Then I Stamped the NND Sentiment using a Stazon Ink so it wouldn’t smear when Stamping over the Foil!!
I adhered to a few of the same Sequins and Rhinestones that were added to the Shaker to the Card Panel again using some Ultra Bond Adhesive!! So SWEET right!!?? Now let’s create another Card using the Negative Foil!!
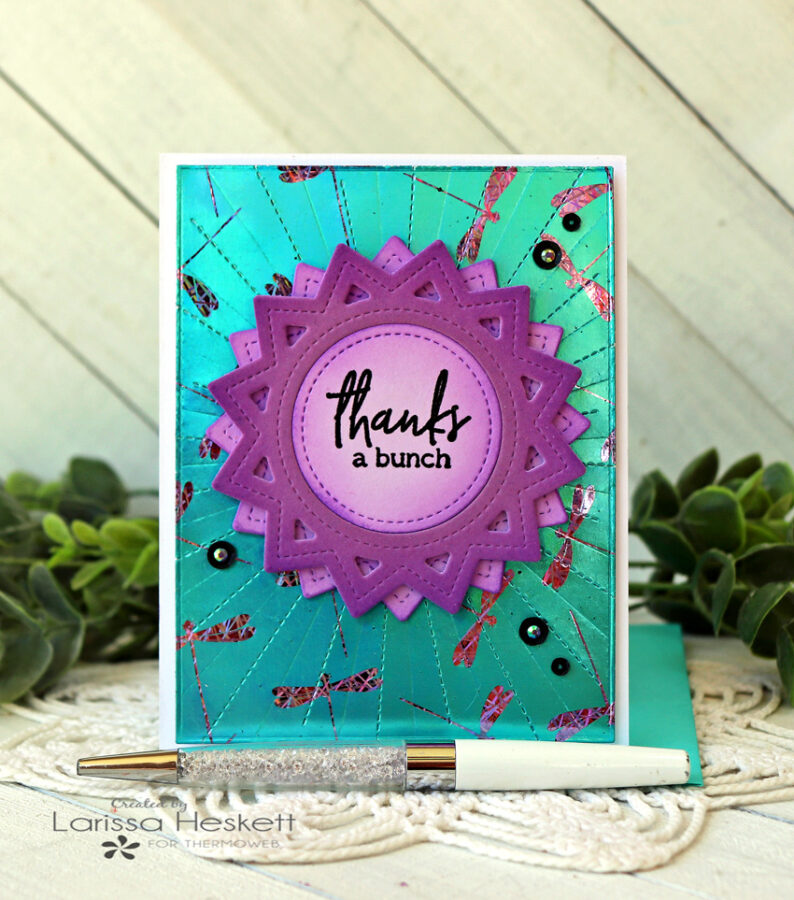 Thanks a Bunch Dragonfly Negative Card
For my 4th Card, I’m using the Negative Foil to create my Card Panel!!
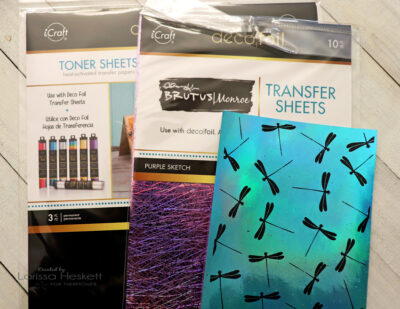
I Cut a Piece of the Deco Foil Toner Sheet larger enough to fit the Negative Deco Foil Sheet!! Then I ran it through my Laminating Machine to create my Foiled Sheet!!

Next, I cut a piece of the Brutus Monroe Purple Sketch Foil Foil large enough to cover the Foiled Toner Panel and ran it through my Laminating Machine!! SWOON!! You’re left with a STUNNING Two-Toned piece, that’s just so BEAUTIFUL in real life!!

Then I created the SWEET Sun Images using some of the Deco Foil Flock Sheets in Purple Punch!! Adhering it to a Lavender piece of Cardstock using some Easy-Cut Adhesive Sheets!! Then I ran it through my Laminating Machine to burnish it to the Cardstock!! Then I Die Cut the Sun Images using the Lawn Fawn Stitched Sun Frame Die!! To help make the Flock POP I added some Wilted Violet Distress Oxide Ink to the edges of the Die Cut Sun Images!!

This time again instead of creating a Shaker I just Stamped and Embossed a TE Sentiment!! There are so many possibilities with this design!!
I adhered to a few of the same Sequins and Rhinestones that were added to the Shaker to the Card Panel again using some Ultra Bond Adhesive!! So SWEET right!!?? Now let’s create another Card using just the Toner Sheets!!
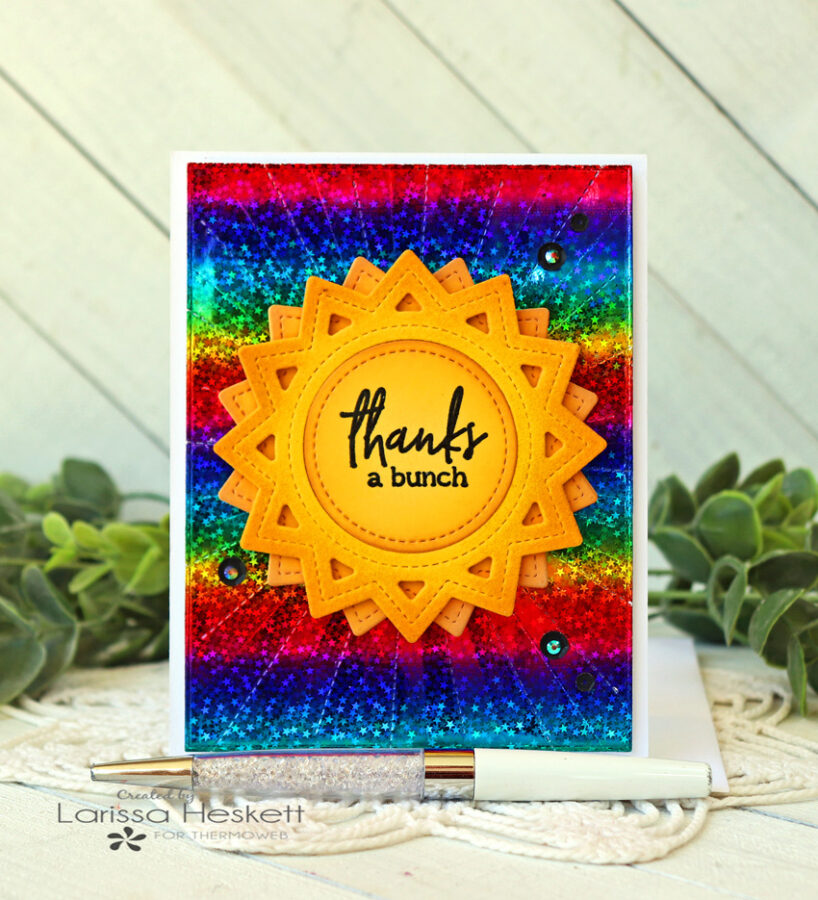
Rainglow Foil Flock Sunshine Card
I’ve created this 5th Card using the Deco Foil Toner Sheets and I LOVE the possibilities with being able to mix and match different color combinations!! Seriously, you could choose ANY of the 40+ Colors here!!

I chose to Cut a piece of Brutus Monroe Rainglow Foil large enough to cover the Foiled Toner Panel and ran it through my Laminating Machine!! SWOON!! I LOVE this Foil in real life!! Again I Die Cut the Foiled Panel using the Lawn Fawn Sunburst Backdrop Die!!
Then I created the SWEET Sun Images using some of the Deco Foil Flock Sheets in Sunshine Yellow!! Adhering it to a Yellow piece of Cardstock using some Easy-Cut Adhesive Sheets!! Then I ran it through my Laminating Machine to burnish it to the Cardstock!! Then I Die Cut the Sun Images using the Lawn Fawn Stitched Sun Frame Die!! To help make the Flock POP I added some Wild Honey & Vintage Photo Distress Oxide Ink to the edges of the Die Cut Sun Images!!

This time again, instead of creating a Shaker I just Stamped and Embossed a TE Sentiment!! There are so many possibilities with this design!!
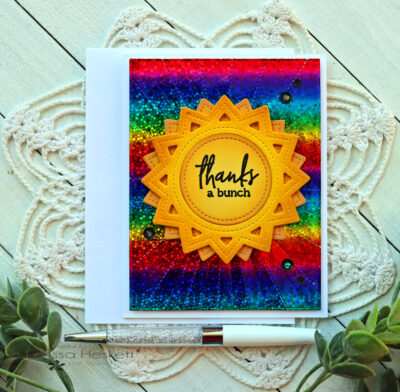
To finish off the card I adhered a few Sequins and Rhinestones that were added using some Ultra Bond Adhesive!! So BEAUTIFUL right!!?? I really LOVE how FUN it is to create with just the regular Deco Foil Toner Sheets too!! So many possibilities!!
Products Used:
Therm O Web:
Deco Foil Slimline Toner Card Fronts in ~ Time To Fly
Deco Foil Toner Card Fronts in ~ Time To Fly
Deco Foil in Glass Slipper
Gina K Designs Fancy Foils in Dazzling Orange
Brutus Monroe Foil in Purple Sketch & Rainglow
Deco Foil Flock Sheets in Sunshine Yellow and Purple Punch
Deco Foil Toner Sheets
Ultra Bond Adhesive
Other:
Lawn Fawn Sunburst Backdrop Die
Lawn Fawn Stitched Sun Frame Die
Lawn Fawn Outside In Stitched Sun Die
TE Full of Flowers – Singles Stamp Set
Newton’s Nook Designs Floral Roundabout Stamp Set
WoW Clear Gloss Embossing Powder
Stazon Ink
Sequins and Rhinestones
Distress Oxide Inks
So there you have 5 Sunny Cards that show you how to use BOTH the Positive & Negative Pieces of the NEW Deco Foil Toner Card Front Cards in Time to Fly!! I hope I’ve INSPIRED you to play with the NEW Deco Foil Toner Card Fronts and create some SUNNY Design of your own!!??
THANKS SO MUCH for stopping by today and for your comments, they mean more than you know and I read every one of them!! Hope you have a FABULOUS WEEKEND!!
Larissa Heskett

Debbie P
April 29, 2021 at 6:29 am (3 years ago)Great cards. Thank you for the tips .