


You & Me Scrapbook Layout
by Jessica Michaels
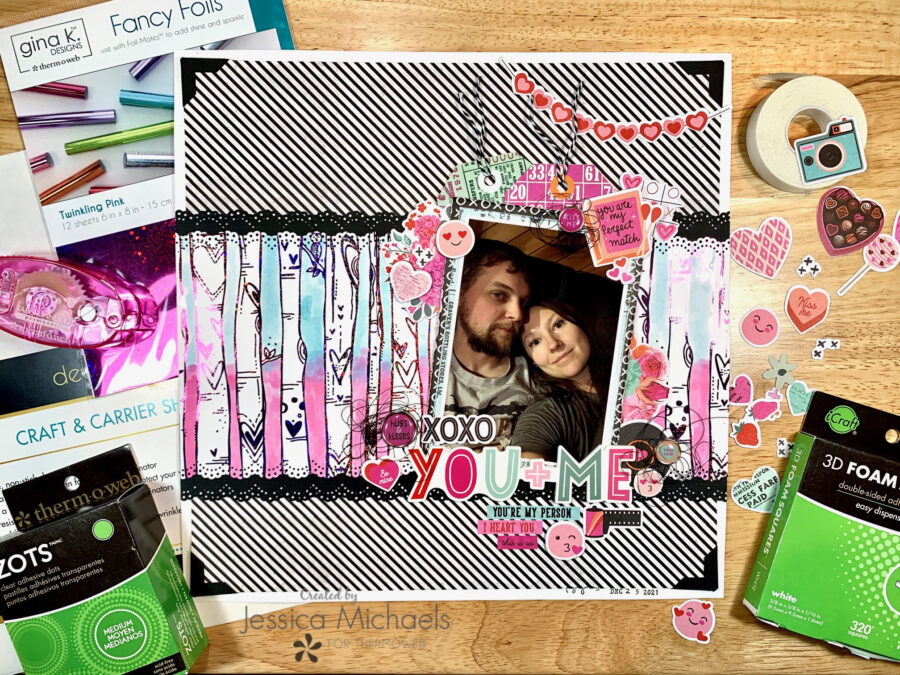
Hello everyone! I’m utilizing some older stash and chose the Heart Trees Toner Card Fronts for this layout of my and my hubby on Christmas day 2021. I’ve been eyeing these toner card fronts and waiting for the perfect scrapbook layout to use them on and today is the day!
Therm O Web Supplies Used
Memory Runner XL
Memory Runner XL Refill
Easy Tear Tape 1/4″
Gina K Fancy Foils, Twinkling Pink
Zots, Medium Box
3D Foam Squares Box, White
Craft & Carrier Sheets
Deco Foil for Unity Toner Card Fronts – Heart Trees
Other Supplies Used
Simple Stories Heart Eyes collection
OLFA 12×17 Folding Cutting Mat
OLFA AK-4 Cushion Grip Art Knife
Distress Oxides in Black Soot, Picked Raspberry, ink in Salvaged Patina
Laminator
I started this layout by pulling out a sheet of white cardstock and cutting the middle out of it to just use it as a border on my page. I used my OLFA folding cutting mat and craft knife tool to cut the middle portion out of my paper so I didn’t waste all of it and then I will have a scrap piece to matte my photo with.
I then pulled out a sheet of patterned paper from the Simple Stories Heart Eyes collection and cut it down to 11.5×11.5 inches and added some photo corners to the edge, adhering with my tape runner. I then attached the patterned paper to my border piece with easy tear tape.
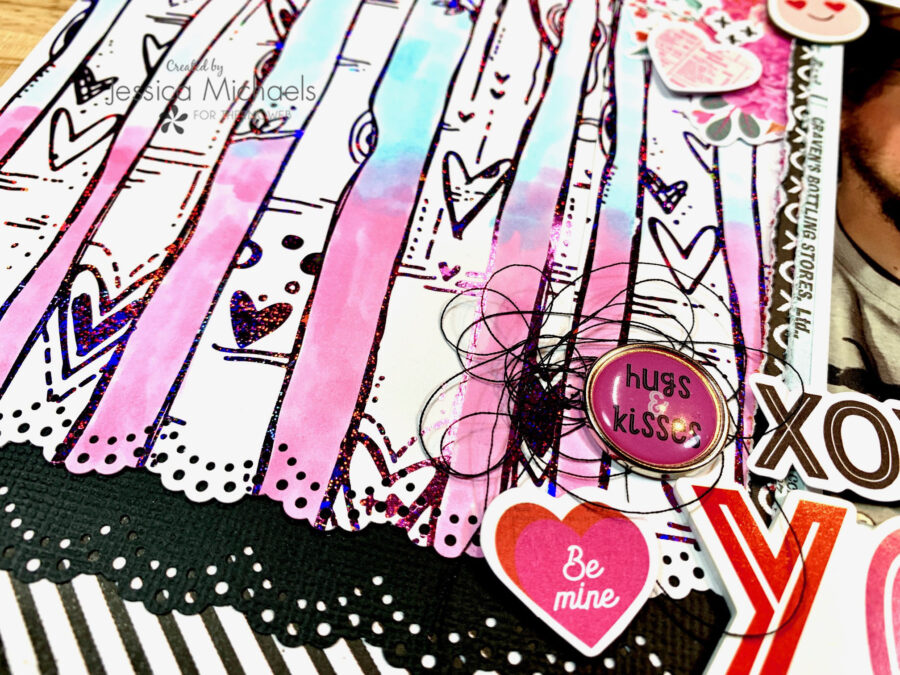
Next, I went to work on my toner card fronts. I pulled out three of them so they would lay across my page and watercolored between the trees with a couple distress inks and oxides to make it look like a sunset. I turned my laminator on so it could heat up while I was doing this step.
When my toner fronts were dry, I sandwiched them between a craft and carrier sheet with Gina K Fancy Foils in Twinkling Pink to give my trees some sparkle! Once those came out of my hot laminator, I used a border punch on the top and bottom of them and also a couple strips of black to place behind them with easy tear tape. I adhered the toner card fronts to my page using my Memory XL Tape Runner.

Then I went to work on embellishing. I pulled out some of the die cuts and tags from the collection and added those behind and around my photo, which I’ve matted with some of the patterned papers from the small paper pad in the collection. I popped a couple things up using some of the 3D Foam Squares.

I finished it off by adding my title and some thread behind the adhesive brads. This was a pretty quick and easy layout!
I have a process video on the Thermoweb YouTube channel if you’d like to watch exactly how this came together:
Thank you for being here today and I hope I was able to inspire you to create!
Jessica