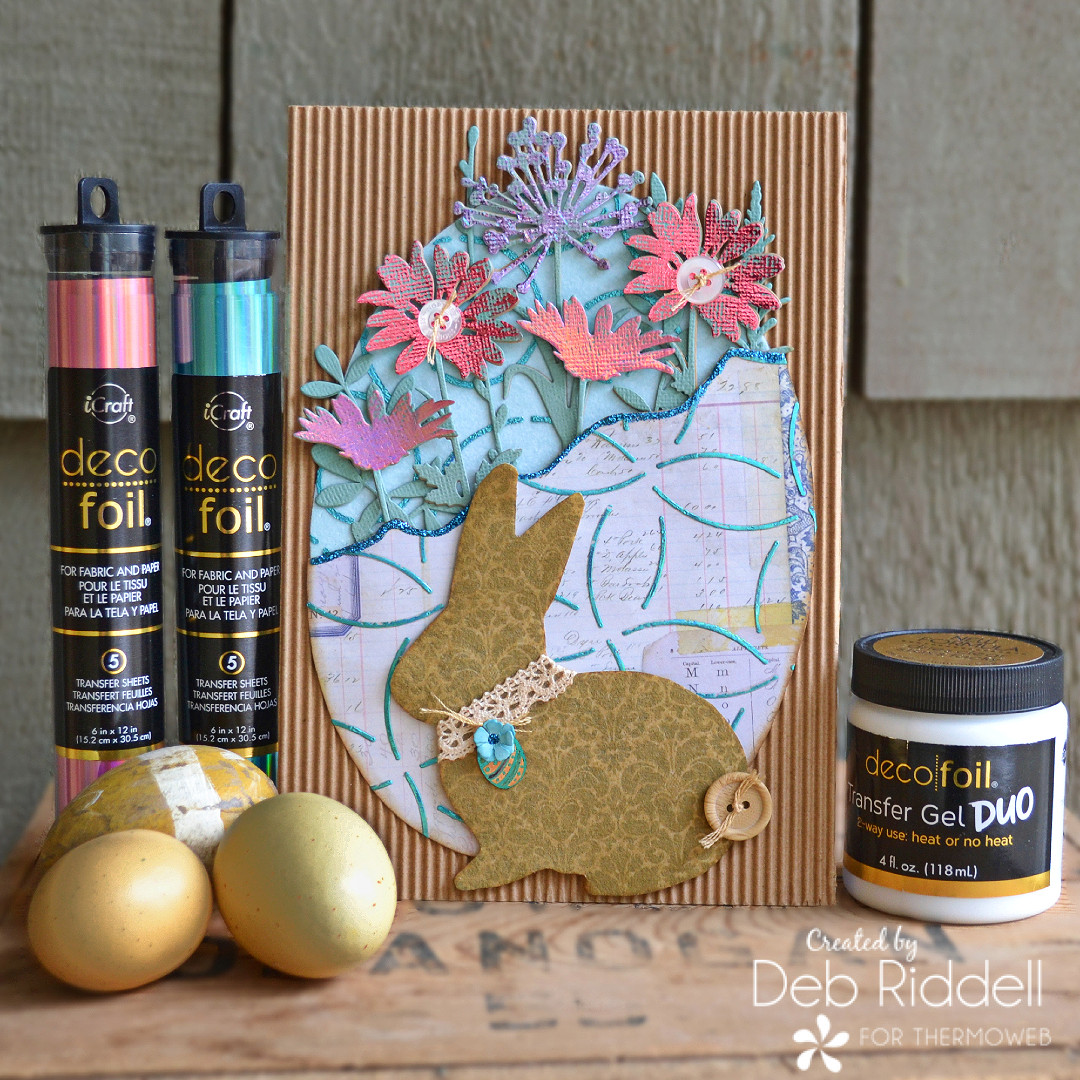
 Hello everyone and welcome to Easter Week on Therm O Web’s blog! It’s Deb here with you today and I have an Easter home decor piece to share created with Therm O Web’s Deco Foil Duo Gel and their Foil and Flock Transfer Sheets.
Easter Blooms Mixed Media Project with Deco Foil

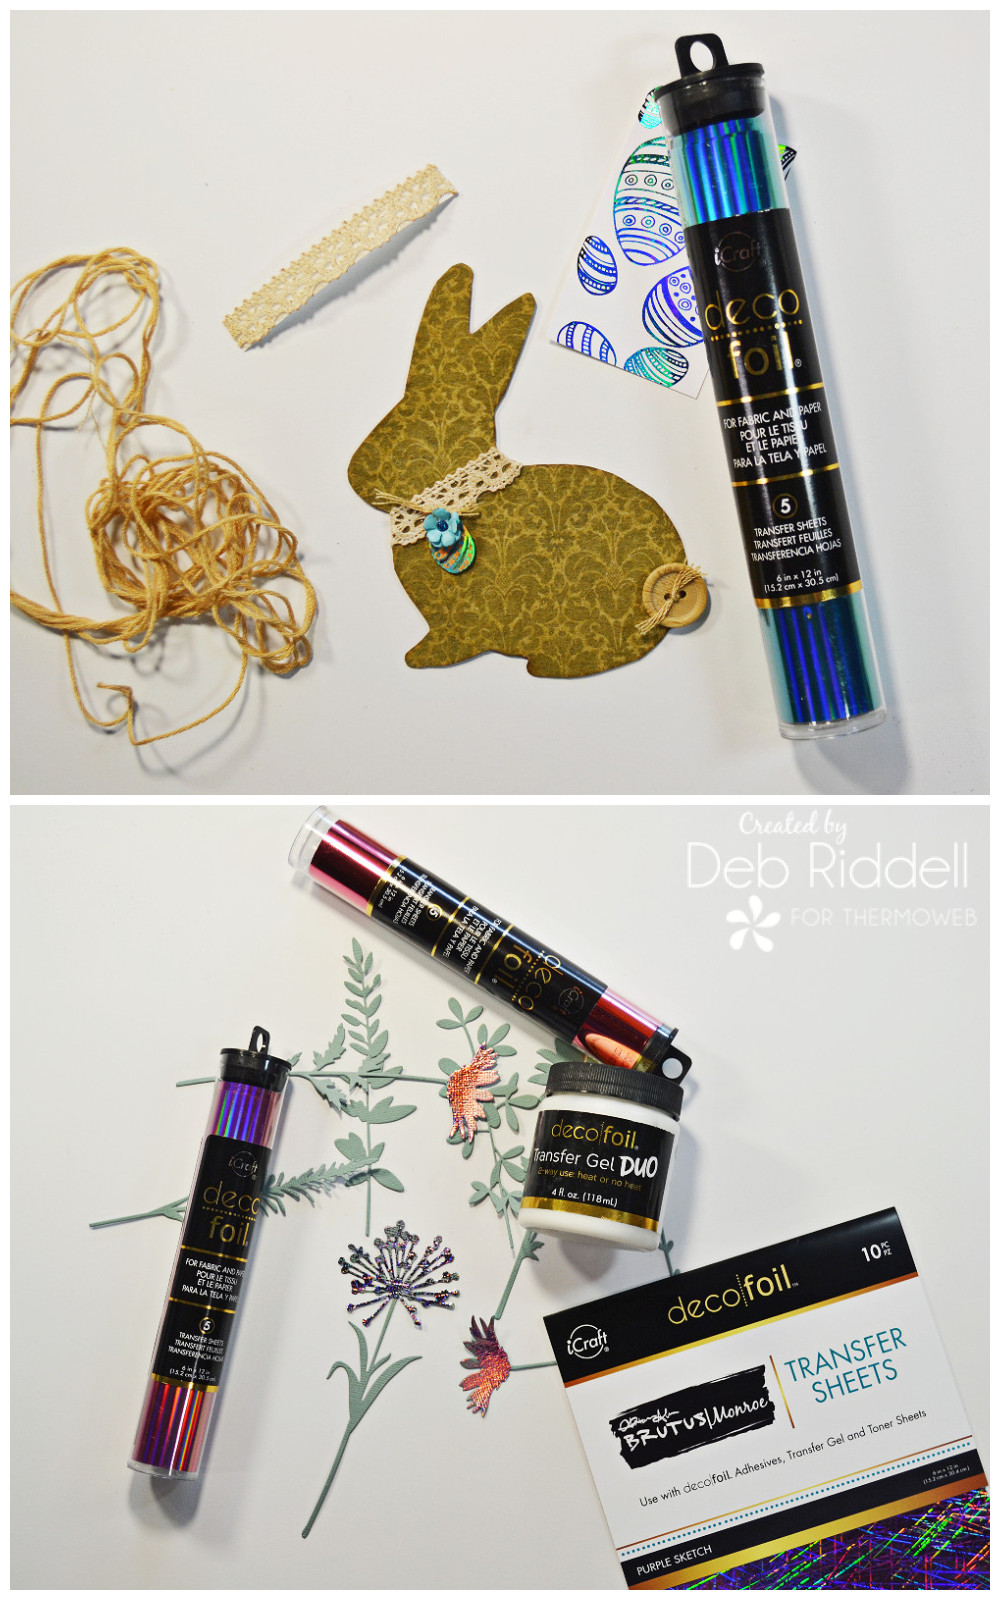
Therm O Web supplies used:
Deco Foil Transfer Gel Duo, 4 fl oz
Deco Foil Transfer Sheets – Glass Slipper
Deco Foil Transfer Sheets – Enchanted Rose
Deco Foil Transfer Sheets, Pink Melon
Brutus Monroe Foil Transfer Sheets, Purple Sketch
Deco Foil Flock Transfer Sheets, Tuscan Gold
Deco Foil Flock Transfer Sheets, Blue Sky
Deco Foil Toner Card Fronts – Basket of Fun
Deco Foil Stencil, Abstract Circles
Deco Foil Stencil, Swirls
Deco Foil Stencil Pal, 2 PK
iCraft Easy-Cut Adhesive Sheets 5.75 in x 5.75 in, 5 pack
iCraft Ultra Bond Permanent Dries Clear Adhesive, 2 fl oz
Gina K. Designs Double-sided Adhesive Foam Squares, White
Other supplies used:
Easter Blooms Bunny and Egg Templates – CLICK HERE to download the free templates
Cardstock – white, blue, green, and corrugated kraft
Scrapbook papers – brown patterned print for bunny and neutral script or ledger print for the bottom portion of Easter egg.
Flower dies – Sizzix Wildflower Stems 1 and 2 and Tiny Tattered Florals or equivalent
Buttons and floss
Blue glitter glue
Lace
Felt pens or markers
Die-cutting machine
Heat laminator
Scissors
Easter Blooms Instructions
![]() Download the bunny and Easter egg templates (see link under ‘Other supplies’ above) and print them out onto cardstock. Trace the entire Easter egg onto white cardstock and cut it out. Apply iCraft Easy-Cut Adhesive to the egg (you only need to cover the top half of the egg), remove the backing paper and apply a piece of Blue Sky Flock (fuzzy side down!) on top of the adhesive. Run the egg and flock through your die-cutting machine or laminator on the COLD setting to make sure it adheres well and remove the backing paper from the flock. With your Stencil Pal, apply Deco Foil Duo Transfer Gel to the flocked area through the Swirls stencil. Let dry till the Duo transfer gel is clear.
Download the bunny and Easter egg templates (see link under ‘Other supplies’ above) and print them out onto cardstock. Trace the entire Easter egg onto white cardstock and cut it out. Apply iCraft Easy-Cut Adhesive to the egg (you only need to cover the top half of the egg), remove the backing paper and apply a piece of Blue Sky Flock (fuzzy side down!) on top of the adhesive. Run the egg and flock through your die-cutting machine or laminator on the COLD setting to make sure it adheres well and remove the backing paper from the flock. With your Stencil Pal, apply Deco Foil Duo Transfer Gel to the flocked area through the Swirls stencil. Let dry till the Duo transfer gel is clear.
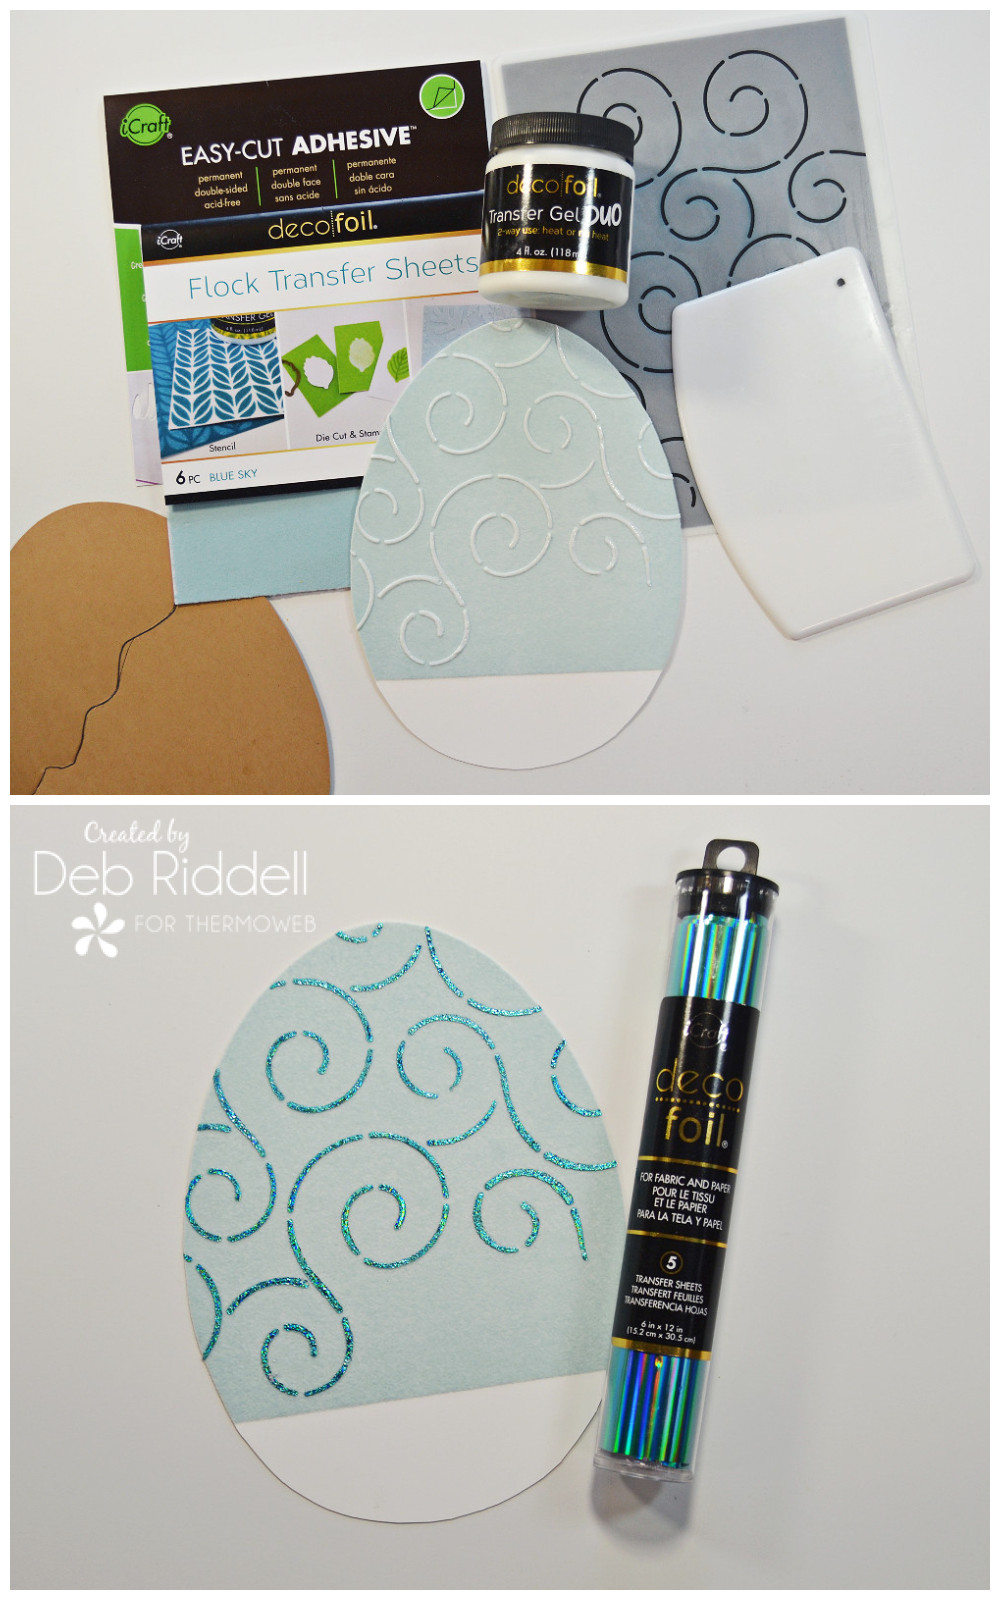
Once the Duo gel has dried, apply a piece of Glass Slipper Transfer Foil over top and run it through your laminator to ensure it adheres well. You don’t need to apply heat to transfer the foil when using the Duo Gel. Before removing the foil backing paper, rub the stenciled areas with a soft cloth just to make sure the foil has adhered to all of the nooks and crannies. Remove the foil backing and set the egg aside for now.
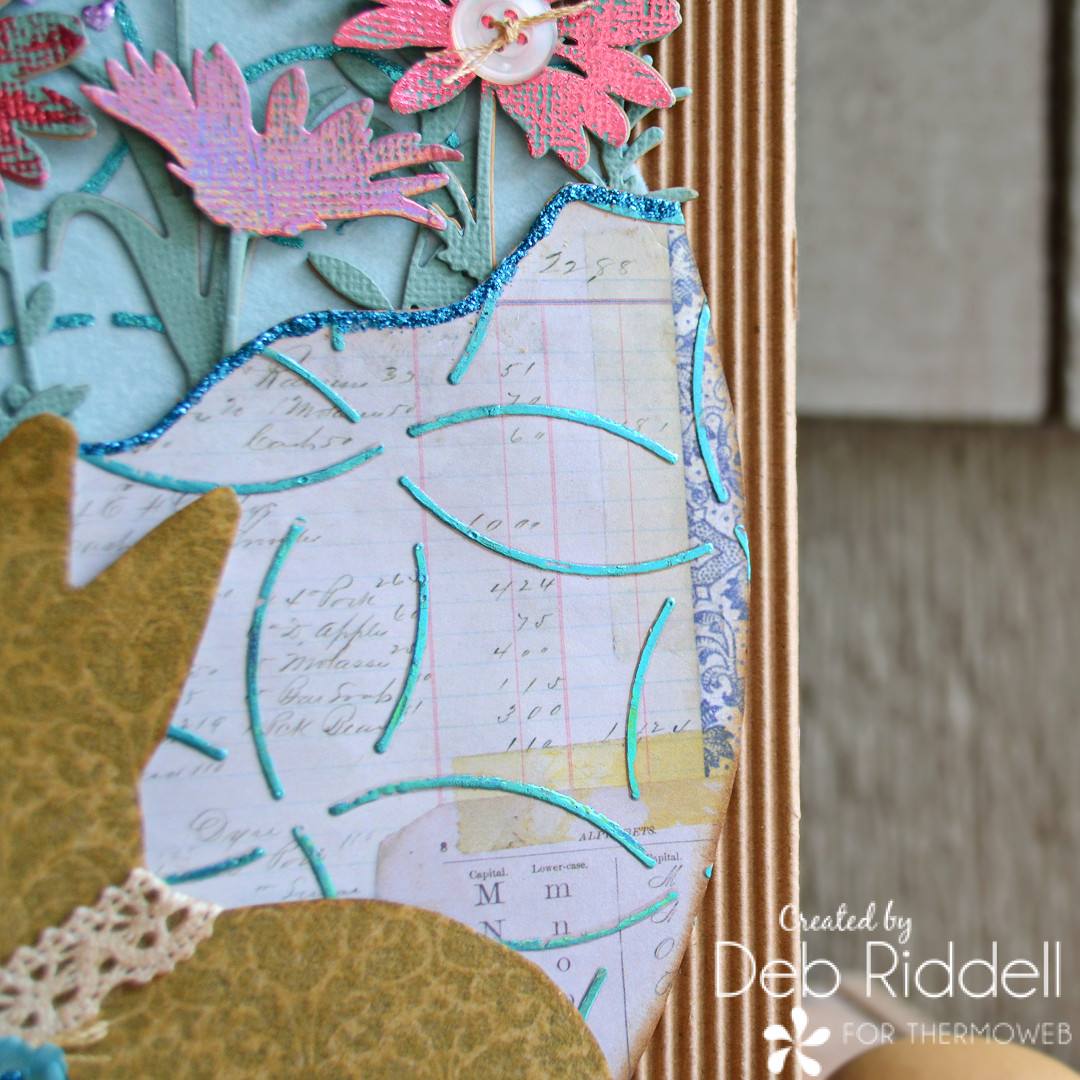
Cut the egg template apart following the line on the template and trace the bottom part of the broken shell onto a piece of neutral coloured script or ledger scrapbook paper and cut it out. With your Stencil Pal, apply Duo Transfer Gel through the Abstract Circles stencil to the shell piece and let dry till clear. Once the Duo has dried apply Glass Slipper Foil to the stenciled areas as you did on the flocked portion of the egg. Set the bottom half of the shell aside for the now.
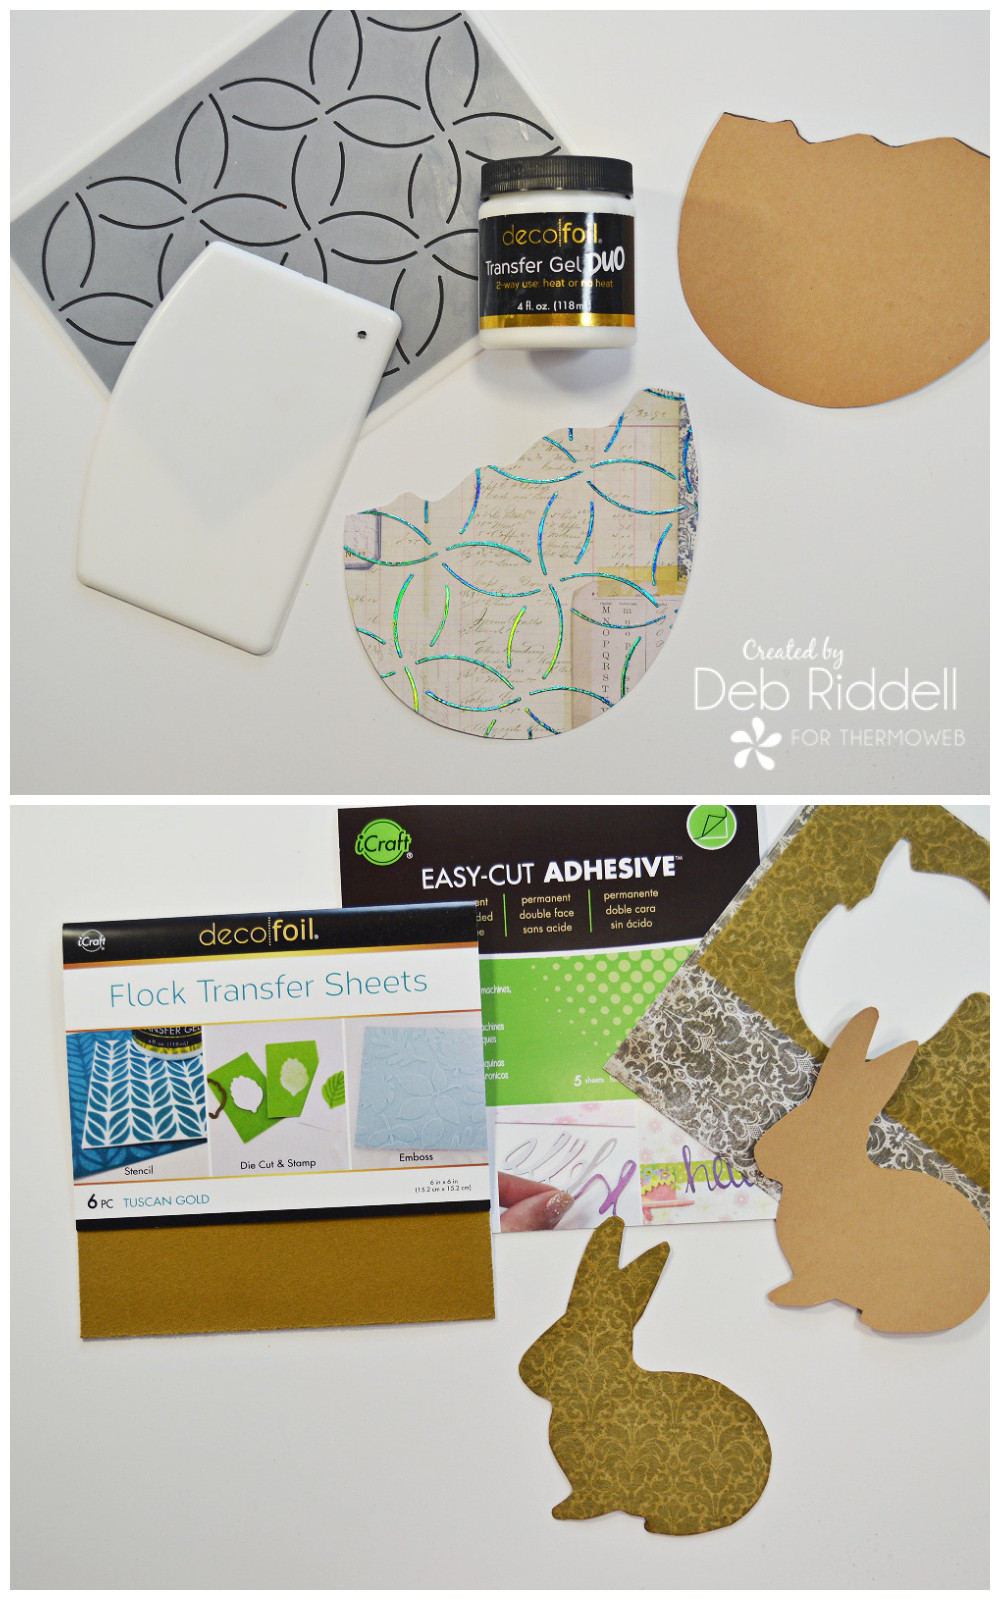
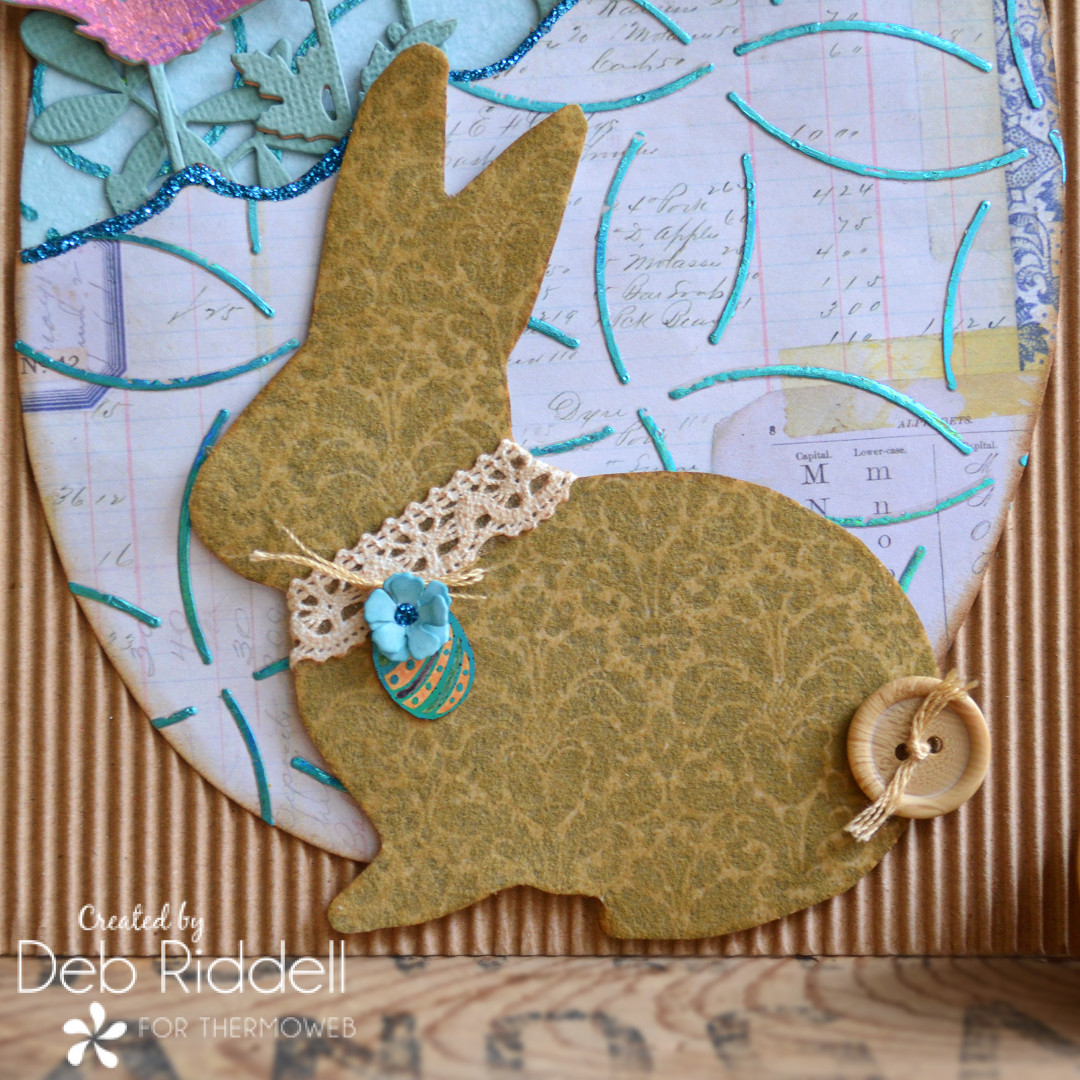
Cut out the bunny template. Apply a piece of iCraft Easy-Cut Adhesive to the brown patterned scrapbook paper, remove the backing and apply a piece of Tuscan Gold Flock to the adhesive. Run it through your die-cutting machine or laminator and remove the backing paper from the flock. Trace the bunny onto the BACK of the flocked scrapbook paper so you can see it easier and cut it out.
Cut a piece of the Basket Of Fun Easter egg Toner sheet and foil it with more Glass Slipper Deco Foil in your preheated laminator. Cut out one of the foiled Easter eggs and colour it with your markers or pens if you like. Die-cut a tiny flower from blue cardstock. Apply a piece of lace around the bunnies neck for a collar, punch a hole in the foiled Easter egg and tie it onto the collar with a piece of floss. Adhere the die-cut flower over the punched hole on the Easter egg with iCraft Ultra Bond adhesive and add a dot of blue glitter glue in the center of the flower. Tie some floss onto a button for the bunnies tail and adhere the button with iCraft Ultra Bond adhesive (or you could sew it on if you prefer).
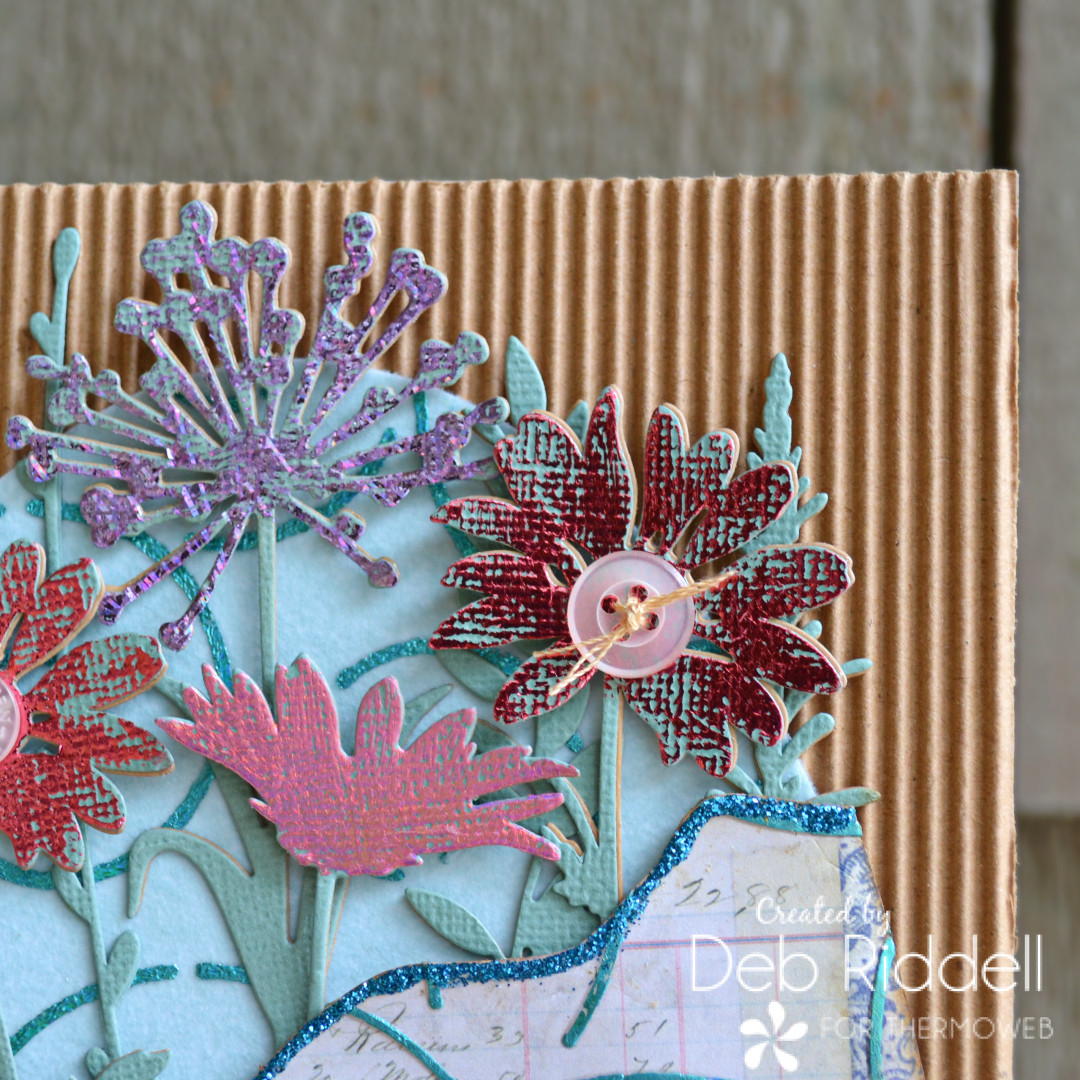
Next, die-cut several flowers and some greenery from the green cardstock. With your fingertip, apply a thin coat of Duo Transfer Gel to the flower heads of the die cuts. Wait till the Duo dries (it is a very thin coat so doesn’t take too long) and then apply pieces of Deco Foil Transfer Foil on top of the Duo gel in several colours (I used Enchanted Rose, Pink Melon, and Brutus Monroe Purple Sketch). Burnish very well with a soft cloth to transfer the foil. The foil transfer is not perfect with this method, you can still see the green cardstock here and there on the flower heads, but I love the distressed look of the foiled flowers. If you prefer more foil coverage you could apply a thicker coat of the Duo Gel or use your Deco Foil Adhesive Pen.
Time to assemble! Adhere the die-cut greenery to the flocked egg with iCraft Ultra Bond adhesive.
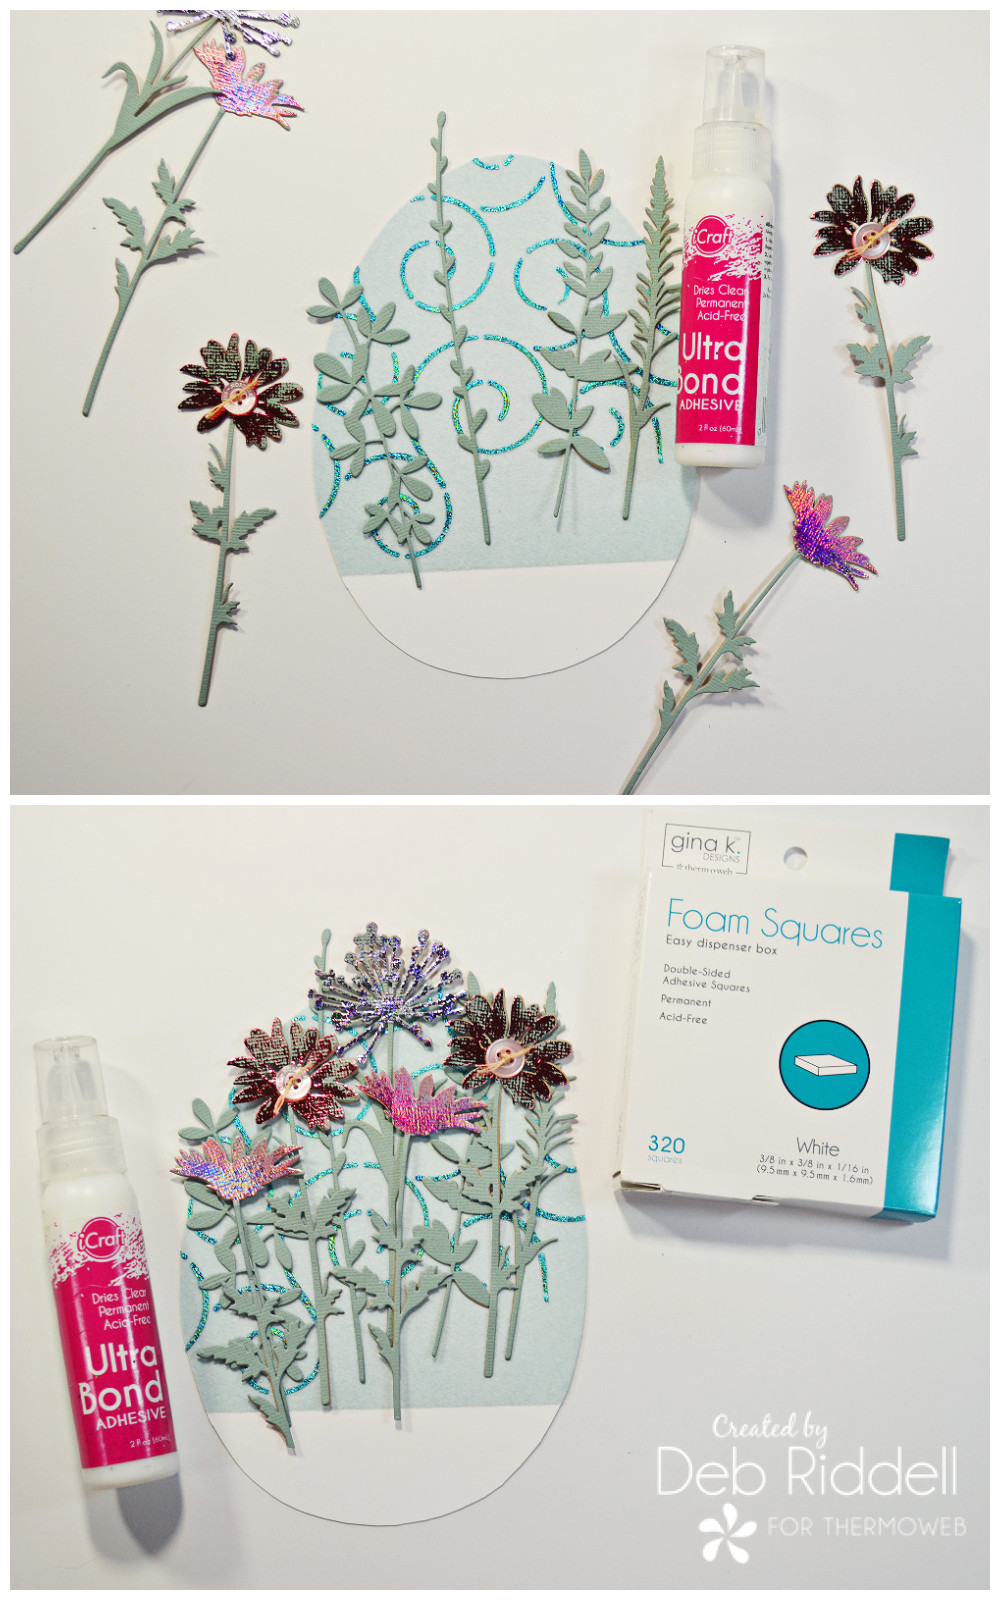
Layer the foiled die-cut flowers over top, popping the flower heads up on Gina K. Designs White Foam Squares for a bit of dimension. As you can see, I decided to add a couple of floss-tied buttons on some of the flowers to echo the bunny’s button tail.
Adhere the bottom half of the shell over the top of the flocked egg with iCraft Ultra Bond adhesive.
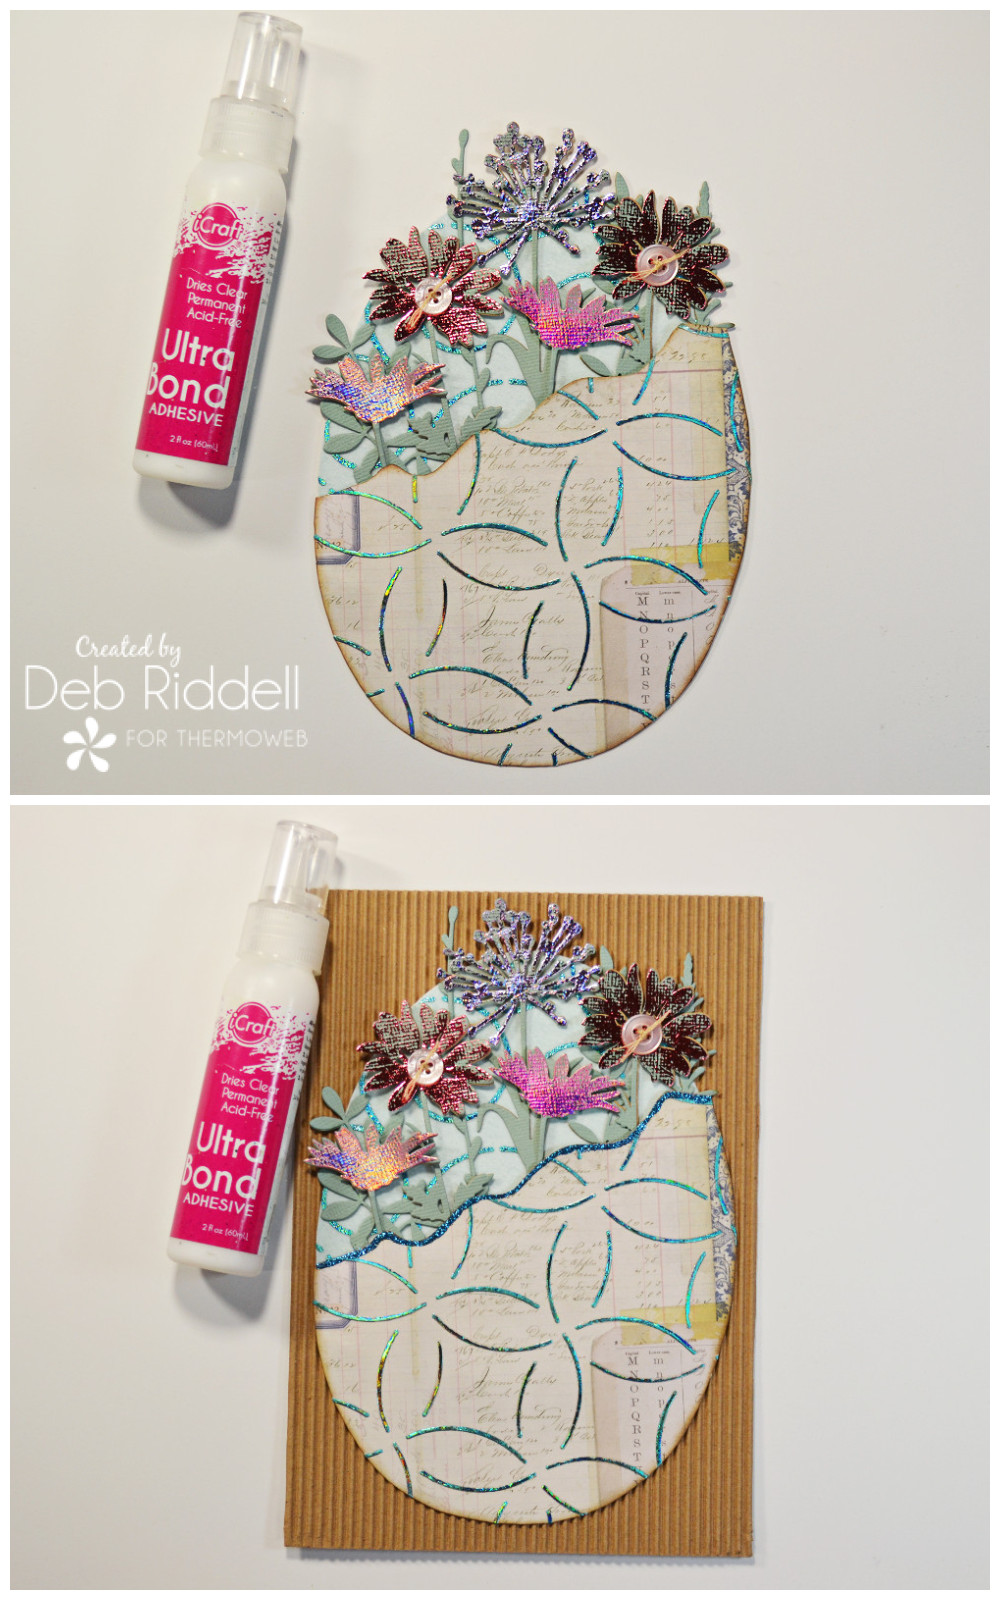
Cut a piece of corrugated kraft cardstock slightly larger than your Easter egg and adhere the egg to the corrugated cardstock with iCraft Ultra Bond adhesive. Apply a line of blue glitter glue along the broken edge of the shell.
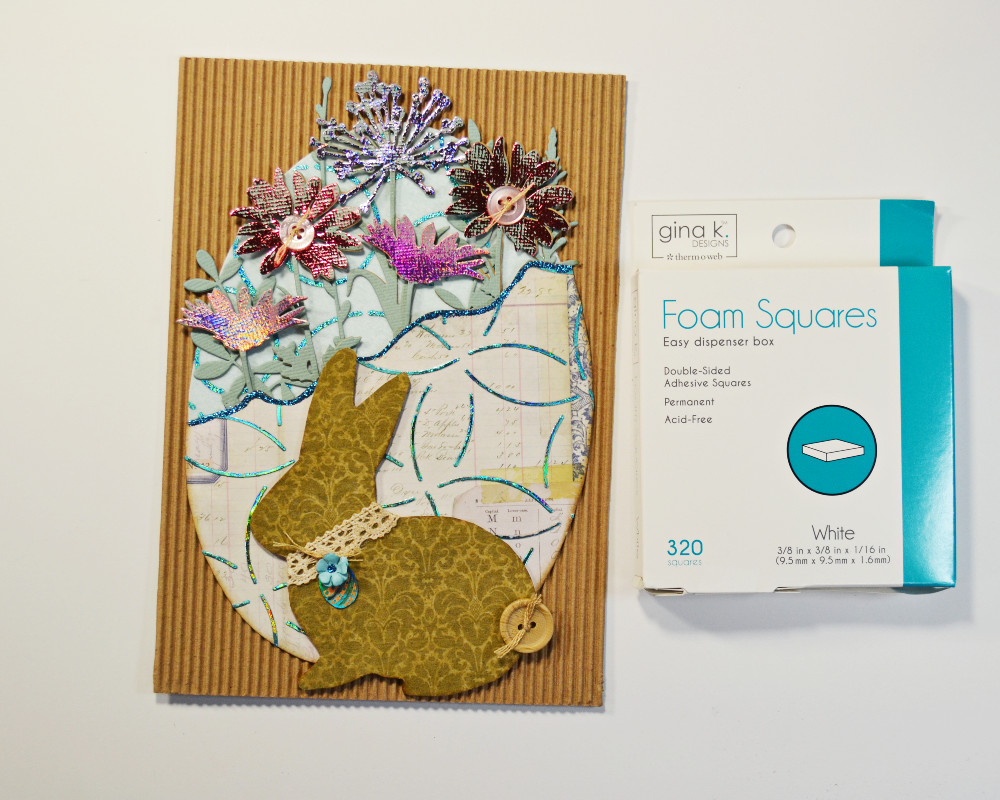
Adhere the bunny at the bottom of the Easter egg, popping it up with Gina K. Designs White Foam Squares for some dimension, add a hanger or an easel stand to the back for display, and your Easter Blooms decoration is done!
Here are a few closeups of the finished piece.
Hope that you’ve enjoyed seeing how it came together and that you have been inspired to create one of your own with Therm O Web’s Deco Foil Duo Transfer Gel, Foil and Flock Transfer Sheets. Thanks as always for stopping by today and wishing you and yours a very happy Easter!
Deb xo
 Deco Foil
Deco Foil has quickly become one of our most popular products and it’s easy to see why! With a Rainbow of colors available at your fingertips and a wide variety of products to use to apply the Deco Foil…it’s easy to say once you dip your toe in…there’s no going back! Our Deco Foil is perfect for cardmaking, papercrafting, mixed media and of course for scrapbooking. And now you’ll find more ways to include it with our NEW Deco Foil Toner Sheets available in A2 and Slimline Sizes! So miss entering to win our FairyTale Foil Collection, Deco Foil DUO Transfer Gel, Deco Foil Foam Sheets, Deco Foil Toner Sheets plus your choice of two of our A2 or Slimline Size Toner Sheets, This prize is worth $60!