 Hello everyone and welcome to Christmas card week on Therm O Web’s blog! It’s Deb here to kick things off and I have some quick and easy Christmas cards to share with you created with Therm O Web’s Deco Foil Transfer Foils, Toner Card Fronts and Toner Sheets.
Christmas Cards with Deco Foil
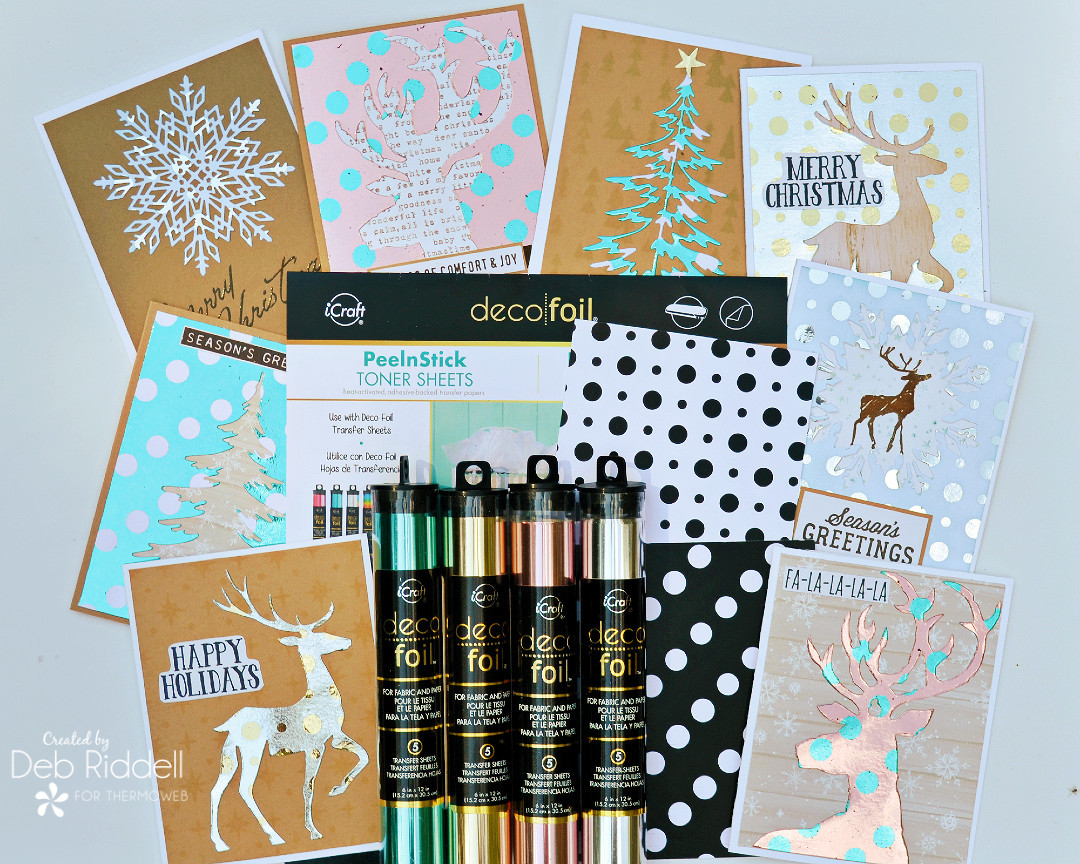

I’ll show you how to double the number of Christmas cards you can make with your foiled Deco Foil Card Fronts and Toner Sheets just by die-cutting them!
Therm O Web Products Used:
Deco Foil Transfer Sheets, Aqua
Deco Foil Transfer Sheets, Pink Quartz
Deco Foil Transfer Sheets, Champagne
Deco Foil Transfer Sheets, Silver
Deco Foil Toner Card Fronts – Reverse Polka
Deco Foil Toner Card Fronts – Lots of Dots
Deco Foil Toner Sheets, Peel and Stick
Deco Foil Toner Sheets
iCraft Ultra Bond Permanent Dries Clear Adhesive Pen, 1 fl oz
iCraft Memory Tape Runner XL (50ft)
iCraft Removable Purple Tape Roll, 1.5 in x 15 yds
Other supplies used:
Assorted Christmas themed dies – Sizzix Woodlands; Flurry #2; Prancing Deer; Dashing Deer
Assorted Christmas themed stamps – Stampers Anonymous Great Outdoors; Christmastime 2; Festive Overlay; Watercolor Trees; Modern Christmas; Holiday Drawings; Holiday Type; Scribble Woodland
Assorted Christmas themed stencils – Stampers Anonymous Starry Layering stencil; Simple Stories Happy Trails stencil
Assorted Christmas themed scrapbook paper – Carta Bella A Very Merry Christmas; Simple Stories Very Merry
White and kraft coloured cardstock
Black and brown permanent stamping inks
Green, blue and tan dye inks
Clear embossing powder
Miscellaneous – foil laminator; die cutting machine; heat gun; scissors; ruler; score board
Christmas Card Instructions
 Preheat your foil laminator and foil the Reverse Polka Toner Card Front with Aqua Deco Foil Transfer Foil and the Lots Of Dots Toner Card Front with Silver Deco Foil Transfer Foil. Peel off the transfer film from the foiled Toner Card Fronts and save them for the next step!
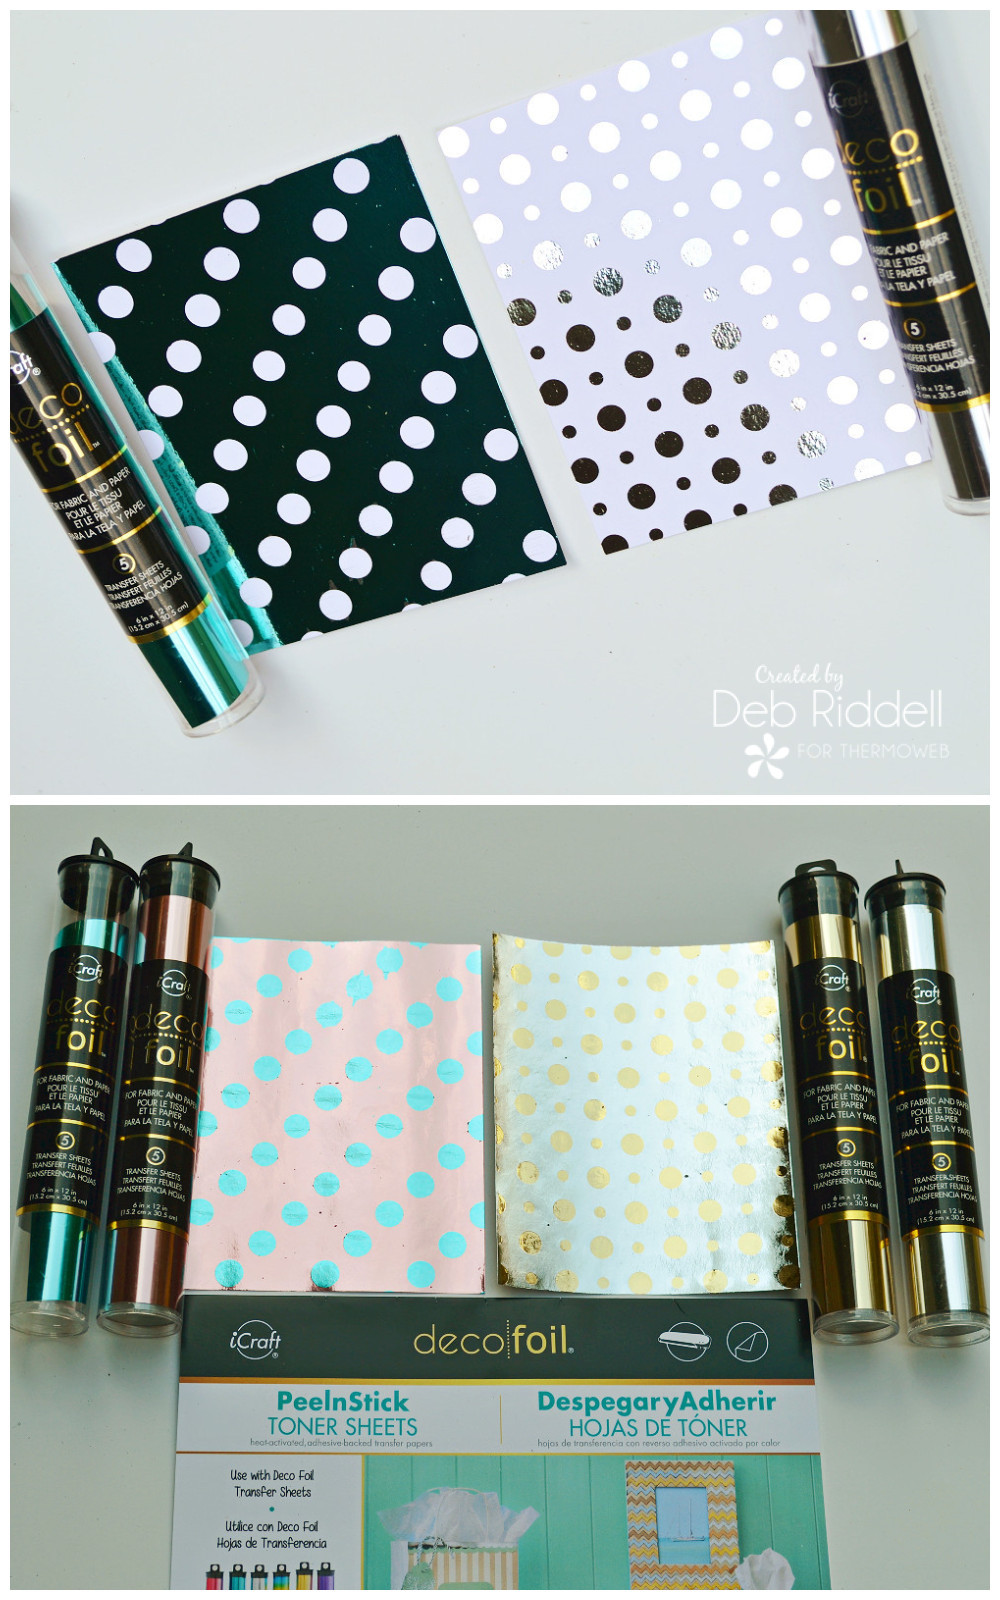
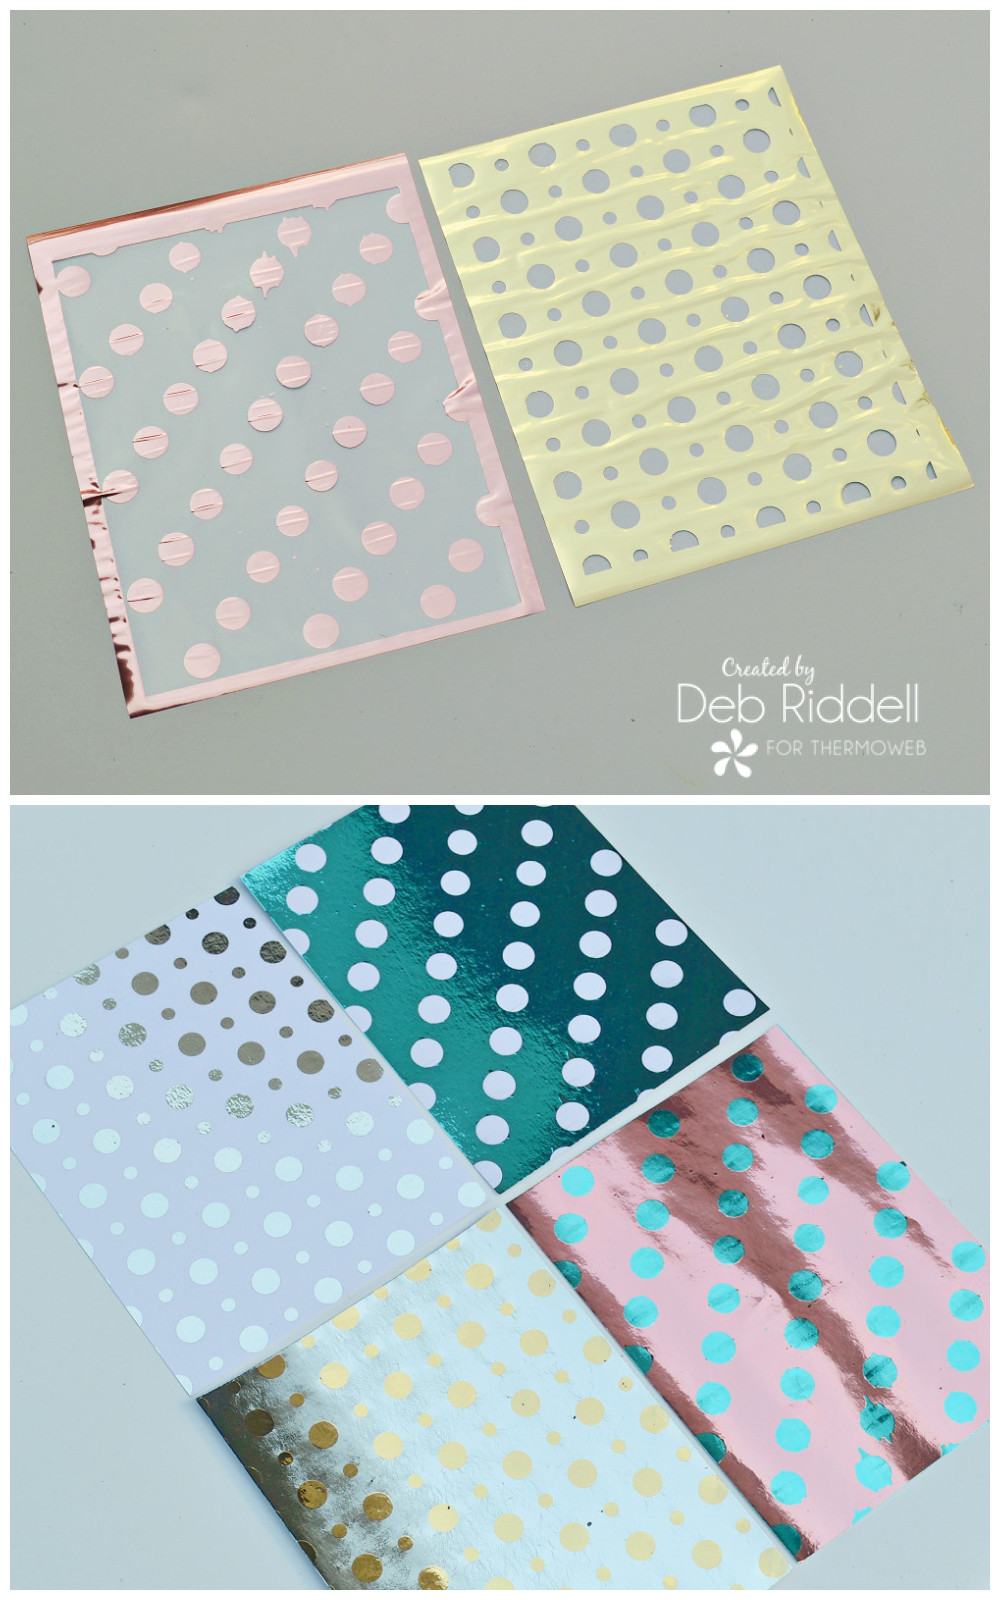
Cut two pieces of Deco Foil PeelnStick Toner Sheet to 4 1/4″ x 5 1/2″. Foil one piece with the foil leftover from the Reverse Polka card front (the Aqua foil), remove the transfer film and then foil that piece again with a piece of Pink Quartz Transfer Foil to cover the rest of the Toner Sheet (piece on the left in the picture above). Foil the second piece of PeelnStick Toner Sheet with the foil leftover from the Lots Of Dots card front (the Silver foil), remove the transfer film and then foil it again with a piece of Champagne Transfer Foil (piece on the right in the picture above).
As you can see, you are left once again with two more pieces of foil that you could use to make even more card fronts. Mix and match your foil colors (there are so many beautiful colors of Deco Foil Transfer Foil) to make as many foiled card fronts as you want!
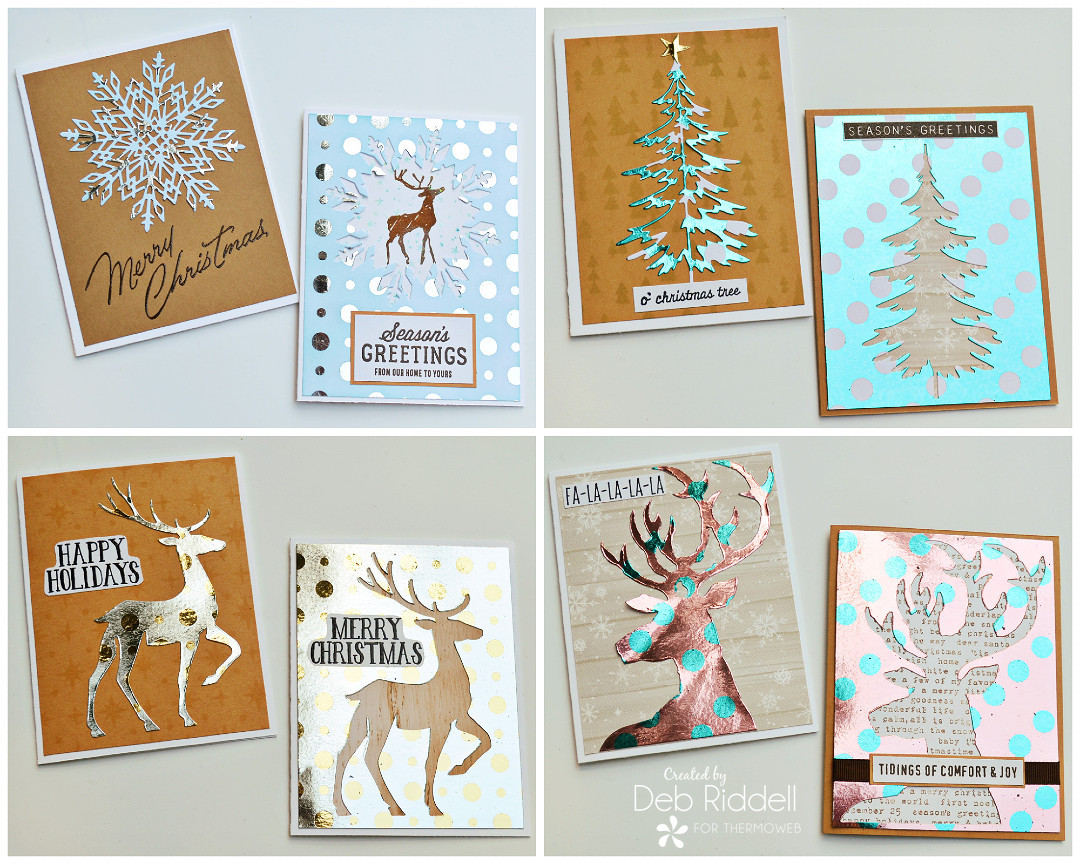
I decided to stop with the four card fronts I had already created (although I did keep those pieces of foil for a future project!). You could most certainly add a stamped sentiment to these card fronts to create four beautiful foiled Christmas cards but with a simple die-cut we can create eight cards, let me show you how.
Starting with the Silver foiled Lots of Dots Toner Card Front, ink it with pale blue dye ink (Tumbled Glass Distress Ink) and then die cut a snowflake (Flurry #2 die).
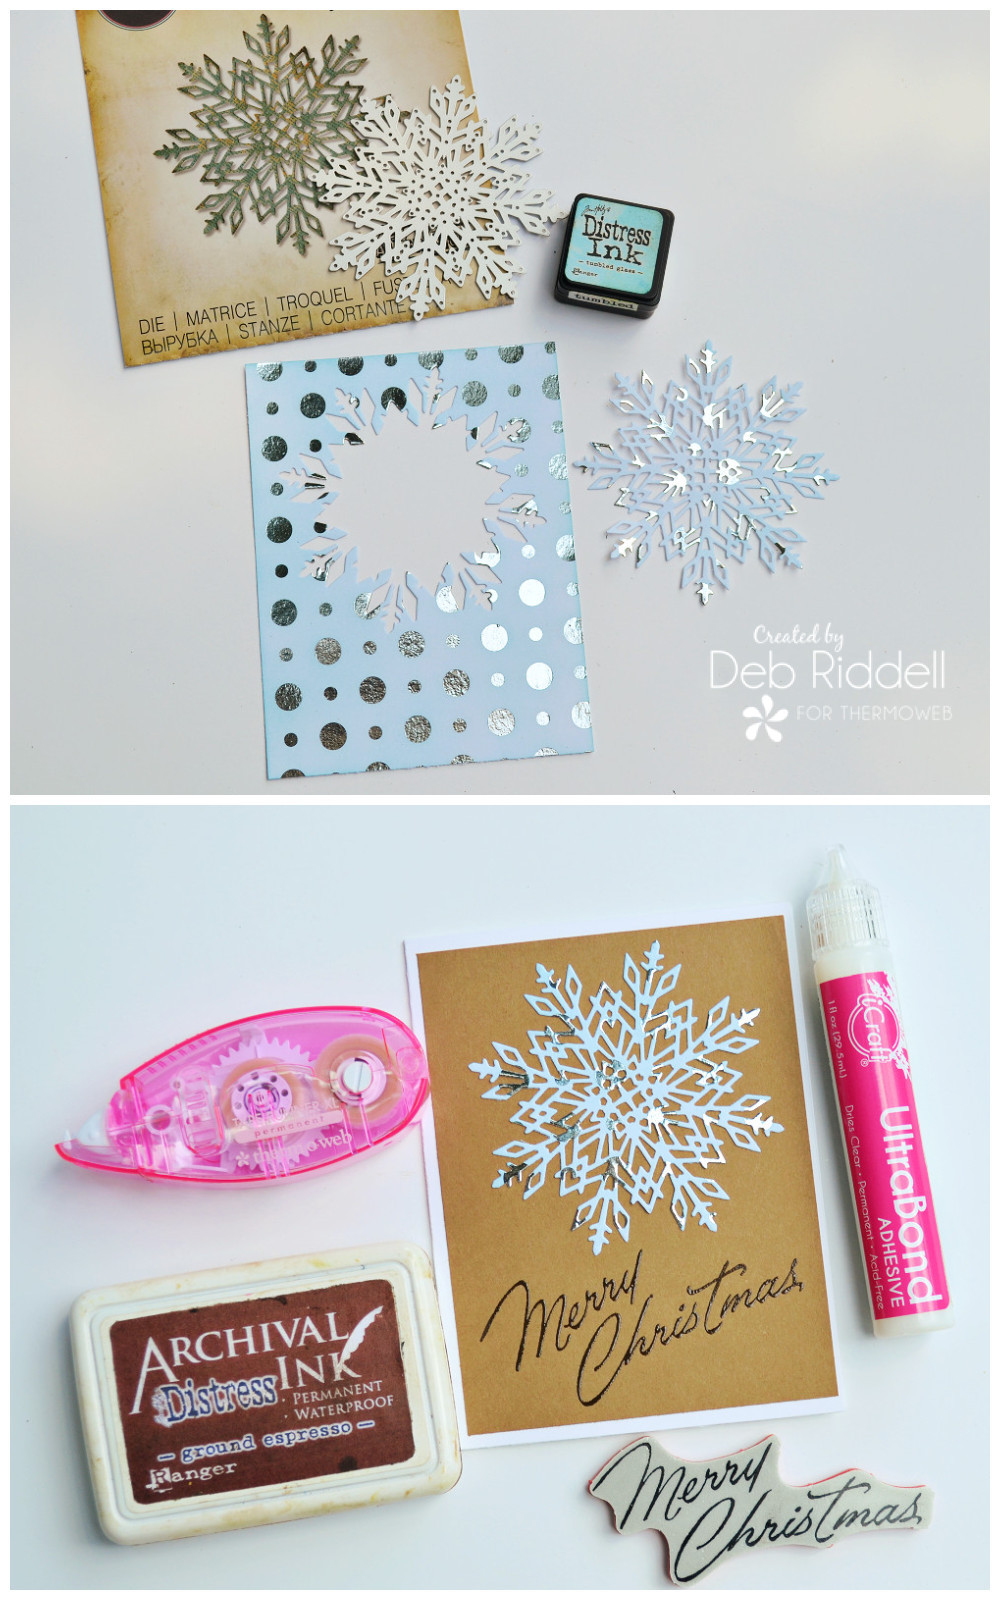
Cut a piece of kraft cardstock 4″ x 5 1/4″ and adhere the foiled die-cut snowflake to it with your iCraft UltraBond Adhesive Pen. Stamp a sentiment along the bottom (Great Outdoors stamp set), clear emboss it, and mount the card front to a white A2 card blank with your iCraft Memory XL tape runner. Card #1 done!
 For the second card, stamp a wintery scene onto an A2 white card blank so that it is centered behind the snowflake die cut on your Lots Of Dots Toner Card Front (Great Outdoors stamp set). Adhere the Toner Card Front to the card with your iCraft Memory XL tape runner. Stamp a sentiment onto a piece of white cardstock (Festive Overlay stamp set), mount it onto a piece of kraft cardstock, leaving a small border, and adhere it to the card with your iCraft UltraBond Adhesive pen. Card #2 is done!
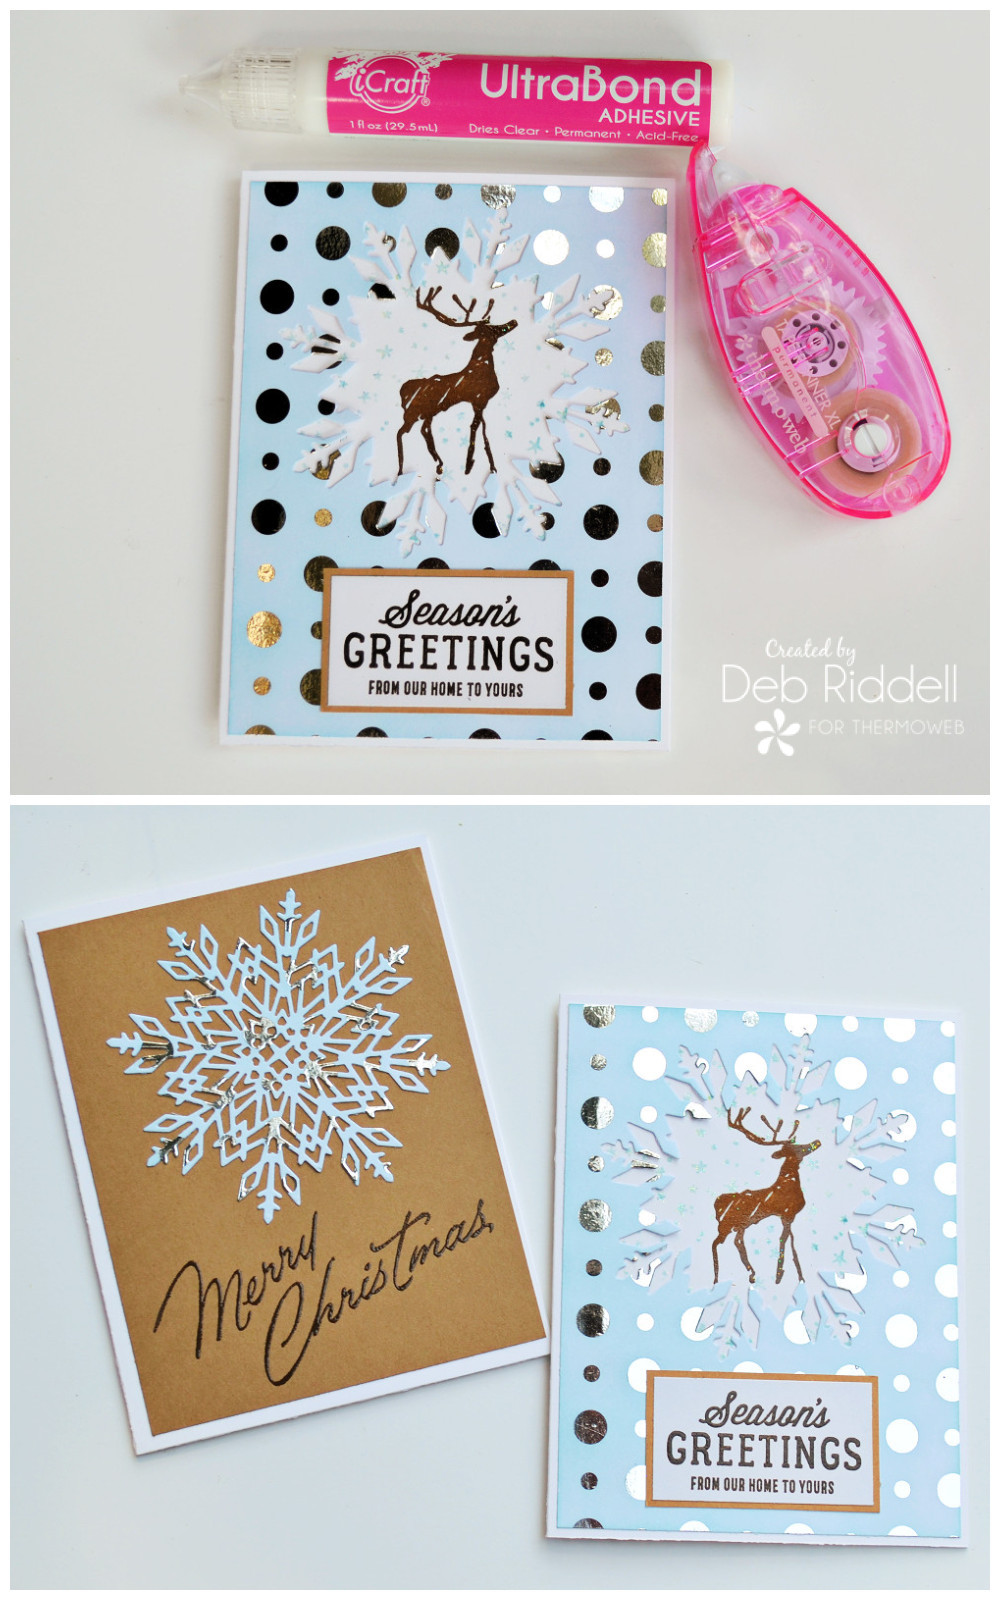
Two quick and easy Christmas cards from one die-cut Deco Foil Toner Sheet, what could be easier!
Continue with the remainder of your foiled card fronts, choosing different dies, stencils, and sentiments to create your cards. Here are a few ideas to get your creative juices flowing!
 Die-cut the foiled Reverse Polka card front with a tree die (Woodlands die). Mount the foiled tree die-cut onto a kraft card front faintly stenciled with a tree motif (Simple Stories Happy Trails stencil), add a star die cut from a remnant of Champagne foiled Toner Sheet and stamp and clear emboss a sentiment (Watercolor Trees stamp set). For card #2, back the negative tree die cut with a piece of scrapbook paper (Carta Bella A Very Merry Christmas), adhere it to a kraft A2 card blank with your iCraft Memory XL tape runner and stamp and clear emboss a sentiment (Modern Christmas stamp set).
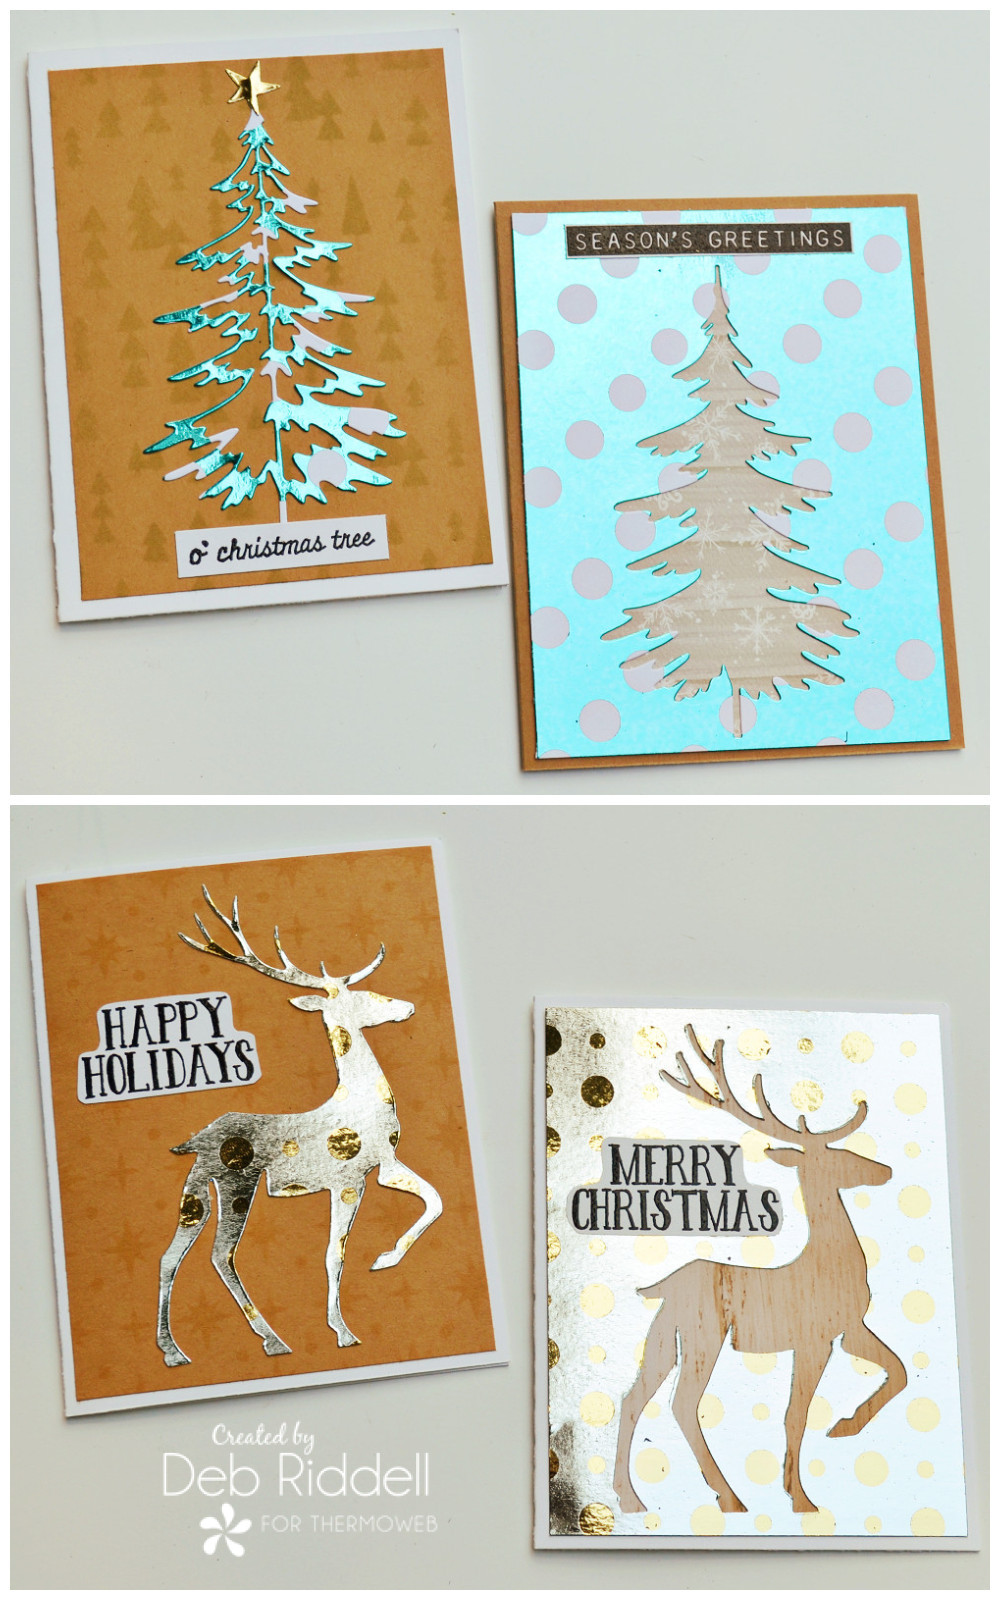
Die-cut the Silver and Champagne foiled PeelnStick Toner Sheet with a deer die (Prancing Deer Bigz die). Adhere the deer die-cut to a kraft-colored card front lightly stenciled with a star stencil (Starry Layering stencil). Stamp and clear emboss a sentiment (Holiday Drawing stamp set) onto white cardstock and adhere the card front onto a white A2 card blank. For card #2, back the negative deer die cut with a piece of scrapbook paper (Simple Stories Very Merry), adhere the card front to a white A2 card blank and stamp and clear emboss a sentiment (Holiday Drawings stamp set).
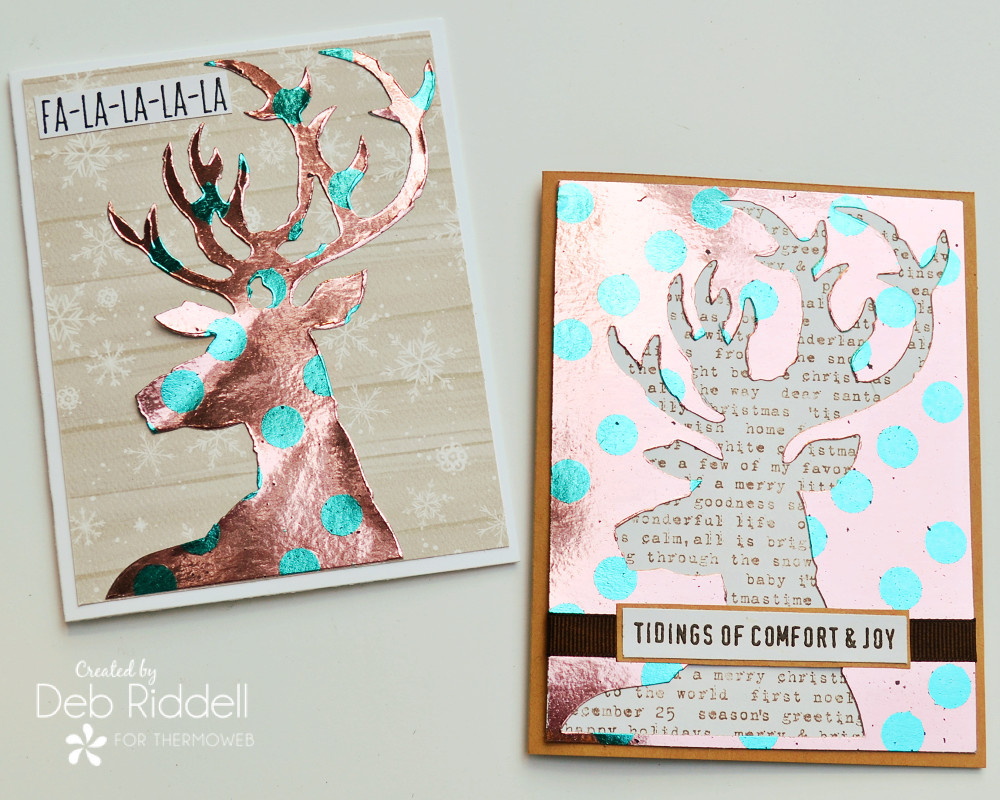
Die-cut the Aqua and Pink Quartz foiled PeelnStick Toner Sheet with another deer die (Dashing Deer Bigz die). Cut a piece of snowflake patterned scrapbook paper (Carta Bella A Very Merry Christmas) to 4″ x 5 1/4″ and mount it to a white A2 card blank with your iCraft Memory XL tape runner. Adhere the foiled deer die cut to the card front and stamp and clear emboss a sentiment (Scribble Woodland stamp set). For card #2, stamp some Christmas-themed words onto a piece of white cardstock (Holiday Type background stamp) and adhere it behind the negative deer die cut. Wrap a piece of brown ribbon around the card front and adhere the whole assembly to an A2-sized kraft card blank. Stamp and clear emboss the sentiment onto a piece of white cardstock (Great Outdoors stamp set), mount it onto a piece of kraft cardstock with a slight reveal, and adhere the sentiment over top of the brown ribbon.
I hope that you’ve enjoyed seeing how these cards came together and that I’ve given you some ideas for quick and easy Christmas cards using Deco Foil Toner Card Fronts, Toner Sheets, Transfer Foils and a few Christmas themed dies and stamps. Thanks as always for stopping by today and make sure to come back all week to see what the rest of the Design Team has to share with you. Happy Christmas card-making in August!
Deb xo