 I have always loved barn quilts, but have no place to hang one. Once Thermoweb introduced Liquid Vinyl, it opened a whole new world. Now I can put them in my garden on a flag!
Bee Happy Garden Flag with Liquid Vinyl
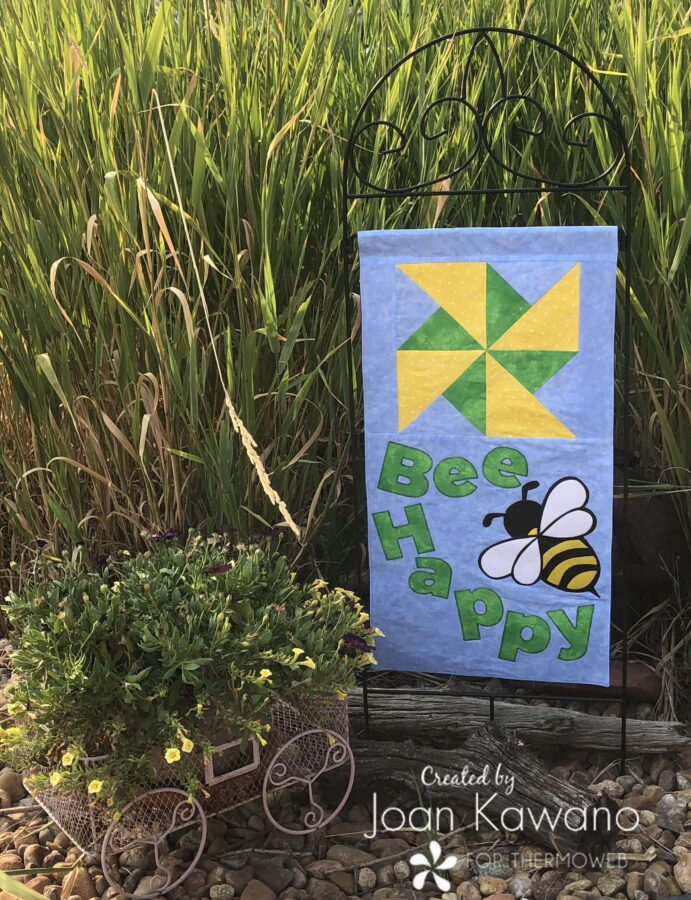
This is “Bee Happy” a 14″ X 27″ garden flag.
Start with downloading the free pattern
“Bee Happy”
Read through the entire pattern before beginning
What to know before you start…
This pattern is for a one-sided flag. If you are placing it somewhere that both sides will be visible,
you will need to make 2, doubling your fabric supplies and not use the solid backing.
NOTE: “Similar” letters are included if you do not have Crafters Edge dies.
The letters on the bee pattern page take into consideration that 2 are needed.
Use ¼” seam allowance, unless otherwise noted.
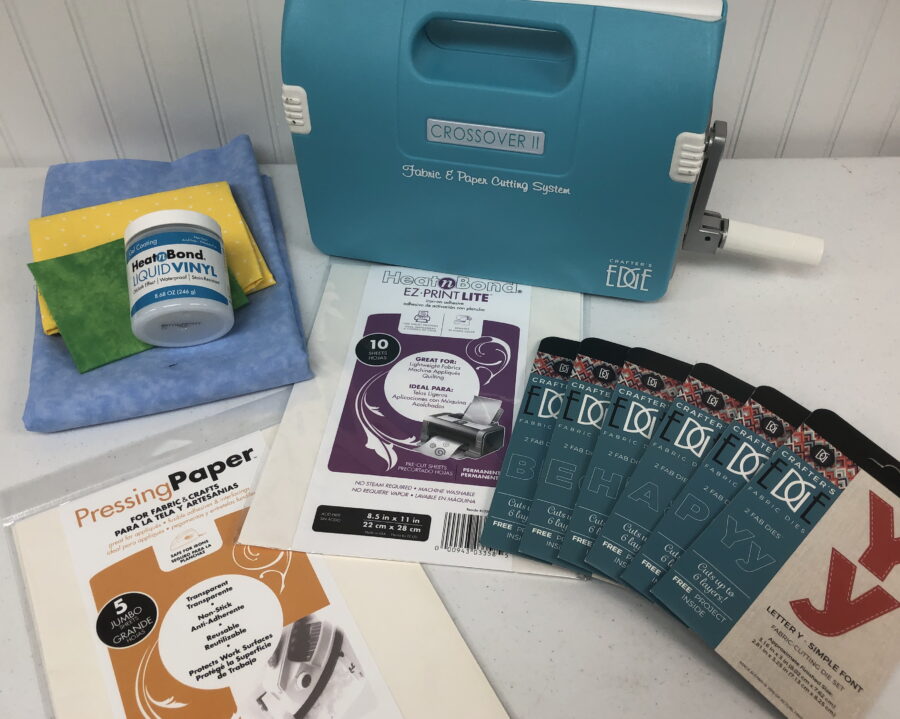
Supplies
1/2 – yard light blue fabric
1 – 6” x 12” strip of yellow fabric for a pinwheel block
1 – 6 1/4” square of blue fabric for a pinwheel block
1 – 6 1/4” square of green fabric for a pinwheel block
1 – 4” x 25” strip of green fabric
1 – 14 1/2” x 27 1/2″ backing fabric
9” square black fabric for bee applique
Scraps of White and Yellow for bee applique
ThermOWeb Pressing Paper or parchment paper
Chalk Marker
Foam brush or fine bristle paintbrush
“Crafters Edge” alphabet dies
Crossover II Die Cutting Machine
Thread to match
Cutting Instructions
From blue fabric, cut 1 – 14 1/2” wide X 15 1/2” long piece for flag bottom
Cut 2 – 2 1/2” x 10 1/2” strips for side borders on block
Cut 1 – 2 1/2” x 14 1/2” strip for the top border on block
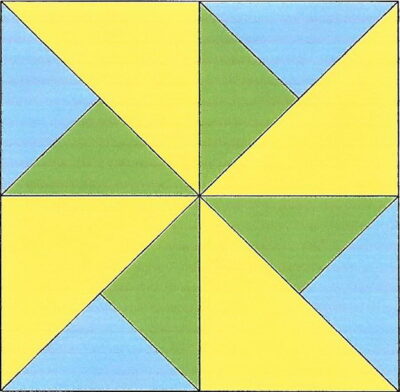
Cut 1 – 6 1/4” square for block pinwheel
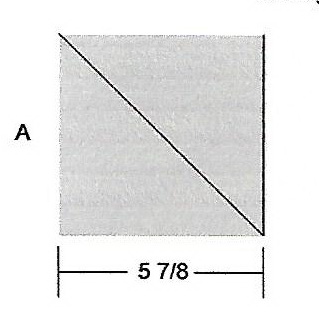
From Yellow fabric, cut 2 – 5 7/8” squares for block pinwheel.
Cut on diagonal as shown below
From Green fabric cut 1 – 6 1/4” square for block pinwheel.
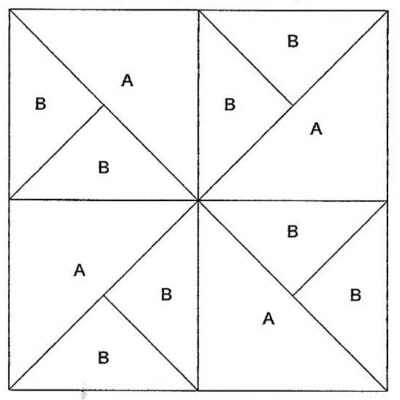
Cut both the blue and the green blocks on the diagonal twice as shown below.

Construction
Layout and stitch the green and blue pieces, as shown.

Press open.
With right sides together, layer with yellow triangle and stitch. Press open.
Using diagrams below, stitch the sections together to form pinwheel block.
Stitch the 2 – 2 1/2” x 10 1/2” blue side pieces to block pressing towards borders.
Stitch the 2 1/2” x 14 1/2” piece to the top of the block
Stitch the 14 1/2” wide x 15 1/2” piece to the bottom of the block.
Print 2 sheets of the bee pattern attached and 1 sheet of lettering
if you are do not have dies, on HeatNBond EZ Print Lite .
Rough cut one of the pages on the outside of the overall bee design.
Fuse to the back of the black fabric, following the manufacturer’s directions.
Cut out on cutting lines, when cool. On the second page, rough-cut the yellow pieces for stripes on the bee and the white wing pieces and fuse to the reverse side of fabrics. Cut out on cutting lines, when cool. Lay stripes and wing pieces out on black bee.
Using a photo as a guide, fuse in place.
Rough cut letters “if using” and fuse to the back of the green fabric. Cut out when cool.
If you are using the Crafters Edge Crossover II machine and dies, fuse a 4” x 25” strip of fusible web to the back of a green strip of fabric, for lettering and cut-out letters when cool.
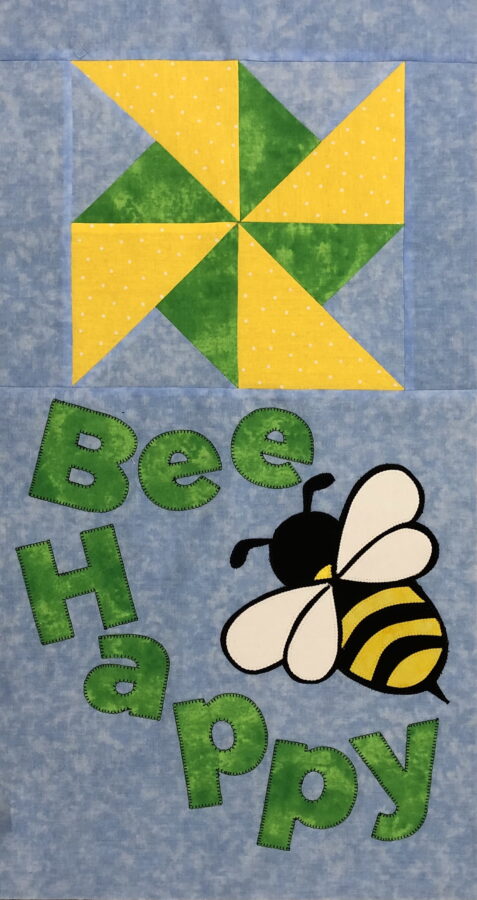
Arrange the letters and bee as desired and fuse to the bottom of the flag. Stitch all appliques, using your preferred method.
 Lay flag on backing fabric, right sides together. Stitch across the top of the flag and backing. Measuring down 1 1/2″ from the seam line, make a small mark 1/4” from the edge on both sides of the flag. Clip both front and back, making sure you do not go any deeper than 1/4″ deep. Press top seam open. Turn the 3” area between the clips on each side, under towards the back of fabrics, press, and topstitch in place, to create the opening to hang the flag. Fold the flag in half, right sides together, and stitch down each side from the hanger opening to the bottom. Stitch across the bottom, leaving a 4” opening at the center, to allow for turning. Turn right sides out and carefully press. Topstitch approximately 1/8” from the edge. Using a chalk marker, draw a line from side to side at the bottom of the hanger opening. Stitch across to make a hanging sleeve. Now you can waterproof your flag with HeatNBond Liquid Vinyl.
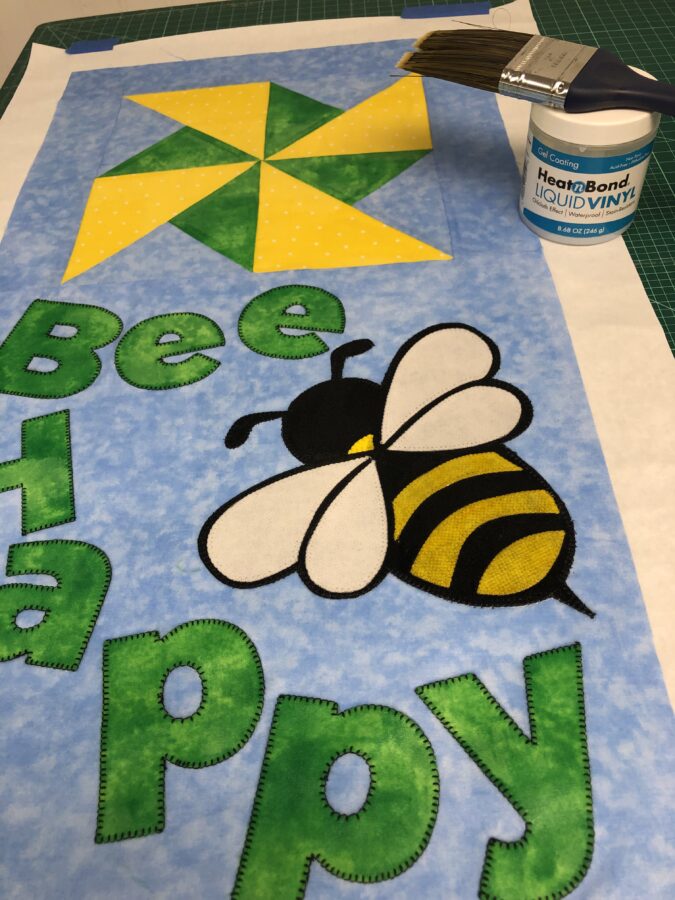
 Lay your flag out on a sheet of parchment paper. Following manufacturer’s instructions, paint a thin layer of vinyl on one side of your flag and let dry. For more protection you can add up to 3 layers, letting it dry in between each one. When completely dry, flip the flag over and do the exact same thing on the back. Once completely dry, following the manufacturer’s directions press flag between 2 sheets of ThermOWeb Pressing Paper or parchment paper. Make sure you do not touch iron directly on the vinyl, and that the bottom surface is on protective paper. When cool remove from paper and flip the flag over and repeat the last steps.
Your flag is now ready to hang in your garden.

This is “Gray Bunny Garden Flag Stand” from Amazon. It is 51” X 15”. The top arm swings open to allow you to load your flag. You can find it HERE for under $20 if you are interested.
Enjoy!