


There’s something wonderful about sitting with a soft blanket and a little one on your lap!
Today we share with you a sweet as a strawberry quilt that used our HeatnBond…SpraynBond Basting Spray along with some super sweet fabrics from Shannon Fabrics!

Strawberry Stripe Blanket
(Using a pattern from Shannon Fabrics)
Size 48” x 60”
Supplies:
Assorted Cuddle Fabrics from Shannon Fabrics (11 stripes – 6” wide by 60” long)
This example uses: 4 – strawberry print, 2 – cherry print, 2 – fuzzy red, 2 – striped red, 1 – blue
1 ½ yards batting
1 ½ yards complimentary Cuddle Fabric for the backing and binding
SpraynBond™ Basting Adhesive
Freezer paper
Thread
Walking Foot for your sewing machine
Directions:
1. Lay your batting and backing fabric out on a large surface. Fold back one half of the backing fabric and spray SpraynBond™ Basting Adhesive evenly on the back of the backing fabric and smooth it out onto the batting (reposition as needed to avoid any wrinkles or bumps). Repeat with the other side.
2. Trim off any extra batting.
3. Fold the blanket in half vertically and mark a center line on the batting material.
4. Open the blanket (batting side up) on a large surface. Take the blue strip and place it evenly across that center line.

Fold the blue strip onto itself, spray SpraynBond™ Basting Adhesive onto the back of the exposed half. Smooth it down onto the batting to adhere it. Now fold the other half of the blue strip onto itself, spray with SpraynBond™ Basting Adhesive and smooth it down onto the batting.
5. Figure out which direction the nap is going on your middle stripe. You’ll want to keep the nap in mind as you lay your remaining stripes down.
6. Lay a Strawberry strip onto the blue stripe right sides together. Pin it in place. Repeat with another Strawberry strip on the other side of the blue center stripe.
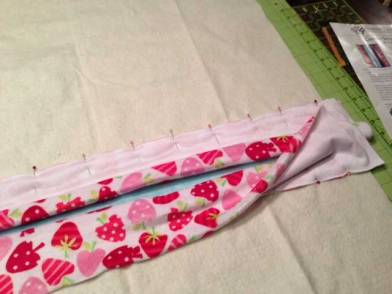 Using a ½” seam allowance and a walking foot on your machine, sew each of the strips in place.

7. Place a long piece of freezer paper under one of the sewn down strawberry strips. Spray the back of that strip with SpraynBond™ and smooth it down. Lay the next strip (we used the red fuzzy strip) right sides together on the sprayed down strawberry strip and pin. Repeat the same steps on the other strawberry strip on the other side. Sew both of those strips down.

8. Continue to attach the remaining strips using the same freezer paper protection – spray – smooth down – pin new strip – sew procedures.

9. Trim off and excess cuddle fabric and batting.
10. Use a 2” strip of backing material to add binding to the blanket.
Visit our friends at Shannon Fabrics for a great video tutorial on attaching a cuddle fabric binding.
http://www.cuddlesoftkits.com/cuddlesoftkits/binding-quilt-step-by-step.htm
Melissa Malzahn
March 22, 2013 at 1:14 pm (11 years ago)That is beautiful, be a awesome gift for a Valentines present. I’ll have to try the spray looks alot easier to work with seems .
linda campbell
March 23, 2013 at 3:55 am (11 years ago)I find the little blanket very interesting I `ve done adding forms to a background with a double sided iron on the spray will be interesting to try
Colleen
March 23, 2013 at 6:15 pm (11 years ago)So cute! I am going to make today!
Lynne
March 24, 2013 at 3:44 pm (11 years ago)I don’t understand the use of the freezer paper in this quilt? You sew it between the layers?
admin
March 25, 2013 at 4:12 pm (11 years ago)Hi Lynne!
Candace used a sheet of freezer paper to protect the other fabric from overspray. If you didn’t…the fuzzy cuddle fabric would get sticky residue on it. Here’s a note from the designer,
“I just kept using the same long piece of freezer paper. I would slide it underneath the flipped over piece that I was spraying and only spray where it was covered…that way none of the main quilt top got sprayed accidentally.”
Hope that helps! Thanks for stopping by the blog!
Grace Gibson
March 28, 2013 at 12:51 am (11 years ago)I love this. I like to make things that are not so complicated.
Patrice Troope
April 6, 2013 at 2:55 pm (11 years ago)That is very cute!!