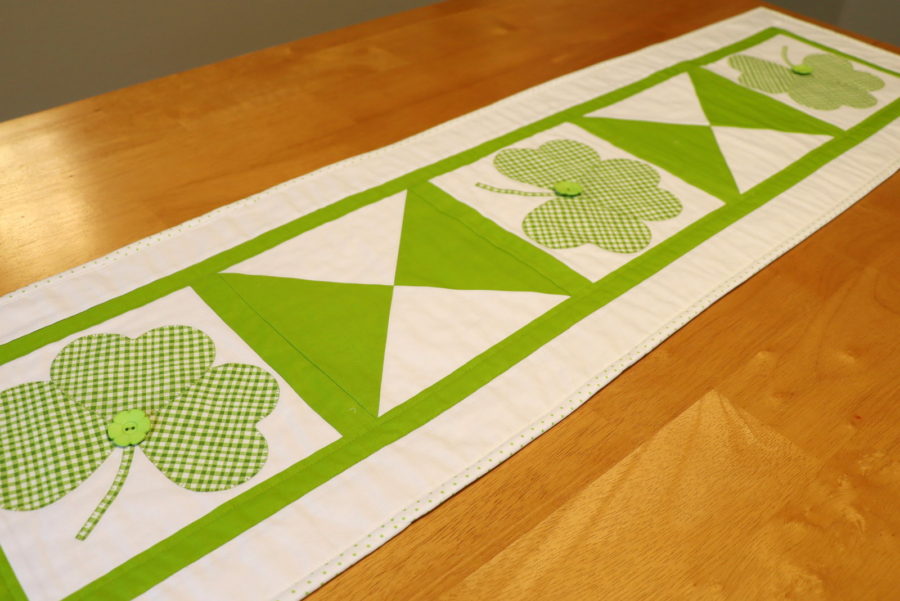
We could all use a bit of luck and this St. Patrick’s Day runner could just be the thing to bring that Irish luck to you! Those sweet shamrocks made with Crafter’s Edge Nested Hearts and green fabric will bring some cheery fun to the party, too!
St. Patrick’s Day Fabric Shamrock Table Runner

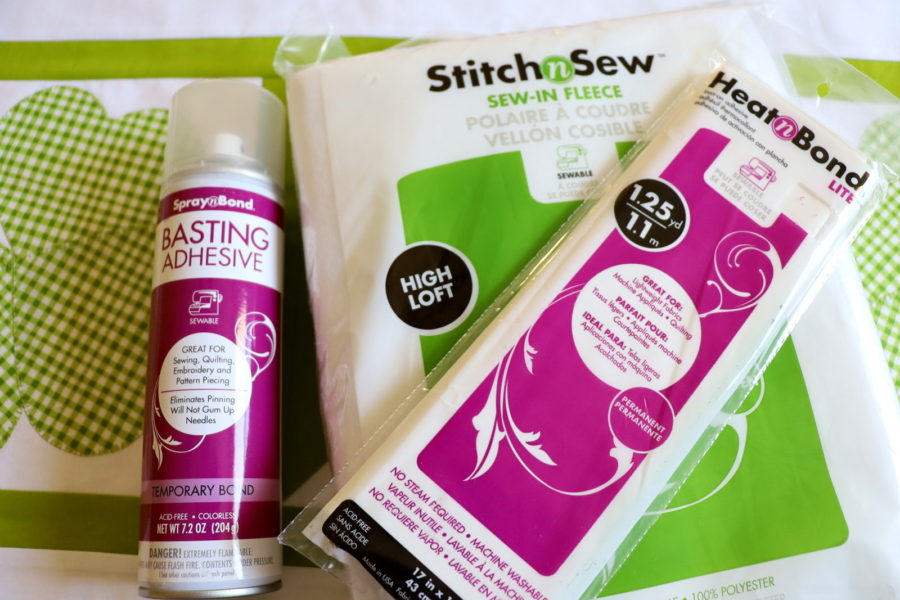
Putting the runner together goes quickly with the Crafter’s Edge fabric dies and ThermOWeb products. The Heat n Bond Lite Iron-on Adhesive has just the right amount of thickness without adding bulk and you’ll love how easy it is to peel off the protective backing paper. The Spray n Bond Basting Adhesive and Stitch n Sew Fleece Sew-in High Loft are great products for finishing the runner without needing to pin the layers together before quilting.
Supplies:
Heat n Bond Lite Iron-on Adhesive
Spray n Bond Basting Adhesive
Stitch n Sew Fleece Sew-in High Loft
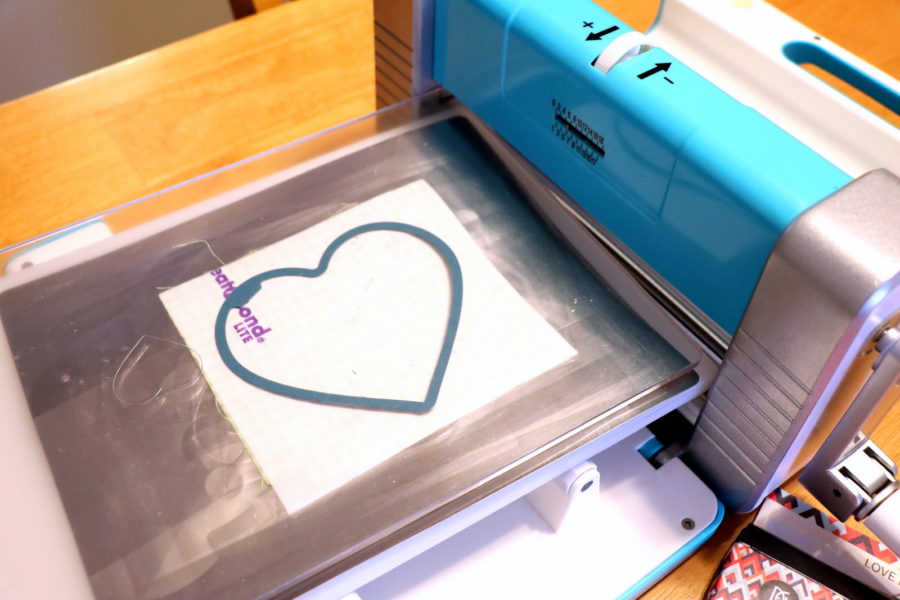
Crafter’s Edge Crossover Machine
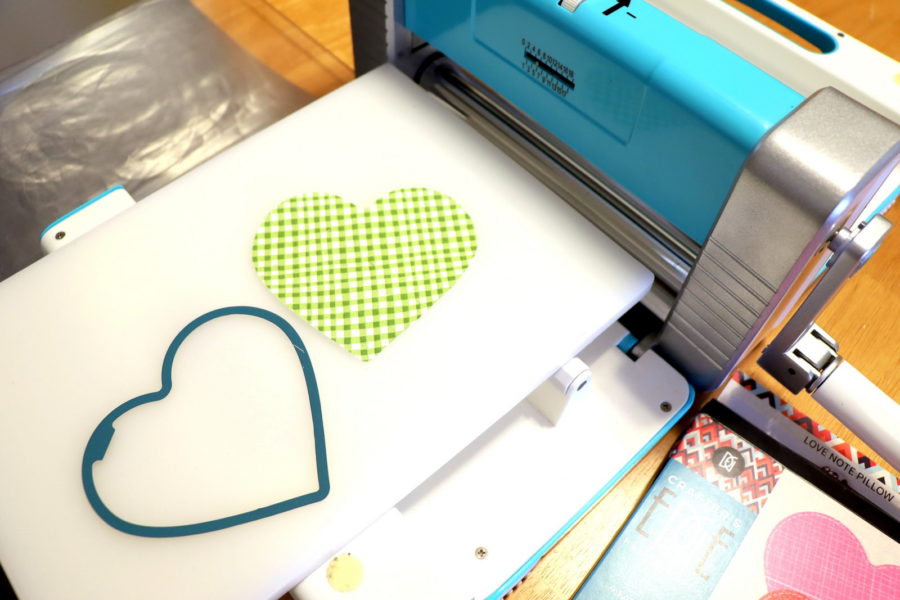
Crafter’s Edge Nested Hearts Fabric Die
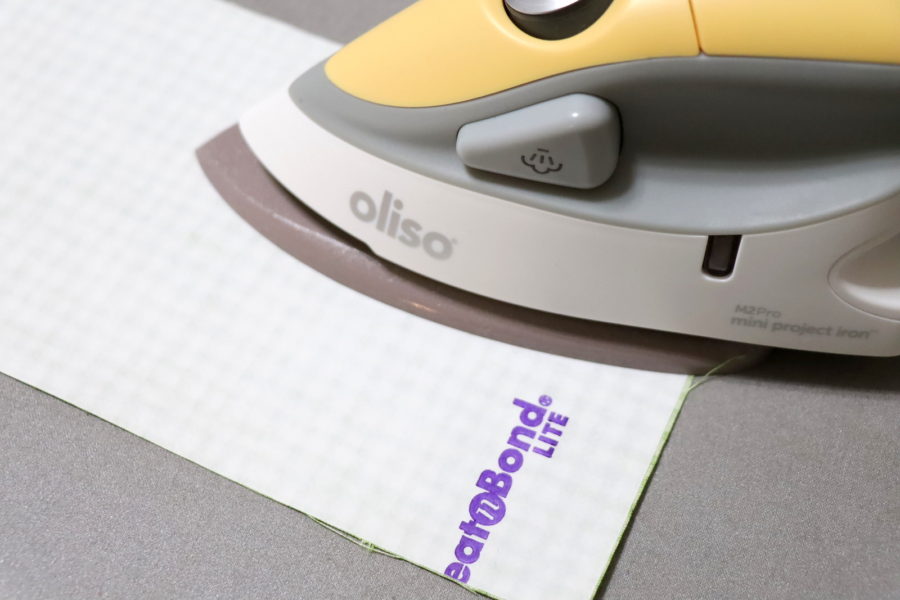
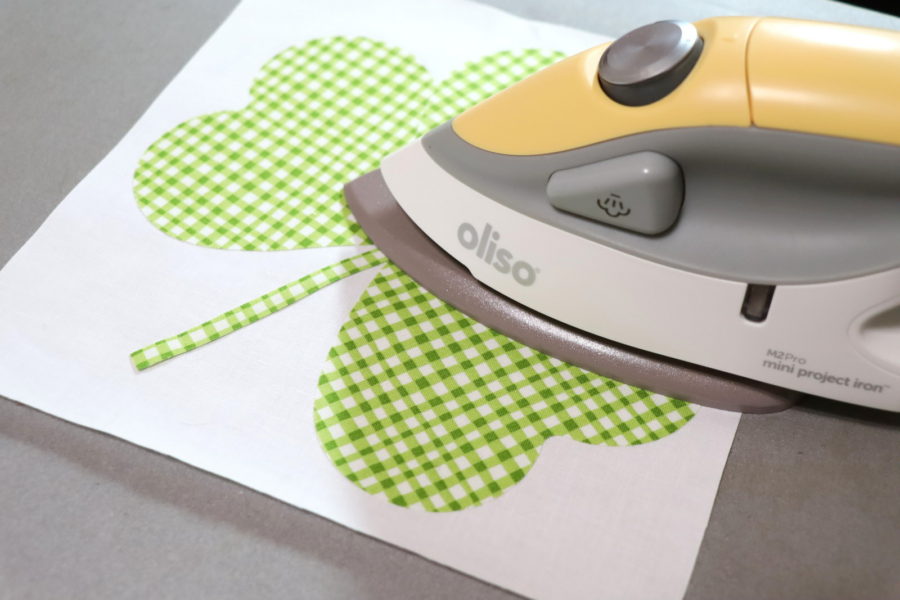
Oliso Mini Project Iron
Optional – Three 1” Buttons
Crafter’s Edge Nested Hearts Fabric Die comes with different sizes and lays flat for storage. You’ll love the variety of sewing things you can make with them. The edges aren’t sharp either!

Fabric needed:
1/4 yard green and white gingham
1 1/4 yard green cut lengthwise (1/2 yard if piecing strips)
1 3/8 yard white cut lengthwise (5/8 yard if piecing strips)
1 1/2 yard green backing
1/3 yard white and green polka dot– binding
1 3/8 yard – Stitch n Sew Fleece Sew-in High Loft or batting
Cutting instructions:
Cut 1 – 9 ½” x 9 ½” green squares (hourglass blocks)
Cut 1 – 9 ½” x 9 ½” white squares (hourglass blocks)
Cut 3 – 8 ½” x 8 ½” white squares (shamrocks background)
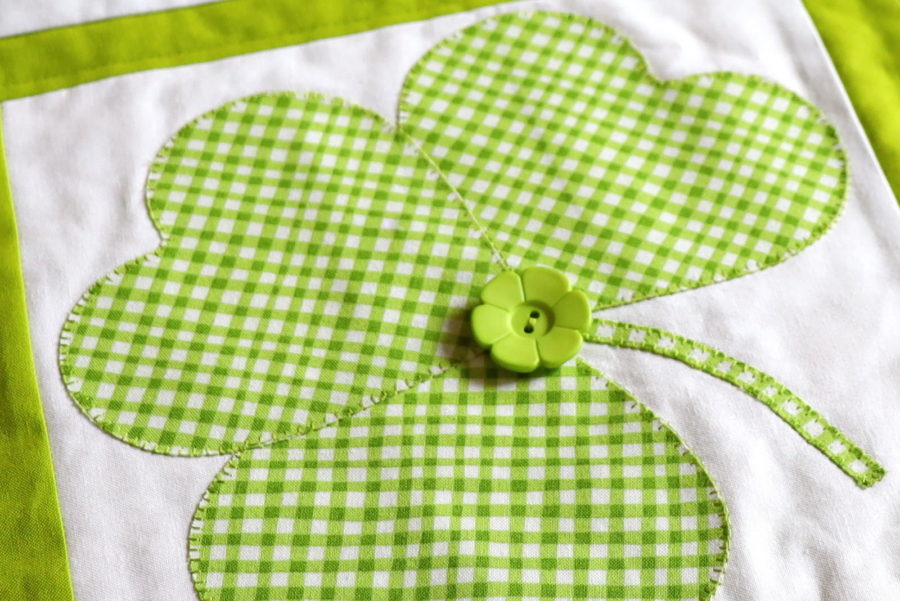
Cut 9 – 3 ½” x 3” green and white gingham Crafter’s Edge Nested Hearts with iron-on adhesive (shamrocks)
Cut 3 – 1/2” x 3 ½” green applique strips with iron-on adhesive (shamrock stems)
Cut 3 – 1” applique circles (shamrock centers or use buttons)
Cut 6 – 1 ½” x 8 ½” green strips (sashing)
Cut 2 – 1 ½” x 46 ½” green strips (top and bottom Border A) *cut lengthwise on fabric or piece to make 46 ½” strip
Cut 2 – 2 ½” x 10 ½” white strips (left and right Border B)
Cut 2 – 2 ½” x 50 ½” white strips (top and bottom Border B) *cut lengthwise on fabric or piece to make 50 ½” strip
Cut 1 – 16” x 52” green runner backing (extra allowed for quilting)
Cut 1 – 16” x 52” batting (extra allowed for quilting)
Cut 4 – 2 ½” x 43” green fabric (binding)
Table Runner Instructions
Sewing/Applique Instructions: Seams are sewn 1/4” wide
Step 1: Applique – Iron adhesive to the wrong side of gingham fabric following package directions. Oliso’s Mini Project Iron is the perfect size for almost any sewing project!
Cut out applique Nested Hearts using Crafter’s Edge Crossover II.
Press the appliqued hearts
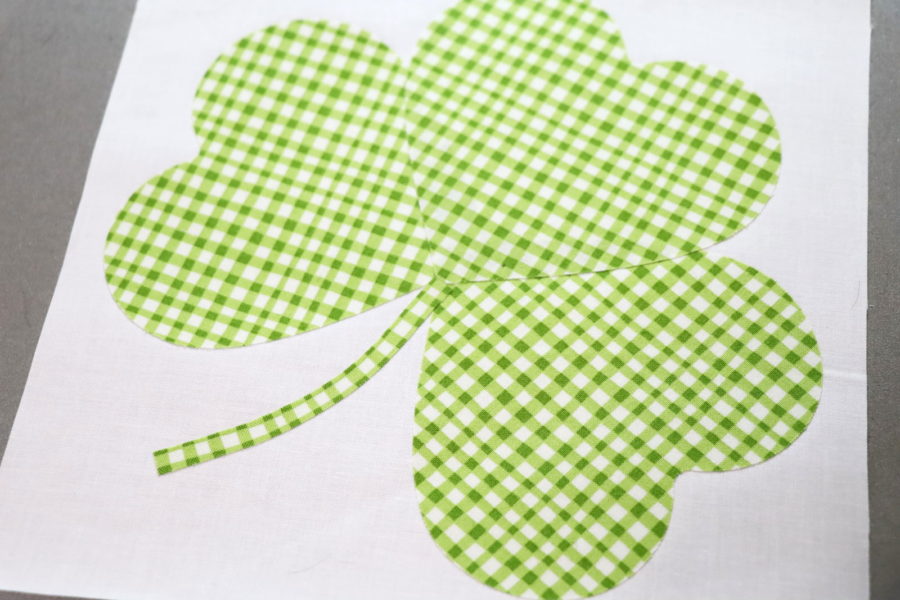
Peel off paper liner from the backs of appliqued hearts. Place applique, adhesive side down, on the right side of the fabric. Press according to package directions until the entire piece is bonded. Let cool. Sew around edges of applique using a straight, zig-zag, or blanket stitch.
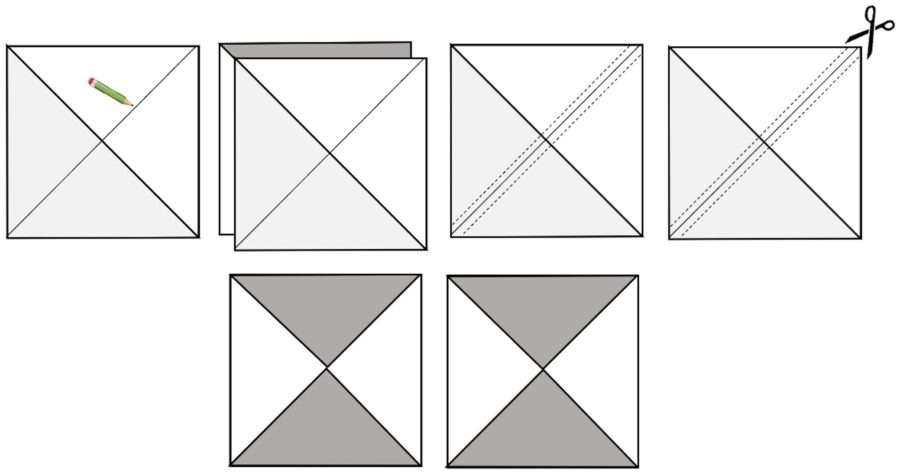
Create hourglass blocks
Step 2: Hourglass blocks – You’ll need one 9 ½” x 9 ½” white square and one 9 ½” x 9 ½” green square to make two blocks. Draw a line diagonally on the wrong side of the white square. Place the right sides of green and white squares together. Sew a 1/4″ seam along both sides of the drawn line.

Cut the block along the drawn line to create two blocks. Open and press fabrics to the dark side.
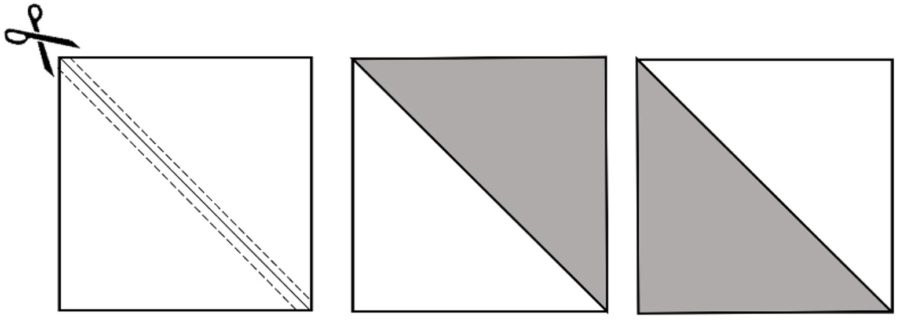
On one of the blocks, draw a diagonal line opposite from the seam on the wrong side of the fabric. With right sides together (colors opposite of each other) and nesting the seam, sew 1/4″ along both sides of the drawn line. Cut the blocks along the drawn line. Open and press seams toward the side. Trim blocks to 8 ½” x 8 ½”.
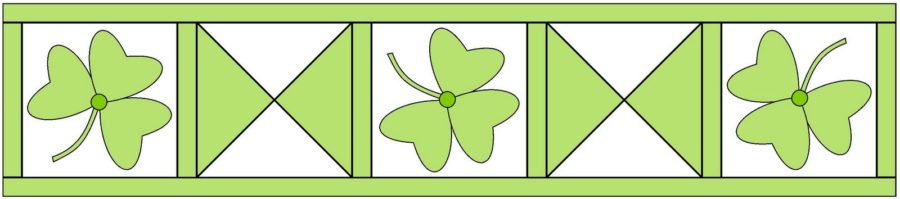
Step 3: Center Row – With the right sides together, sew appliqued shamrock blocks, hourglass blocks, and sashings together as shown below. Press seams to right.

Step 4: Border A – With right sides together, sew 1 ½” x 46 ½” green strips to top and bottom of Center Row. Press seams down.
Step 5: Border B – With right sides together, sew 2 ½” x 10 ½” white strips to left and right of Center Row/Border A. Press seams towards border. With right sides together, 2 ½” x 50 ½” white strips to top and bottom of Border A. Press seams down.

Assemble the runner
Step 6: *Runner assembly with batting and basting spray: Protect the area where you will be working by placing an old sheet of paper under and around the area you’ll be spraying. Place the batting on the work area, smoothing to remove wrinkles. Place the runner backing, wrong side down, on top of the batting. Smooth to remove wrinkles. Having the batting a bit larger than the backing is suggested.
Rollback about six inches of the runner back to expose some of the batting. Using the basting spray, spray batting from one edge to the other. Carefully lay the wrong side of runner backing over the sprayed surface of batting. Smooth fabric to ensure it adheres to the sprayed fabric and removes any wrinkles. Rollback the rest of the runner back to continue spraying and smoothing about six inches at a time until you reach the bottom of the runner back. Check for creases or folds you might have missed.
Turn the backing and batting over to have batting facing up. Lay runner front, wrong side down, on batting. Make sure the runner front is lined up correctly; smooth out wrinkles. Use the same spray and smooth method as the backing. Trim edges and square-up runner.
Quilt the runner
Step 7: Quilt as desired and add the binding. Add buttons if desired.
Have a Happy St. Patrick’s Day full of wonderful luck!