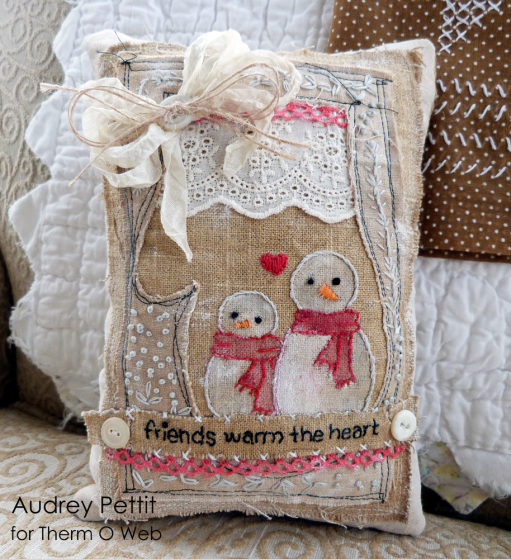


Friends Warm the Heart Pillow
By Audrey Pettit
Supplies:
SpraynBond® Fusible Adhesive
PeelnStick Fabric Fuse™ Tape
Zots™ Medium Clear Adhesive Dots
Stamps: Lawn Fawn
Die: Papertrey Ink
Trim: Webster’s Pages, Stampin’Up, American Crafts
Floss: DMC
Ink: Stampin’Up
Buttons: vintage
Other: Linen Fabric, Gesso, Thread, Polyfill Fiber
I had so much fun putting this pillow together, and thanks to the help of some time-saving tips from Therm O Web’s Spray n’ Bond Adhesives, it was really easy, too.

Diecut the Mitten from Linen Fabric
To get started, die-cut a mitten from linen fabric. Set the mitten aside for another project, because for this pillow, we are going to be focusing on the negative shape instead. Here is a pattern, if you do not have a mitten die.
Spray the Backside with SpraynBond
Spray the backside of the fabric with Therm O Web SpraynBond® Fusible Adhesive and layer onto a larger piece of fabric. The Fusible Adhesive eliminates the need to pin the fabric in place, which is a real time saver.
Machine stitch around the outline of the mitten, and around the edge of the fabric using black thread.

Embroider Embellishments
Add random embroidery stitches around the outline of the mitten. Mix it up and just have fun!
Stamp snowmen, scarf, and heart images onto the center of the mitten. Using the stamped images as a guide, embroider the outlines of the snowmen and scarves. Satin stitch the heart. If you don’t have this snowmen stamp set, use whatever images you may have on hand, or feel free to use this pattern.
Watercolor the scarves using a red ink pad and a wet paintbrush. Then paint the snowmen with Gesso. Dry brush more Gesso randomly over the entire piece.

Stamp a Sentiment
Stamp or write a sentiment onto a thin strip of fabric and hand-stitch with black floss. Apply Fabric Fuse™ Tape to the back of the strip, peel off the liner, and adhere across the bottom.

Lightly lift sentiment strip and tuck lace trim under the bottom edge. Add a few hand-stitches for decoration. Using Fabric Fuse™ Tape, adhere trims across the top of the mitten.
Spray the back of the fabric with SpraynBond® Fusible Adhesive and adhere onto a larger piece of fabric. Machine stitch the edges. Dry brush with additional Gesso.

Cut a second piece of fabric the same size as the layered front. Placing right sides together, machine stitch the pillow closed, leaving a small opening. Turn the pillow right side out, fill with polyfill fiber and slip stitch the pillow closed.
Adhere buttons with Zots™ Medium Clear Adhesive Dots. Tie a bow from shabby seam binding. Adhere onto the pillow using Zots™, along with another button tied with hemp cord.
Don’t forget…you can shop for all the Therm O Web and HeatnBond® products used today right from our NEW website! It’s safe, secure, and fast too!
12 Comments on Embroidered Snowman Pillow – with SpraynBond Fusible Adhesive
3Pingbacks & Trackbacks on Embroidered Snowman Pillow – with SpraynBond Fusible Adhesive
-
[…] I’ve been getting a little crazy with the “mixed-media” again. Been combining paint and inks and stain with fabric and trims to make this cute little snowman pillow for our special Pinterest Inspiration challenge last week on the Therm O Web blog. […]
-
[…] embroidery stitching. The sentiment “friends warm the heart” is stitched across the bottom. Go to the Therm O Web blog to get the free pattern by Audrey […]
-
[…] stitching. The sentiment “friends warm the heart” is stitched across the bottom. Go to the Therm O Web blog to get the free pattern by Audrey […]

Debbie Kaste
February 19, 2013 at 9:16 am (12 years ago)Iron on vinyl? Wow, where have I been? LOL! Love the pillow and the bib!!! We are expecting our second grandbaby in a few months. The bib pattern is PERFECT. Thanks so much for sharing. Have a great day.
Christine
February 20, 2013 at 2:35 pm (12 years ago)Wow, Amy, what a great baby bib project. I am definitely going to try that. I have never heard of iron on vinyl. Can’t wait to try it myself. Thanks for sharing the tips and the pattern.
Audrey, your pillow project is simply gorgeous!! I love all of the details, the hand stitching, and the stamping!! Truly a masterpiece. I wish I lived closer so I could see it up close.
Lovely work today ladies!!
xoxo, Christine
emily
February 21, 2013 at 6:57 am (12 years ago)Am I the only one who cannot get this to print….? It appears on my screen, but in the preview it is blank…?
Therm O Web
February 21, 2013 at 3:46 pm (12 years ago)Hi Emily…just tried and it’s working properly for us. Could possibly be your browser? Could you try clearing your cache and see if that will work for you. Hope that helps!
Sharon
October 8, 2013 at 6:11 am (12 years ago)There are some interesting techiques in this project. I never worked with some of the applications before.
EllenB
October 8, 2013 at 6:17 am (12 years ago)I can see lots of ways to use your products.
Leticia
October 8, 2013 at 8:34 am (12 years ago)Can’t wait to use this product. Cute snowman project.
Lorie
October 10, 2013 at 10:15 pm (12 years ago)I have a daughter who will just love this project! It will be perfect as a gift!
pjc
November 25, 2013 at 5:21 am (12 years ago)cute!