Heather Tyler (Qtee Card Designs)
Hello Crafty Friends! Today, I am showing you an amazing gift Idea, using the newest Deco Foil’s Toner Card Fronts and Color Harmony Transfer Foils! I will share a trick I learned along the way! Also, at the end of this blog, I will share other ideas that can be put into this holder!
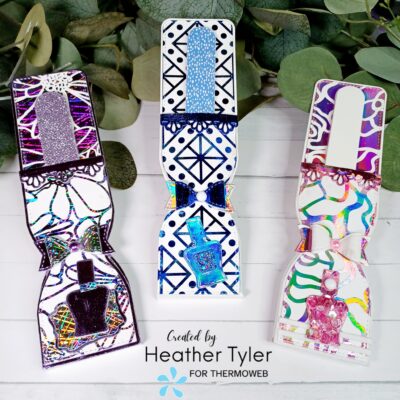
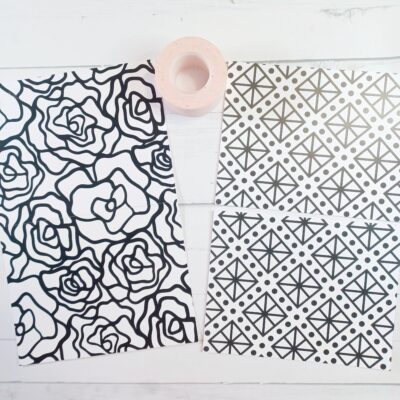
For my first holder, I wanted to use the “Bold Blooms”, Toner Card Front to die-cut the holder. The problem I ran into is that one Toner Card is not long enough to die cut the holder! So, I picked two toner cards that I could match the pattern, then I flipped over the toners cards and taped them together with ICraft Purple Tape.
I chose a sheet of the Deco Foil, Purple Sketch, from Brutus Monroe and placed it shiny side up and ran it through the Fuse Foiling System on level four. I wanted to use the negative, so I placed the negative foil on the Gina K. White Poly-Glaze Sheet which comes in the perfect size (81/2 X 51/2). I ran the negative sheet shiny side up through the Fuse on Level four. That gave me the gorgeous, purple outline with white flowers!
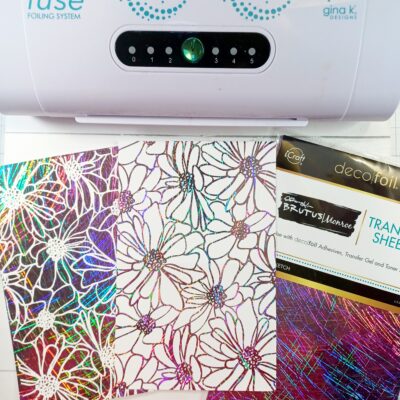
I also wanted to use the Lilac Foil from the Color Harmony Transfer Foils, so I placed two sheets onto another piece of White Poly-Glaze sheet (81/2 X51/2) and used the Fuse Foiling System. I used this color for the outlined dies and decorations!
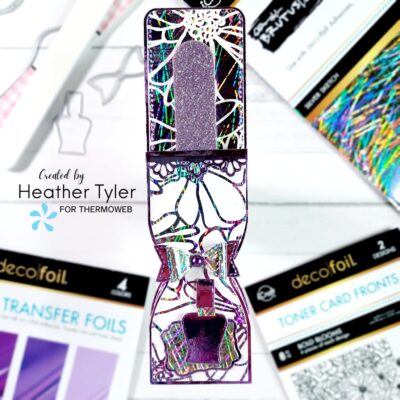
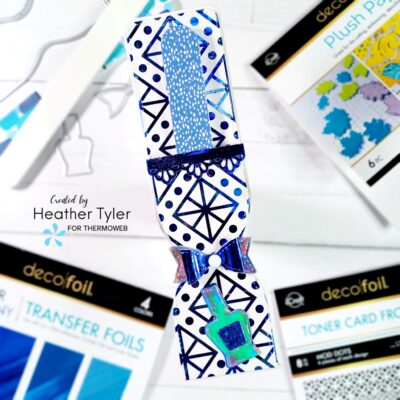
I already had some pieces of Deco Foil Silver Sketch from Brutus Monroe that I used for the decorations as well! I die-cut the pieces and used my Ultra Bond Adhesive to assemble. I inserted my nail file and glued the sides (top and bottom) together just above the bow! I love using Ultra Bond adhesive, because it holds so well, I could slide the nail file in and out with ease!

I ran into a little bit of a problem on my negatives where part of my foil did not completely transfer (I forgot to wipe down everything..oops). Since I foiled it using the White Poly-Glaze, I was able to use a Sakura White Gel Pen to fill in the parts that were needed it and it worked!

As for the next two holders, I repeated the same process, but with different toner card fronts and different colored foils. For the middle file holder, I used the “Mod Dots” Toner Card fronts and used the Blue Como foil from the Color Harmony Transfer Foils, I did not use the negative in this project! I also used Royal Blue from the same pack, which matches perfectly, for the decorations! I used a piece of leftover Iridescent Transfer Foil as well!
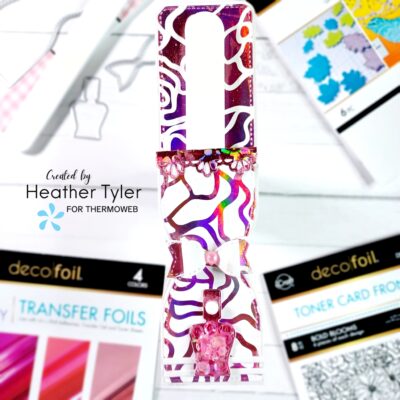
My last holder I did the exact same process as the first holder! I used the “Bold Blooms-Roses” Toner Card Fronts, and I used Deco Foil Enchanted Rose Transfer Foil for the color. I used Flower Child Color Harmony transfer Foils and White Latte Plush Papers for my decorative pieces.
This is a great die set from KSCRAFT (Nail File Holder Cutting Dies), but what I think makes it special is decorating it with the Toner Card Fronts and all the great accent colors! Even adding the Plush Papers for texture!
Some other things you can put in this holder, other than a nail file, are the trendy pens, markers, lipsticks, eyeliner and even a reusable straw! The list is endless! I hope you feel inspired to decorate some of your favorite gifts with Deco Foil and Therm O Web products! I hope you have a fabulous, crafty weekend!
THERM O WEB PRODUCTS USED:
Color Harmony Transfer Foil Packs
Toner Card Fronts – Bold Blooms
Gina K White Poly-Glaze Sheets (81/2 X51/2)
Iridescent Deco Foil Transfer Foil Sheets
Enchanted Rose Deco Foil Transfer Sheets
Purple Sketch, Brutus Monroe Transfers Foil Sheets
Silver Sketch, Brutus Monroe Transfers Foil Sheets
Jessica Scott
June 19, 2024 at 5:53 pm (12 months ago)Wowzers! I love spicing up small gifts like this! This is amazing and such a fun use of the foil. Beautiful foil that I can’t wait to get!