


 Join us all this week as we kick off our first Christmas in August holiday week! That’s right! All this week we’re bringing you holiday projects from cards, quilts, home decor and more. So be sure to check in daily as you never know what we have planned for you! Kicking things off for our Mix It Up Monday projects… a stunning faux mercury glass mason jar made with our Deco Foil!
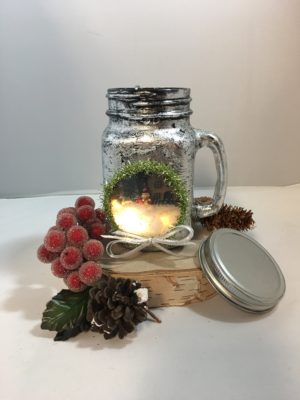
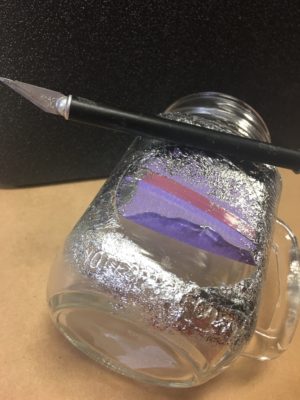
Hi all, Wendy here with a Christmas project to get you started on holiday décor. This faux mercury glass mason jar housing a tiny winter scene would be a great project to do with older children and to give as a gift during the holidays.
Make a Faux Mercury Glass Mason Jar Winter Scene with Deco Foil
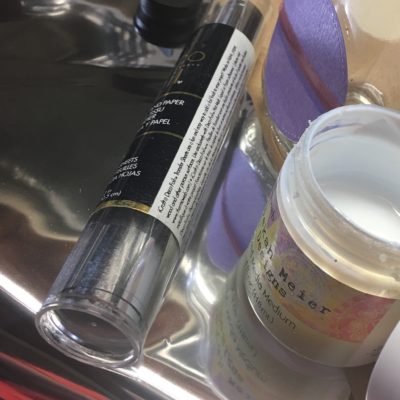
Supplies:
Rebekah Meier Designs Mixed Media Medium
iCraft Mixed Media Adhesive
Deco Foil Transfer Sheets – Silver
iCraft Purple Tape
Super Tape Roll 1/2″
Wafer-thin metal die set by Gina K. Designs – Circle (large set)
Wafer-thin metal die set by Gina K. Designs – Circle (small set)
Other Supplies Used: Mason Jar (I used a dollar store version), make-up sponge, black paint, craft knife, ribbon, cotton, mini house die, tiny trees, tiny ornament, LED light string, glue gun, Tim Holtz Grit Paste, bamboo skewer, wooden discs, wax paper, paint brush, heat tool, die-cutting machine, cardstock, heavy stock, vellum, spatula, tinsel and cotton balls.
Mason Jar Winter Scene (Faux Mercury Glass) Instructions:
Step One:
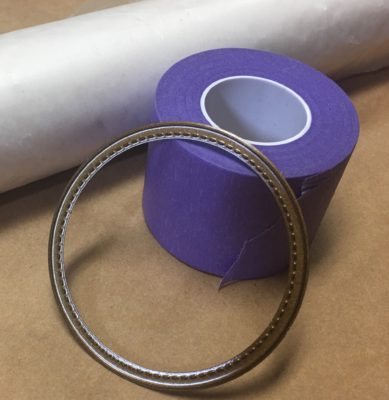
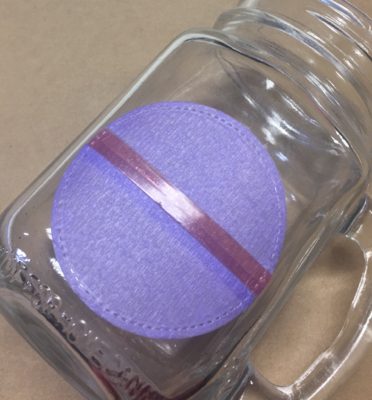
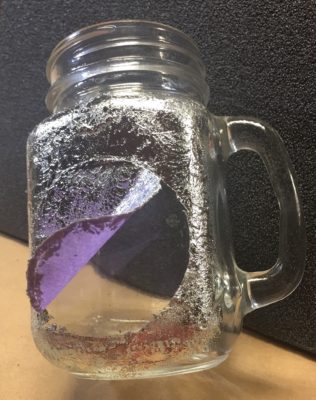
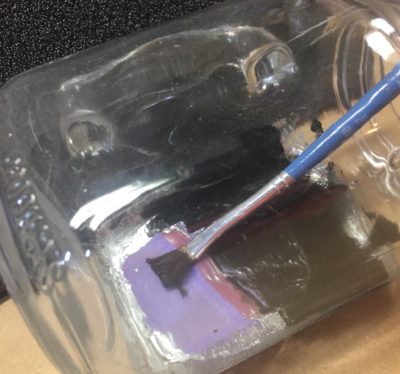
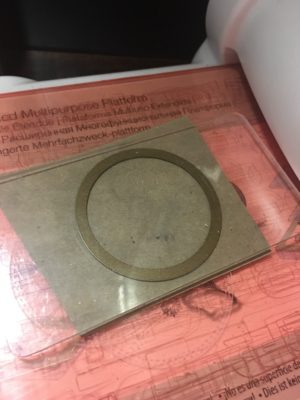
Lay down, on a piece of wax paper, two strips of iCraft Purple Tape approximately 2.5” long with one overlapping the other slightly on the long side (see photo). Add a piece of Super Tape along the seam to ensure stability. Die-cut from the Purple Tape/wax paper the smallest circle from the Wafer-thin metal die set by Gina K. Designs (large set). Peel the die-cut, sticky circle from the wax paper and position it on your mason jar where you want your window. The sample uses a dollar store mason jar.
Hint: Use your craft knife or scissors to cut a slit in the center of your wax paper before you lay down the purple tape, otherwise it will be difficult to pull the tape from the wax paper (I know this from experience 😊).

Step Two:
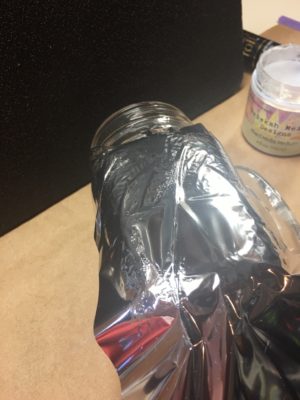
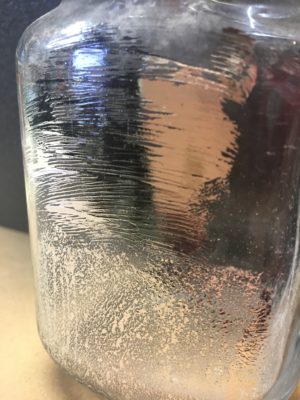
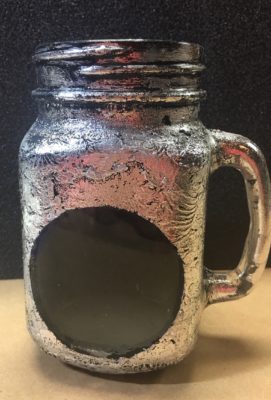
Using a make-up sponge apply Rebekah Meier Mixed Media Medium to the surface of the mason jar in stages (i.e. do the front section first and then move to one side, etc.) by tapping the sponge against the glass. Use a heat tool to dry the Mixed Media Medium just until it loses any opacity and becomes completely translucent (it will still be tacky). Lay your Silver iCraft Deco Foil Transfer Sheet (pretty side up) over the Mixed Media Medium and burnish with your finger. Peel back the transfer sheet and voila . . . faux mercury glass! Complete this process until you have foiled the entire jar. Note: you will have areas where the foil doesn’t stick. Just go back with a bit more Mixed Media Medium, dry and reapply the Silver Foil Transfer Sheet to the specific areas.
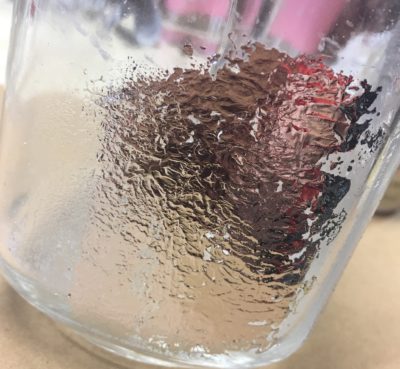

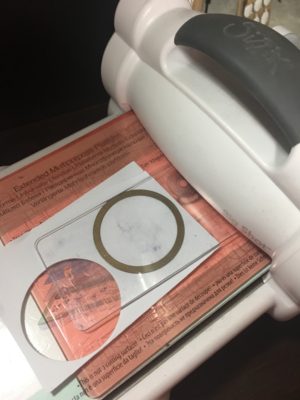
Hint: If you do not have a make-up sponge, make sure to test your chosen applicator to make sure you will get the desired result. The below photo shows Mixed Media applied with a brush first and then tapping onto the glass with a finger. Neither of these gave the desired result.
Step Three:
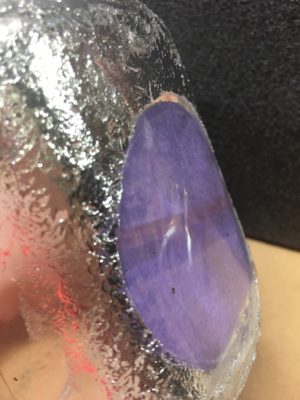
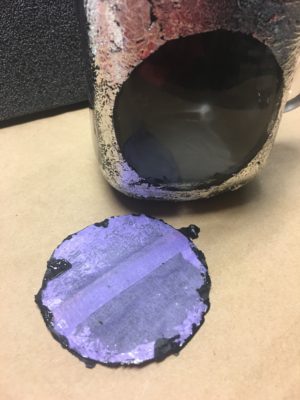
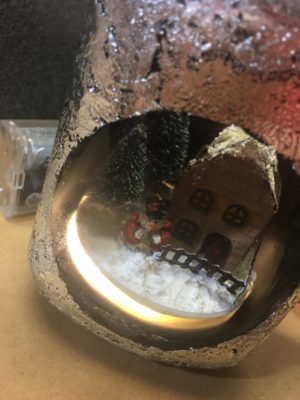
Pull the die-cut circle from the front of the jar to expose your window.
Hint: Using a craft knife, gently cut around the circle to ensure you don’t pull up any extra foil when you peel back the circle.
Step Four:
Slip the same Purple Tape die-cut circle inside the glass and cover the window from the inside this time.
Hint: Make sure to press down the edges well so that paint will not seep under the Purple Tape.
Step Five:
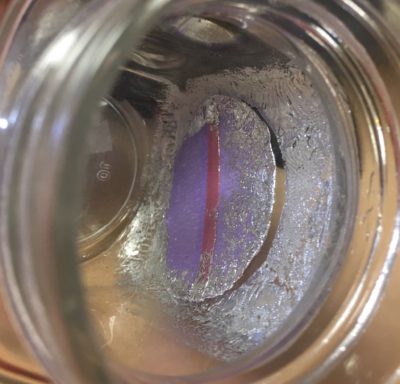
Paint the inside of the jar with black craft paint and allow to dry.
Step Six:
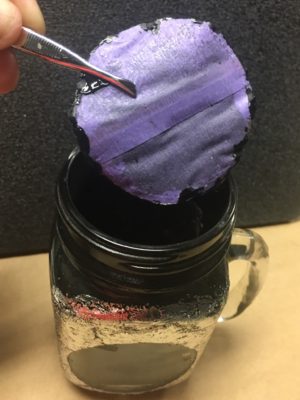
Once the paint is completely dry peel away the die-cut Purple Tape circle again and discard this time.
Hint: Tweezers come in handy for this.
Step Seven:
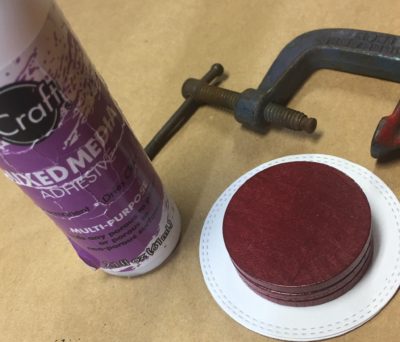
Die-cut from heavy stock (sample uses lightweight chipboard) two of the smallest circle from the Wafer-thin metal die set by Gina K. Designs (large set) and three from white cardstock (or white mat board). Adhere together into a stack the three, white cardstock (or one mat board) and one lightweight chipboard. And set aside.
Hint: You need the smaller die set to make sure your scene fits into the mouth of the jar.
Step Eight:
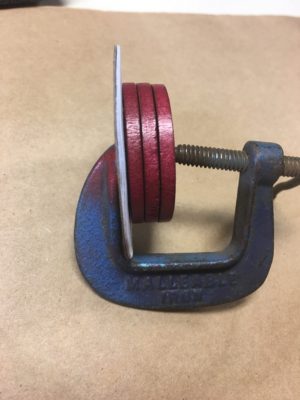
Stack and adhere three wood discs together and then to chipboard/cardstock die-cut as pictured and clamp together to dry. You could also use four or five pieces of chipboard glued together or a single piece of wood the height you need it.
Hint: The height of your stack of wood or chipboard will coincide with the height from the bottom of your window to the bottom of the jar.
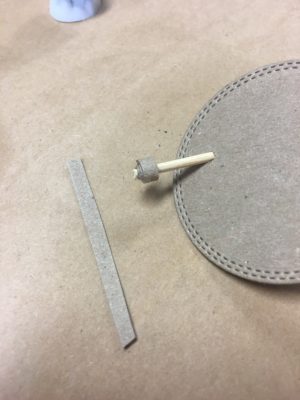
Step Nine:
Poke or punch a tiny hole (the diameter of your skewer) in the remaining chipboard die-cut circle approximately 1/4″ from the edge. Using scissors cut three small strips of lightweight chipboard or heavy cardstock (all should be the same height). Roll one of the strips around the end of the skewer and adhere it using a glue gun. Insert the skewer into the chipboard, die-cut circle (as pictured) and adhere it in place. Roll the remaining two strips and adhere those to the die-cut circle as well. See the picture in Step Ten. The rolls of chipboard are used as spacers.
Hint: Instead of strips of rolled chipboard you could use beads as spacers.
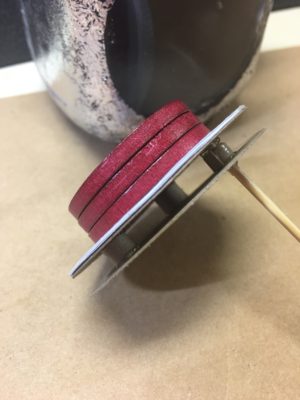
Step Ten:
Adhere together the two die-cut circles with the spacers in between (the skewer will become your handle to place and pull out your winter scene. Paint the skewer with black craft paint (this step was forgotten on the sample until after the scene was built and it was more difficult). Wind battery operated LED light string around the spacers in between the two die-cut circles. Using scissors cut a strip of vellum to cover and diffuse the light strip. Use Super Tape to adhere the vellum.
Hint: In the absence of vellum use tracing paper.
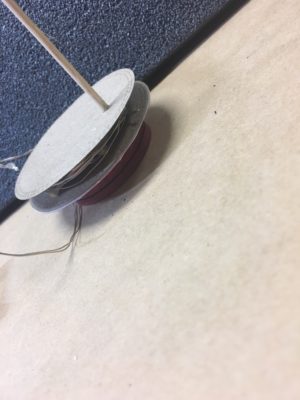
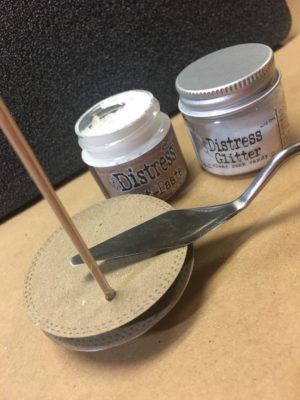
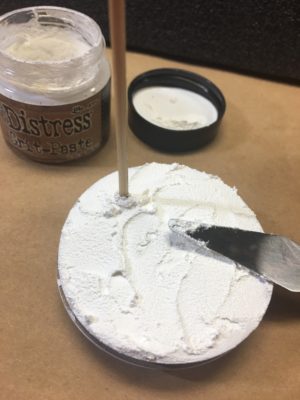
Step Eleven:
Spread Tim Holtz Grit Paste onto the top die-cut circle (the side where the skewer is sticking out) and sprinkle with Distress Glitter (Rock Candy) or other clear glitters to add sparkle. Set aside.
Hint: No Grit Paste? Use modeling paste or (dare I say it . . . toothpaste).
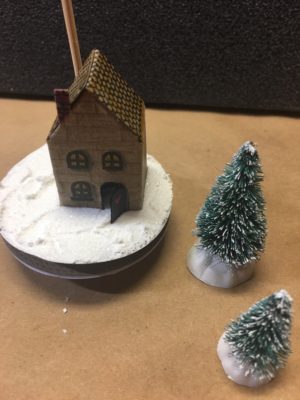
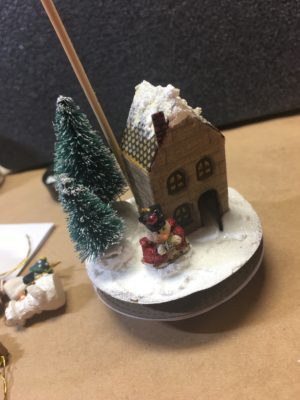
Step Twelve:
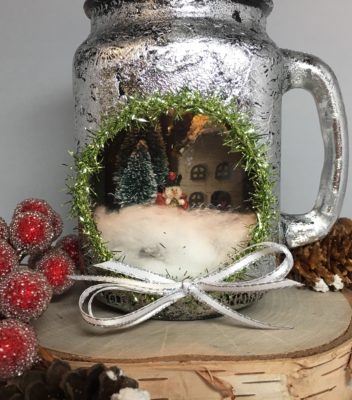
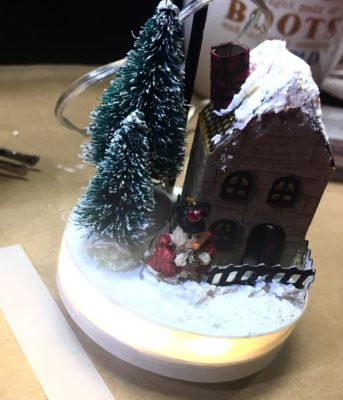
Add a tiny die-cut (or figurine) house, snowman, and some trees to the grit paste (add a little hot glue to keep the pieces in place). A tiny fence around the house is a nice touch.
Hint: You can use any tiny die-cut pieces inside (my plan was to use the houses from the Tim Holtz Snowglobe die set many of you probably have but because I just moved and am still trying to organize my dies I had to use what I could find. Even though it’s just a generic die-cut for which I had to hand-cut a chimney (see the difference in the first and last pic below), I think it turned out really cute.
Step Thirteen:
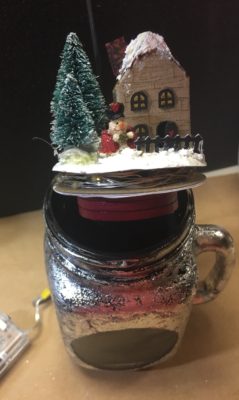
Place a couple of stretched out cotton balls in the bottom of the mason jar and then use your skewer “handle” to lower your scene into the jar and trim the skewer so that you don’t notice it sticking out.
Hint: you can run the cord and the little battery pack inside the jar along with the outside of the circle window and Velcro inside the jar above the circle window and it won’t show because the inside is painted black to hide it.

Step Fourteen (Final Step – Yay!):
Add some tinsel or trim around the circle and finish with a bow at the bottom.
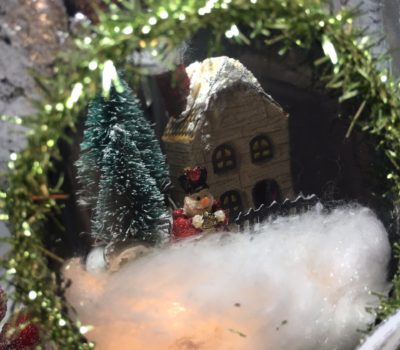
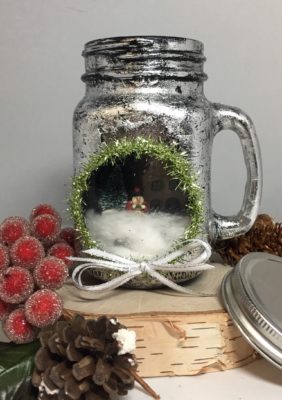
It’s so fun to see the tiny scene through the window and if you set under a lighted area it lights up even more. I hope this inspires you to start your holiday crafting early. I can see this being a great teacher gift your child can help create. Even younger children can help put some “snow” on the trees and decorate a little die-cut house or village. If you try this project, don’t forget to tag Therm-o-web so we can see what you create!
Thank you for sticking around to read to the end of this very verbose set of instructions!
Wendy