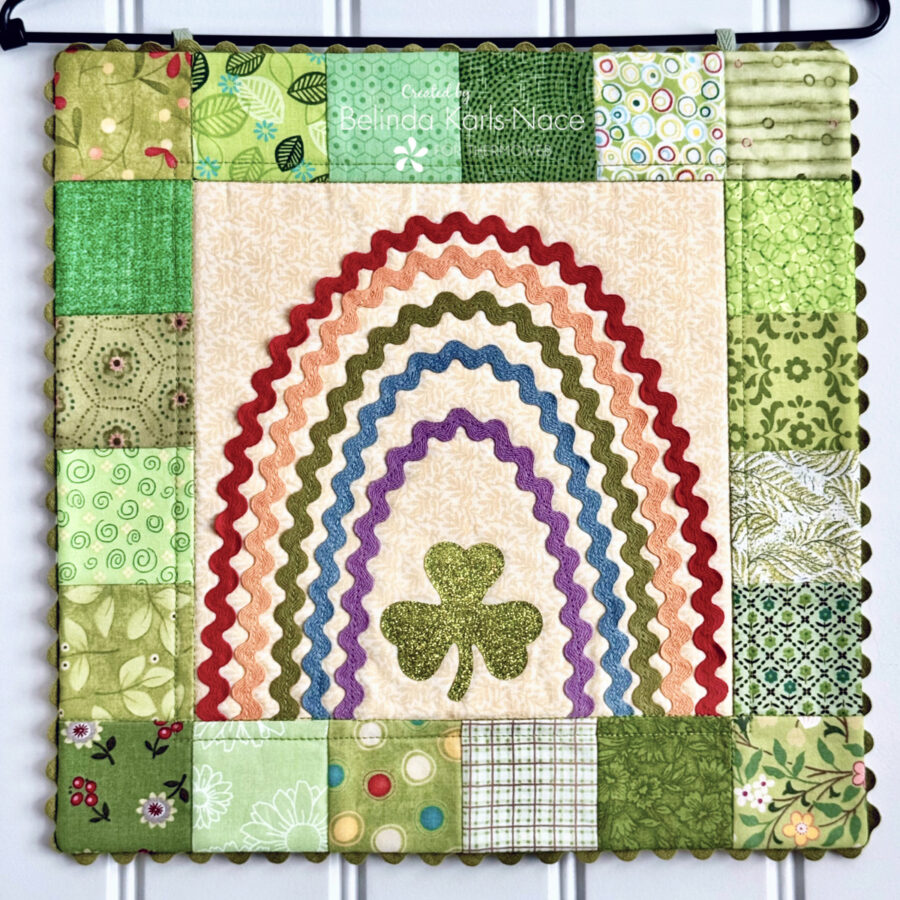
Lucky Charm Mini Quilt featuring HeatnBond
Greetings friends! It’s Belinda from Blue Ribbon Designs, here with a brand new project tutorial featuring an assortment of my favorite HeatnBond products. Today, I am excited to share my “Lucky Charm” mini quilt with you.
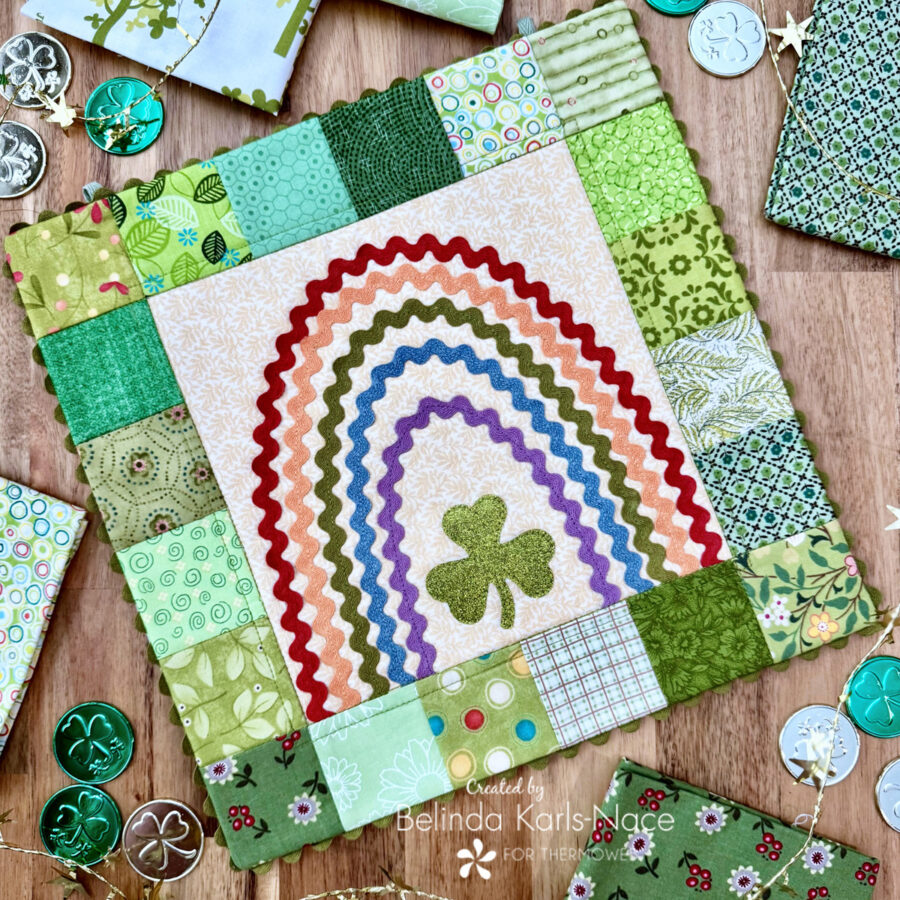
Do you like to decorate for seasons and/or holidays? I find I like to change up small home décor items every month or two to brighten up my home. One of my favorite items is a small quilt table stand that I change each month. With March right around the corner, I thought I would create a new mini quilt with a St. Patrick’s Day theme. This easy-to-make small quilt uses scrap fabrics and colorful rick rack, plus a little sparkle (thanks to HeatnBond Sparkle Paste).
Let’s get started! Simply gather the materials/supplies listed below, then download the pattern with PDF templates and quilt layout image.
*NOTE*: This tutorial requires basic quilting knowledge. If you need additional assistance to piece your quilt, search/visit the Internet, or look at a basic quilting book to learn the fundamentals of quilting.
What you need:
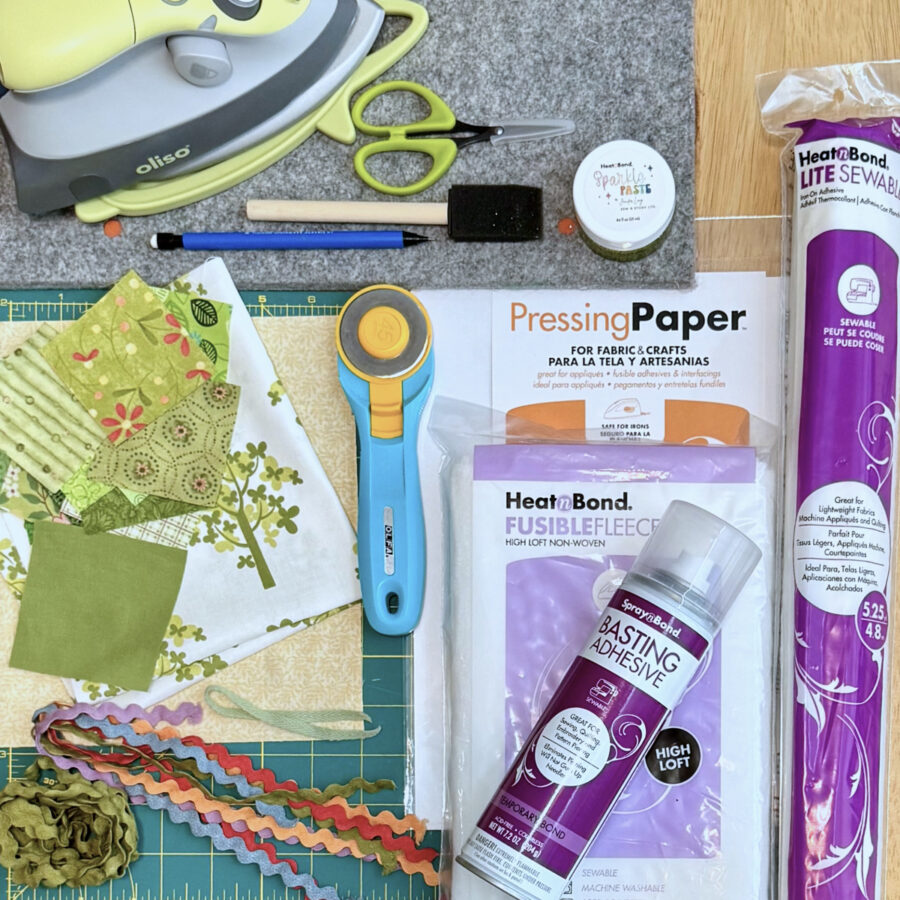
- HeatnBond Lite Iron-On Adhesive
- 1 – 3” x 3”
- HeatnBond Fusible Fleece
- 1 – 12 ½” x 12 ½”
- Tear Away Machine Embroidery Stabilizer by HeatnBond – 8-inch x 8-inch
- 1 sheet
- Pressing Paper Fabric and Craft Sheets
- 1 sheet
- SpraynBond Basting Adhesive Fabric Spray
- HeatnBond Sparkle Paste by Jennifer Long Sew A Story
- Color: Sprout
- Optional: HeatnBond Fabric Fuse PeelnStick Fabric Adhesive Tape, 5/8 in
- Cotton Fabrics: Scraps
- 20 – 2½” squares of assorted green fabrics (patchwork border)
- 1 – 3” green square (shamrock)
- 1 – 8 ½” x 8 ½” yellow squares (center background)
- 1 – 12 ½” x 12 ½” piece of backing fabric
- Rick Rack (model uses Hand-Dyed 100% Cotton Half Inch Rick Rack from Lady Dot Creates)
- 20” Red
- 18” Orange
- 16” + 52” Green (rainbow and perimeter of quilt)
- 14” Blue
- 12” Purple
- Optional, if Hanging: Twill Tape or Ribbon
- 2 – 2” pieces (hanging tabs)
- Optional, if Hanging: Quilt Hanger (model uses Ackfeld Scroll Table Stand Quilt Hanger – 12″ x 14″)
- Oliso Iron
- Olfa Cutting Tools (cutting mat, rotary cutter)
- Sewing Machine
- Basic Sewing Supplies/Tools (paintbrush, small sharp scissors, pins and/or wonder clips, rulers, sewing thread, pencil, etc.)
How to Make a Lucky Charm Mini Quilt
(12½” x 12½” with rick rack)
1. Download and print the Lucky Charm Mini Quilt PDF.
Lucky Charm Mini Quilt – A Project for the Therm O Web Blog
Print actual size – do NOT “fit to page” or “shrink to fit.”
- Print both pages on regular printer paper.
2. Prepare Shamrock
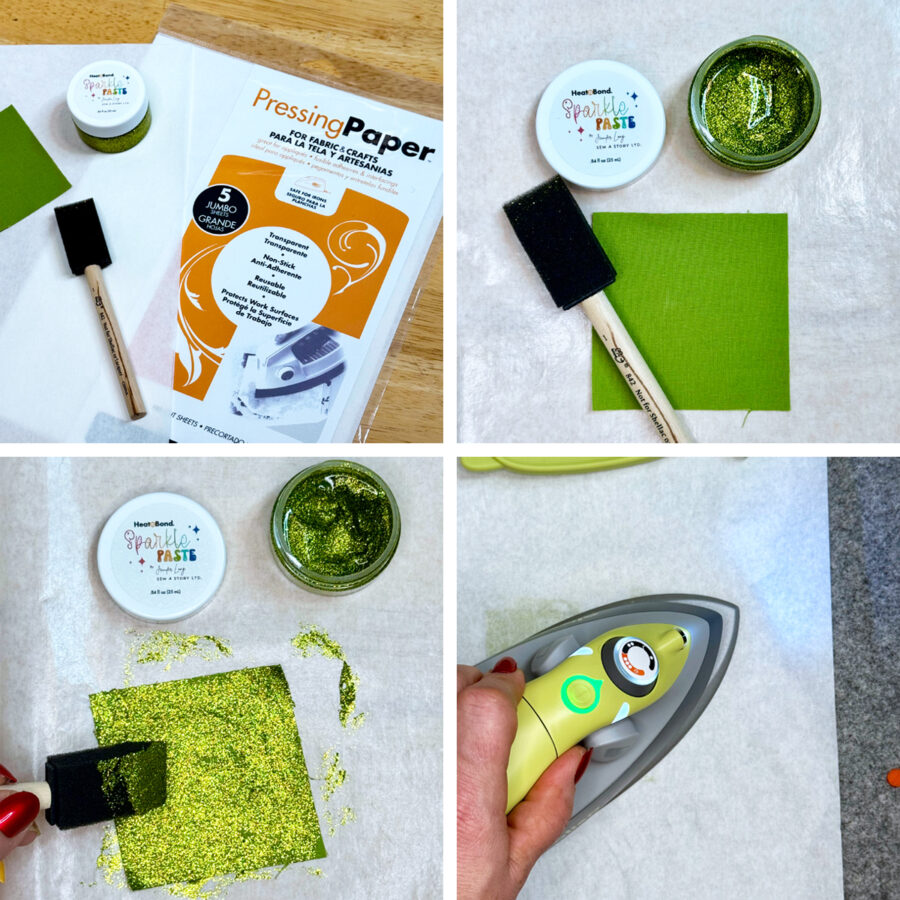
- Apply HeatnBond Sprout Sparkle Paste to 3” square of green fabric. I used a small foam brush to apply. Play with the sparkle paste to get your desired results.
- Protect work surface with HeatnBond Pressing Paper. PRO TIP: Work on one side of the pressing paper – then cover with the other side when pressing.
- Apply the desired amount of Sparkle Paste to fabric with a brush or palette knife. Wash the tools immediately afterward in warm, soapy water.
- Let dry 1 hour.
- Preheat dry iron to cotton setting (high heat), no steam. Cover design with HeatnBond Pressing Paper and press with medium firm pressure for 60 seconds.
- Let Sparkle Paste cure for 24 hours. Sparkle Paste will now be permanent and machine washable.
- The durable glittery finish won’t flake off and will stand up to frequent use and handling.
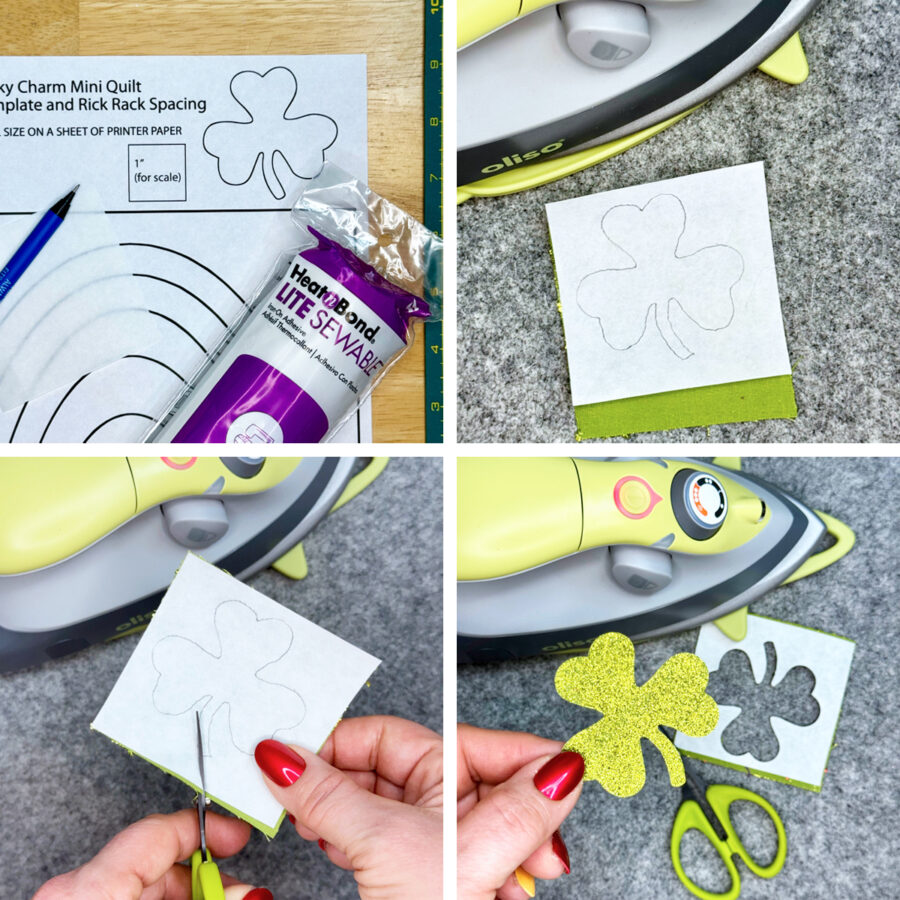
- Apply HeatnBond Lite Iron-On Adhesive to the back of the 3” square of green fabric (with Sparkle Paste).
- Trace the shamrock template on to the paper side of the 3” square of HeatnBond Lite Iron-On Adhesive with a pencil.
- Pre-heat iron to medium heat, no steam.
- Place traced shamrock template on the wrong side of fabrics (printed paper, smooth side, should be face up).
- Place and hold the iron on the paper for 2-3 seconds.
- Allow it to cool.
- Cut or trim the shamrock on the traced line to create the desired shape. Leave paper in place until ready to fuse in place.
3. Create Center Rainbow Block
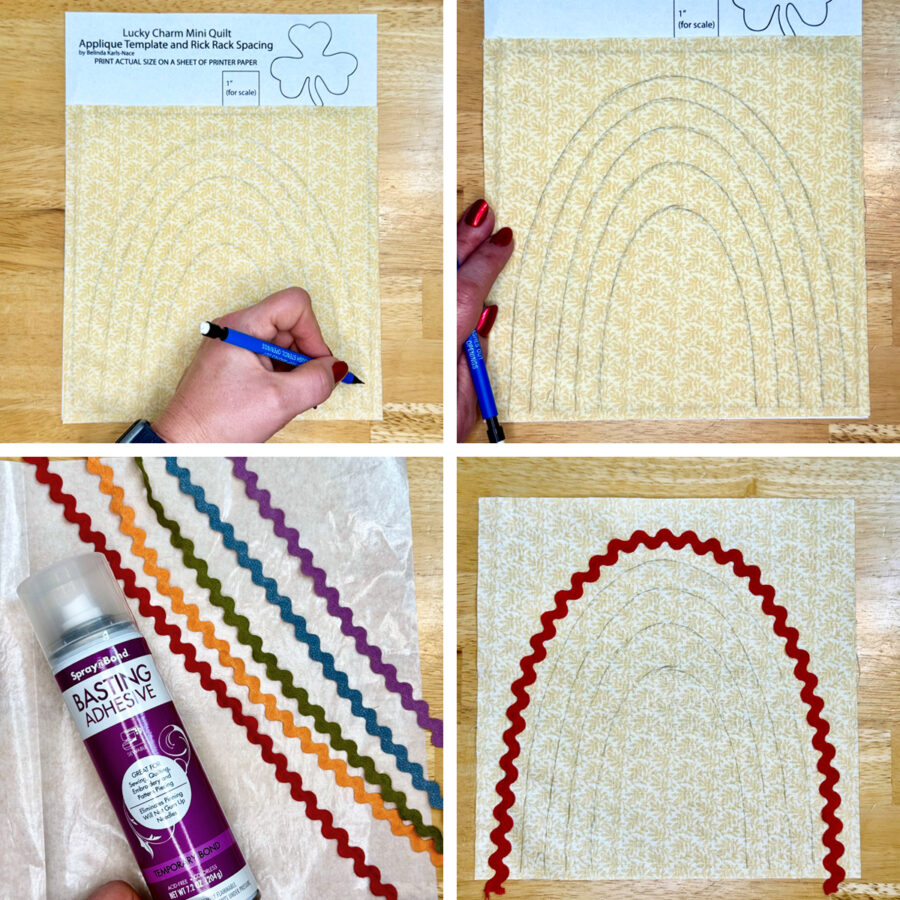
- Trace rainbow lines on to 8 ½” square of yellow fabric.
- Center the 8 ½” square of yellow fabric right side up on top of rainbow template. Line up the fabric on the bottom and sides of the printed paper template.
- Trace the rainbow lines onto the right side of the fabric with a pencil. A lightbox or window may help with this step if you are using a darker yellow fabric. I was able to easily see the lines through the fabric.
- Apply SpraynBond Basting Spray Adhesive to rick rack (working with one piece at a time) to hold it in place for stitching.
- Protect work surface with HeatnBond Pressing Paper.
- Shake SpraynBond Basting Spray Adhesive well.
- Hold can upright, 12 inches from rick rack. Press spray pad button and apply a light coating of adhesive using a sweeping motion.
- Wait 30 seconds, then place the rick rack over the designated pencil line on the yellow background fabric. Reposition as needed.
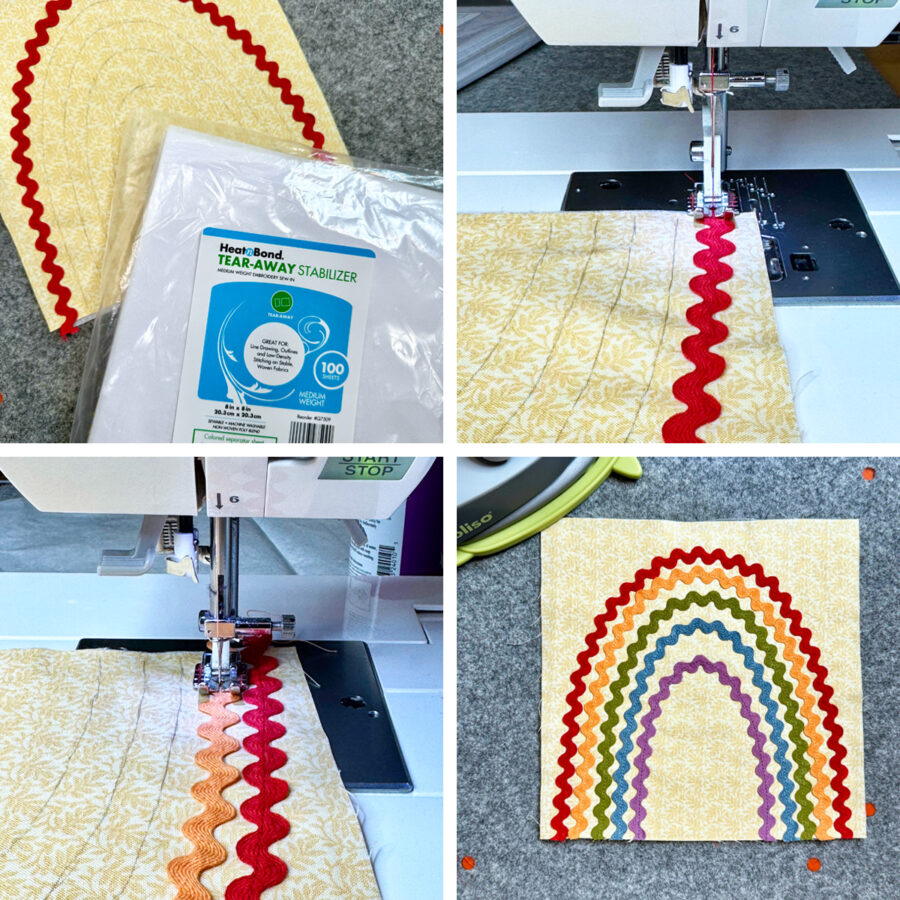
- Place block on top of an 8” x 8” sheet of HeatnBond Tear-Away Stabilizer. Sew down the rick rack with a straight stitch using coordinating sewing thread. Repeat until all five colors of the rainbow have been added.
- Fuse the shamrock in place under the rainbow.
- Pre-heat iron to medium heat, no steam.
- Peel off paper.
- Center/arrange shamrock, adhesive side down.
- Press and hold iron for six seconds on the shamrock, until the piece is bonded.
- Sew down the shamrock using a straight stitch or your favorite applique stitch. Tear away the stabilizer (use small sharp scissors to help remove the stabilizer, if necessary).
4. Create the quilt top.
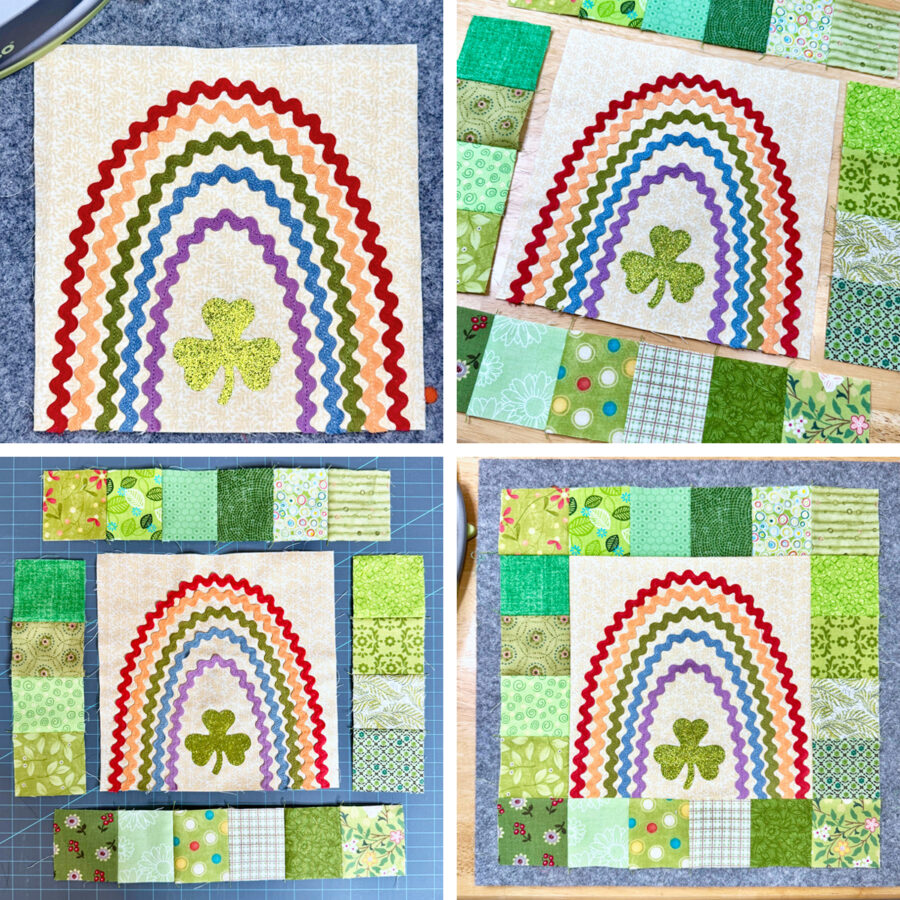
- Create the patchwork border by sewing together the 2½” x 2½” squares, as shown. Use a ¼” seam allowance. Create two columns of four 2½” squares and two rows of six 2½” squares.
- Lay out, pin, and sew one patchwork column border strip unit on each side of the center rainbow block.
- Lay out, pin and sew one patchwork row border unit on the top of the combined center unit. Lay out, pin and sew one patchwork row border unit on the bottom of the combined center unit.
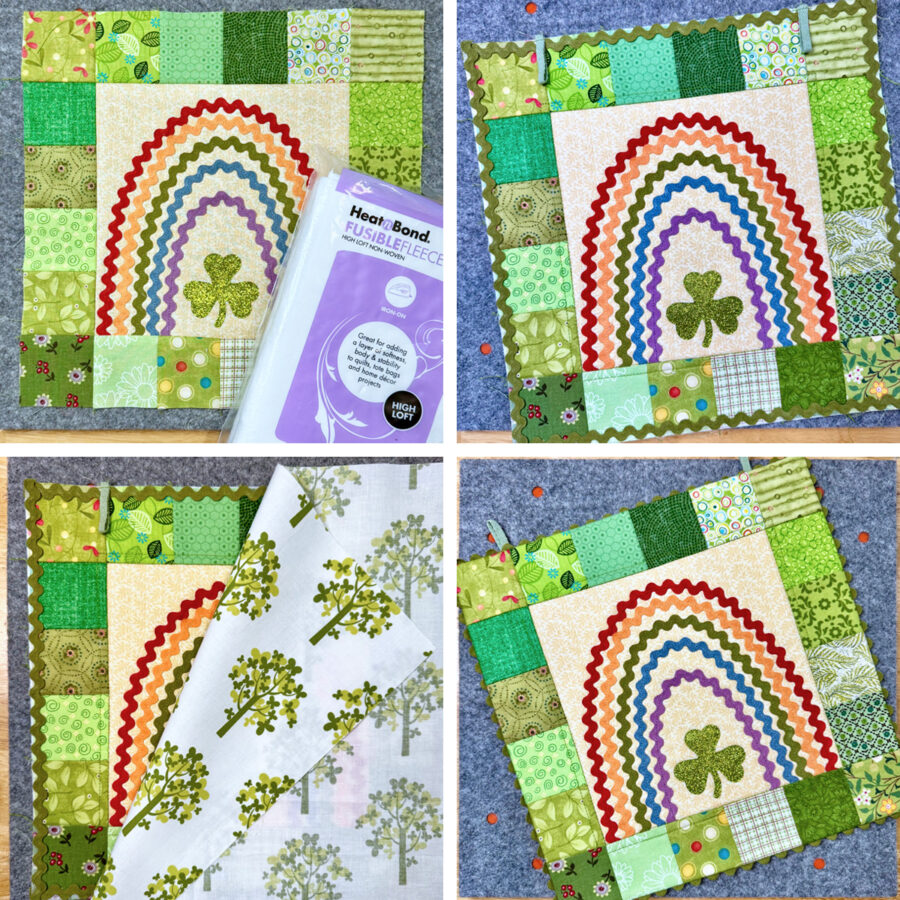
- Center and fuse the 12½” x 12½” piece of HeatnBond Fusible Fleece to the wrong side of the 12½” x 12½” quilt top, following the package instructions.
- Pre-heat iron to a medium setting, no steam.
- Place the rough side of the Fusible Fleece on the wrong side of the quilt top unit.
- Cover with a lightweight, dry pressing cloth.
- Press and hold iron with medium pressure for 10-15 seconds. Repeat by lifting iron to new area, slightly overlapping previous area until the entire surface is bonded.
- Allow it to cool.
- Quilt as desired.
5. Assemble the quilt.
- Baste rick rack in place around the perimeter of the quilt top.
- Baste hanging tabs in place, if desired.
- Place quilt top unit and backing fabric right sides together and sew around the perimeter with a ¼” seam allowance, leaving an approximate 3” opening for turning.
- Clip corners and turn right side out through opening. Push out corners and press well.
- Sew the opening closed or use HeatnBond Fabric Fuse PeelnStick Fabric Adhesive Tape, 5/8 in, to seal the opening left for turning closed (no sew, no heat).
- Adhere the tape inside the opening along the edge.
- Peel off the paper liner.
- Press opening closed with firm pressure. Try using the rounded side of a metal spoon and pressing down with your thumb while applying heavy, consistent pressure. The harder you press, the better the bond. Repeat on back side of item.
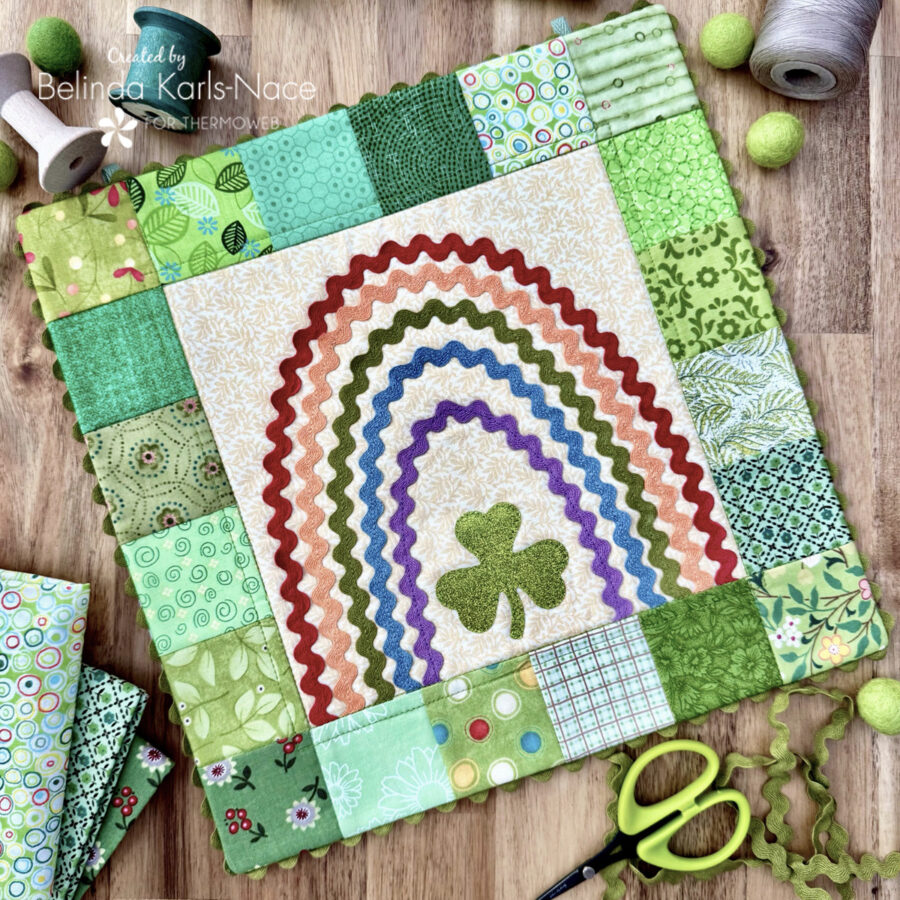
Your Lucky Charm small quilt is now complete. Place the mini quilt on a small quilt hanger or stand to display or use as a table topper. This makes a cheerful seasonal display. It also works great as a small table topper, placemat, or snack mat.

Thank you for joining me today for my Therm O Web blog tutorial. I hope this post inspires you to create a Lucky Charm mini quilt, using scrap fabrics and materials you have on hand. To see more of my projects and patterns, stop by my blog, website, and/or Instagram – I would love to visit with you and see what you create!

Nadine
February 17, 2025 at 7:01 pm (4 months ago)I did not find the 2 pg tutorial .pdf pattern.
Belinda Karls-Nace
February 17, 2025 at 7:07 pm (4 months ago)Please see step one of the tutorial – click on the link provided (Lucky Charm Mini Quilt – A Project for the Therm O Web Blog).