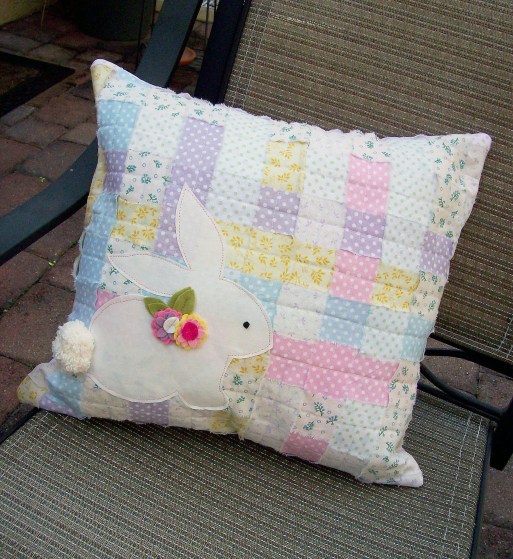
This week is all about inspiration, and from one of our favorite places Pinterest. After doing a bit of searching and find a sweet bunny pattern along with a large pile of fabric strips sitting at the end of the craft table, a quilted project seemed like a perfect way to go.
With strips of torn fabric (you’ll need about 30 strips that measure approximately 2 by 17 inches), I laid them out on top of a square (approximately 14 by 11 inches) piece of HeatnBond Fusible Fleece and created a basket weave effect. Once each strip was in place where I wanted them, I ironed the front panel to the Fleece and trimmed any extra fabric off each side. Then I quilted the strips by sewing the edges and middles of each strip (using a ¼” seam allowance so the edges of each strip were left raw). The back panel of the pillow was then cut from one solid piece of fabric and ironed on to Fusible Fleece as well.
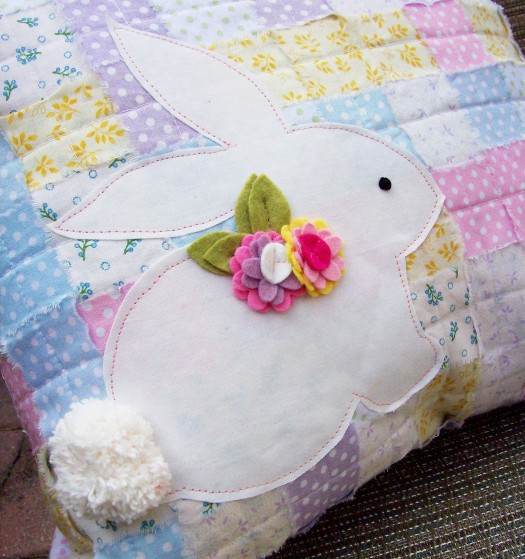
*This sweet bunny pattern can be downloaded free from this page. I found it on Pinterest here too! I cut the Bunny from two pieces of white fabric and fused the layers together using HeatnBond Lite Iron-on Adhesive. I added thread for the eye. Then I used a light coating of SpraynBond Fusible Adhesive Spray on the back of the bunny (be sure to protect your project from any overspray), allowed it to dry and then placed the bunny on my patchwork square. When I had it where I wanted it, I ironed it onto the pillow so it stayed in place as I stitched around it. I added the felt flowers and leaves to the bunny.
*Lastly, the pillow face and back were sewn together, stuffed and completed with a stitched side and a pom-pom tail.
Spring Bunny Pillow by Andrea Budjack
Supplies:
SprayNBond Fusible Adhesive Spray
HeatnBond® Lite Iron-on Adhesive
HeatnBond Fusible Fleece
Fabrics
Pillow form or stuffing
Flower trims die cut from a variety of dies (Sizzix, Papertrey Ink and Provo Craft)
Wool Blend Felt (GiantDwarf.etsy.com)
Don’t forget…you can shop for all the HeatnBond and SpraynBond products used in this Featured Project right from the comfort of your home! Our Therm O Web online store is not only safe and convenient..it’s easy to use! Click here to pick up these products and more!
15 Comments on Hop Along Spring Pillow -Featured Project
2Pingbacks & Trackbacks on Hop Along Spring Pillow -Featured Project
-
[…] Spring Bunny Pillow […]
-
[…] Spring Bunny Pillow […]


jacquelyn
March 18, 2013 at 8:09 am (12 years ago)I’ve appliqued with thermoweb on a quilt front. A small part did not adhere. The packaging warns not to sew on this adhesive after application. What can happen? I hope I don’t have to redo the quilt front. I appreciate any suggestion you can give me.
C athy Martin
March 21, 2013 at 11:02 am (12 years ago)So cute! I needed some inspiration. Thanks.
vicky
March 21, 2013 at 11:39 am (12 years ago)adorable!
Linda Aldrich
March 21, 2013 at 11:47 am (12 years ago)Love the sweet pastel patchwork, white bunny, and love that tail.
Melanie Fritz
March 21, 2013 at 2:36 pm (12 years ago)I never used the fuseable spray before, but will look for it the next time I’m after Heat n bond! I love the bunny pillow, and I may find the time to make one for Easter this year.
Cheri Stuller
March 21, 2013 at 6:49 pm (12 years ago)What an adorable project! Although I’ve been sewing & crafting since I was a young girl, I have very limited experience using any of today’s vast array of fusible products (other than fusible interfacing for garments). By using therm-o-web products as time-saving tools, I’m sure my Spring Bunny Pillow will happily hop into my niece’s Easter basket, rather than falling prey to the UFO vortex. Thank you for the pattern!!
admin
March 22, 2013 at 2:02 pm (12 years ago)Thanks so much Cheri! We’re certain our products will definitely help this adorable pillow get into that Easter Basket! Be sure to visit our Facebook wall for a giveaway of our HeatnBond products!
Beth R
March 21, 2013 at 6:56 pm (12 years ago)Adorable!!
Susan Selby
March 21, 2013 at 9:31 pm (12 years ago)The bunnies here eat all of my shrubs and flowers, butthey are still adorable. Love your pattern.
Carol
March 21, 2013 at 11:17 pm (12 years ago)What a great blog! I love all the cute Easter ideas!
admin
March 22, 2013 at 2:02 pm (12 years ago)Thanks so much Carol! That is so appreciated!!
Nancy
March 23, 2013 at 2:49 am (12 years ago)I love this = I am going to use it for a project to do with my 10 yr. old grandsughter for Easter
She has a new sowing machine – her very own- and this is just the right thing to have her use it and learn about the other products. Thanks!
tururú de Baby-Deco
March 26, 2013 at 11:15 pm (12 years ago)Sooo nice!! 😀