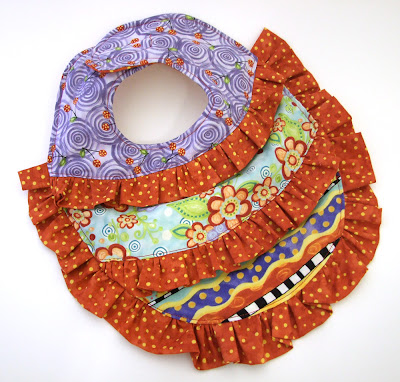
I got to go to a baby shower this past weekend. I knew that our friends, Amber and Ryan were having a girl. I was so excited! I have two boys and here was my chance to make something with ruffles. I came up with this bib pattern and wanted to share it with you. The three pattern pieces can be found here, here, and here for printing. Tape them together if you want to make the one ruffle bib. This pattern can be shrunk or enlarged to suit the size you need.
Here’s the fabric you will need to cut….
One Ruffle Bib(black)
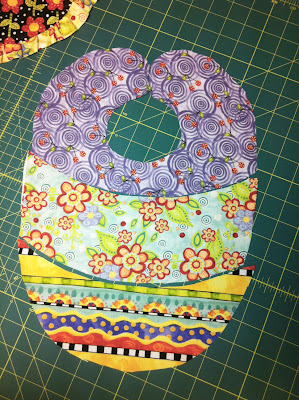
2 full bib pieces for front and back (tape the three pieces together to make one bib)
1 full bib piece from HeatnBond® Fusible Fleece
2.5″ x 44″ fabric strip for ruffle
piece of hook and loop tape
Three Ruffle Bib
1 piece of fabric cut for each of the 3 bib pieces
1 full bib piece for bib backing (tape the three pieces together to make one bib)
1 full bib piece for bib back
2.5″ x 44″ fabric strip for ruffle
Two pieces of 2.5″ x 22″ fabric strips for ruffle
piece of hook and loop tape
Just in case you’re wondering, all of the fabrics I used here come from my Polka Dot Garden Collection of fabric.
After cutting out all of the pieces out, fold the ruffle pieces in half with the right sides facing outward.
With your machine or by hand run a gathering stitch along the raw edge of the fabric strip. Do this for all of the ruffle strips you will need for your bib.
Pull one of the threads of your gathering stitch to gather the ruffle or ruffles.
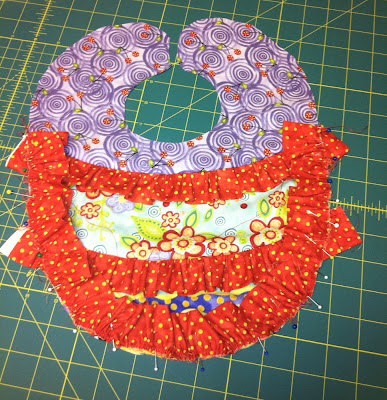
If you are making the Three Ruffle Bib, Start by pinning one of the short ruffle sections across the top of the second bib piece. Pin the ruffle so the raw edges hang over the side of the bib piece. It will eventually get sewn over with another ruffle. The second short ruffle section will get pinned across the top of the third bib piece.
Before sewing the ruffles, pin the bottom of bib piece one to the top of bib piece two. Sew together.
Pin the bottom of the second bib piece to the top of the third bib piece and sew together.
If you’re making the One Ruffle Bib this is where you jump in. Both bibs have the outer ruffle. This ruffle will vary in length because of the gathering. Th make sue the ruffle is center fold it in half to find the center. Pin the center of the ruffle to the center of the bottom of the bib. Continue to pin up each side. Turn the raw edges of the ruffles into the fold of the ruffle before pinning.
Your bib should look like either the picture above or the picture below depending which bib you are sewing.
Next place the right side of the bib backing facing the right side of the bib front. Place the fleece on top of the back of the bib back. Pin all of the layers together. Sew these layers together leaving a 4 inch opening towards the top for turning. Clip the round edges up to the thread, taking care not to cut the seam. Turn and press.
*Note* Because seam allowance, ruffles, etc, vary, when pinning the Three Ruffle Bib start at the neck and work your way down the sides pinning the layers. Smooth as you go and you might find there is a bit of extra fabric left at the bottom of the bib back. After sewing the three layers together trim the excess away.
Hand sew the turning hole closed. Top stitch around the edges.
Sew a piece of hook and loop tape at the top of the bib for opening and closing. Trim and loose threads.
I hope you enjoyed my Ruffled Bib Tutorial, thanks for stopping by the blog and I hope you stop back by again soon.
Have a great day!
Visit my Website, Etsy Shop, Blog, Facebook


