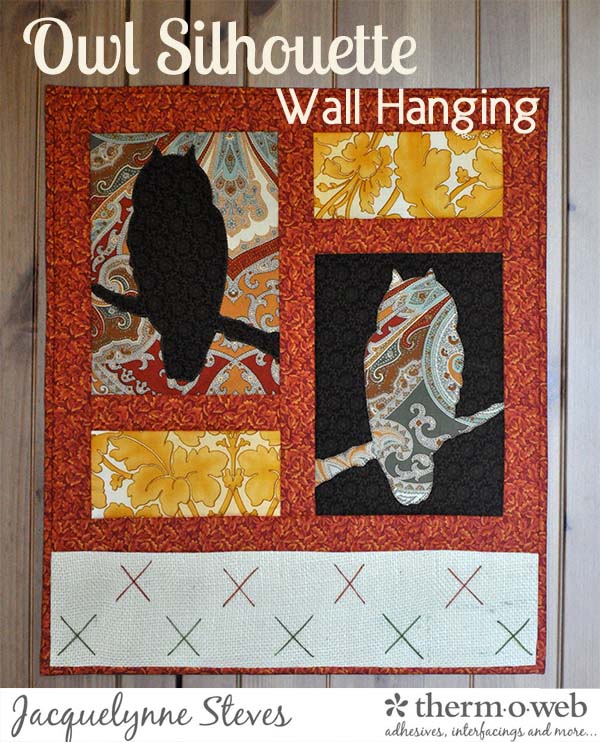
I love this little fall project- you can easily make it in an afternoon! As usual, I used HeatNBond Lite to do my machine applique. Doing machine applique around the owl silhouettes is very simple because it’s all one piece- but since this is a wall hanging that probably won’t be washed, you could use HeatNBond Ultrahold and skip the machine applique all together. Also, if you don’t have burlap or linen fabric, you could substitute any fabric for the bottom of the wall hanging.
Fall Quilted Owl Silhouette Wall Hanging
You can click here for a printable PDF of the instructions and the owl pattern.
Approximate finished size: 17 x 20”. All seam allowances are 1/4”. Sew fabrics right sides together.
Materials/Supplies:
- Brown fabric- 2 pieces, each 7 x 9 1/2”
- Multicolor Focal fabric for owl and background- 2 pieces, each 7 x 9 1/2”
- Gold Floral fabric- 2 pieces, each 7 x 3 1/2”
- Orange fabric – total fabric requirement 3/8 yards
- Cut 3 strips, 1 3/4” wide x the width of the fabric
- Cut these strips into the following lengths: 2 strips, each 7” long, 3 strips, each 13 3/4” long and 2 strips, each 17 1/4” long
- Burlap, linen or Aida (cross stitch) fabric- 1 piece, 4 1/2 x 17 1/4”
- Thread for machine applique (brown) and machine quilting (orange)
- Backing fabric- 21 x 24”
- Thin Batting- 21 x 24”
- Thermoweb Heat N Bond Fusible Adhesive – Lite
- Embroidery floss or wool thread- dark green and orange
Fall Wall Hanging
Trace owl pattern onto the HeatnBond fusible web. Turn the pattern over and trace the REVERSE version of the pattern again onto fusible webbing, so you have 2 mirror images of the pattern. Cut out fusible webbing, leaving 1/8- 1/4” around each shape. Fuse one owl to the WRONG SIDE of a piece of brown fabric, and fuse the other owl to the WRONG SIDE of a piece of the Multicolor fabric. Cut out owls on line.
To make owl blocks, remove the paper backing from the backs of owl appliques. Place each owl on the opposite-colored block (7 x 9 1/2” block) and fuse. Use matching thread to machine applique the owls to the blocks.
Sew a 7” long orange strip to the bottom of one owl block, and sew a 7” orange strip to the top of the other owl block. Sew a gold block to each 7” orange strip (refer to the photo of the finished project.)
Sew a 13 3/4” orange strip to both sides of one of the owl block units. Sew remaining 13 3/4” strip to one side of other owl block unit. Sew owl units together to form the center of the wall hanging.
Sew a 17 1/4” orange strip to the top and bottom of the wall hanging.
Sew burlap strip to the bottom of the wall hanging.
Place the backing fabric on the table, WRONG SIDE UP. Place batting on top. Place wall hanging on top of the batting, RIGHT SIDE UP. Pin or baste layers together.
To quilt, stitch in the ditch (along seam lines.) Trim away excess backing fabric and batting. Bind with remaining orange fabric.
 Use embroidery floss (3 strands) or wool thread (2-3 strands) to make X’s on burlap.
(Tip- find the center of burlap and make a Green X about 1 1/4” big at the center point. Make green X’s at ends of the row, then make 2 more X’s in between the center X and the end X’s. Fill in the top row with 3 orange X’s. Don’t worry about making your X’s perfect- this should have a home-made look to it.)


Kathleen McCormick
October 28, 2019 at 1:03 pm (6 years ago)I love this!
Jacquelynne
October 28, 2019 at 2:18 pm (6 years ago)Thanks Kathleen!
krpilk
October 30, 2019 at 8:49 am (6 years ago)Thank you so much for this sweet owl wall hanging appliqué pattern. It is just precious. God bless.