


 Hello Crafty Friends!!
Larissa here today to share a couple different ways to make Easy and ADORABLE Snowman Ornaments using a combination of Therm O Web Products!! Especially if you like Texture, these Ornaments are SURE to bring a SMILE!! I’m attaching them to some Teacher Gifts and I just KNOW they’ll STEAL the Show!!
h1>Snowman Ornaments with Deco Foil

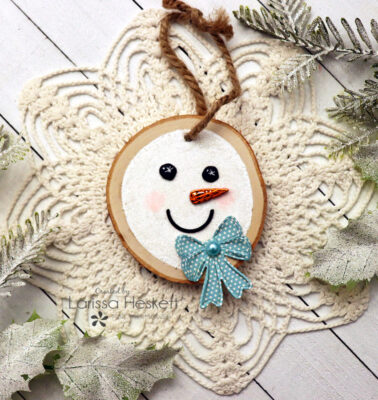
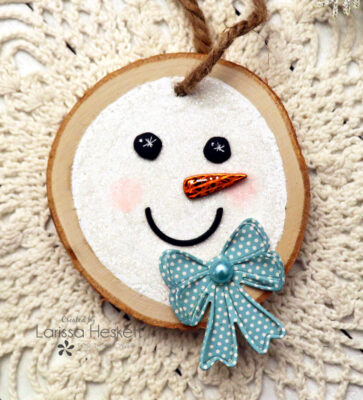
How ADORABLE are these CUTIES!!?? They just make me HAPPY with all of the Texture, Sparkle and Shine!!
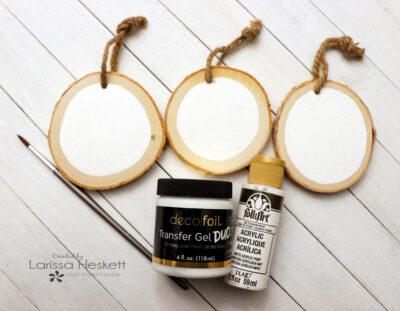
To start I’ve painted a White Circle using some Acrylic White Paint and a Paint Brush to follow the Edge of the Wood Slice Ornaments!! I let the paint dry completely and then I used the same Paint Brush and painted over the Dry White Paint Circle with some of the Therm O Web Transfer Gel Duo!! Then I set them aside to dry completely!!
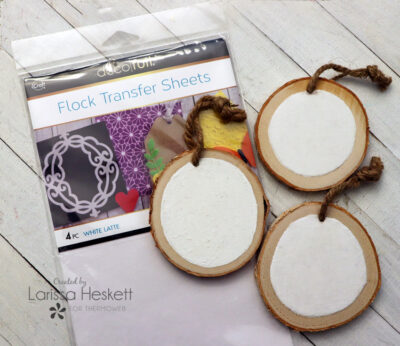
Once dry completely, then I used the Deco Foil White Latte Flock Sheets and placed a piece to fit over the Snowman Circle Painted with Acrylic Paint and the Deco Foil Transfer Gel Duo and then Burnished it into the Deco Foil Transfer Gel Duo to transfer the Flock to the Circle!! SQUEAL!! This is just the SWEETEST in real life!! It resembles the look of Freshly Fallen Snow!!
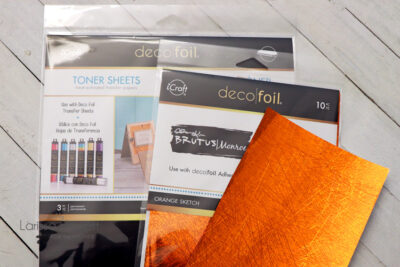
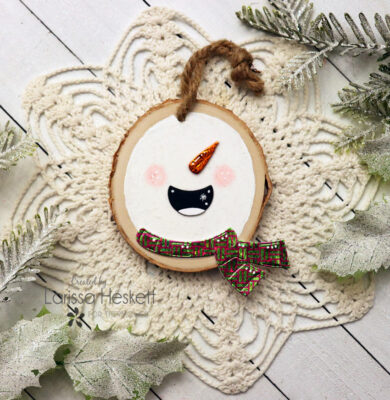
Next, I Foiled some of the Deco Foil Toner Sheets with some of the Brutus Monroe Orange Sketch Deco Foil!! Then I removed the clear Film and Die Cut the Carrot Nose from a Trinity Stamps Slimline Series Happy Snowman Die Set!! (Any Carrot Die would work for this, or even if you just want to free-hand Cut a Long Skinny Triangle!!
I adhered the Black Cardstock Die Cut Eyes and a Sweet Mouth again from the same Trinity Stamps Die Set using some Ultra Bond Adhesive!! I wanted to add some Pink Checks so I used a Q-Tip to apply some Spun Sugar Distress Oxide Ink!! 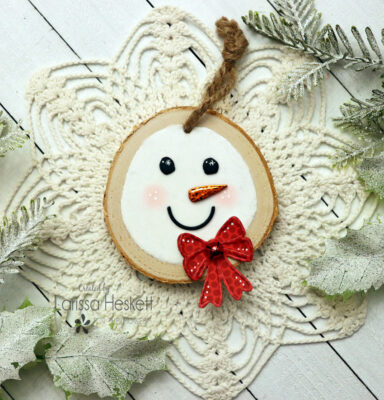
White Gel Pen Details add some Highlights and then to finish off the Design I added a Trinity Stamps Die Cut Bow from the Bunch of Bows Die Set!! I used Patterned Paper and then added an extra Outline Bow to POP Up for a 3-D look finishing it off with a Mini Red Metallic Jingle Bell to the center of the Bow using Zots Bling Adhesive Dots!!
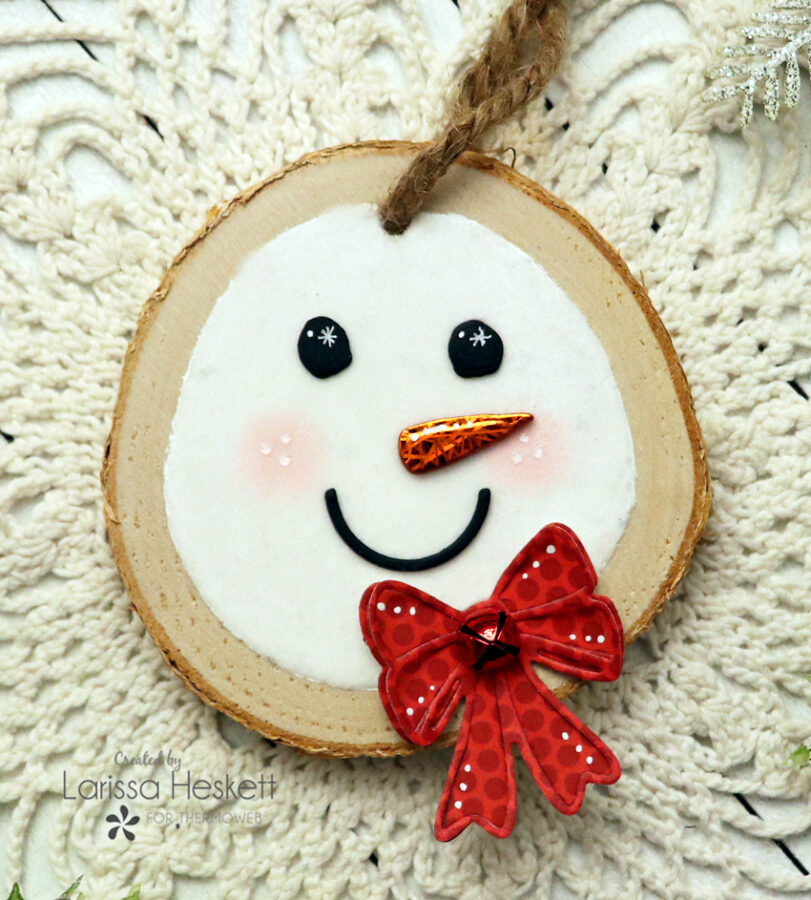
Such a CUTIE Right!!?? I WISH the Flocking showed up better in the photos, but in real life, it adds to the look and dimension of REAL Snow!!
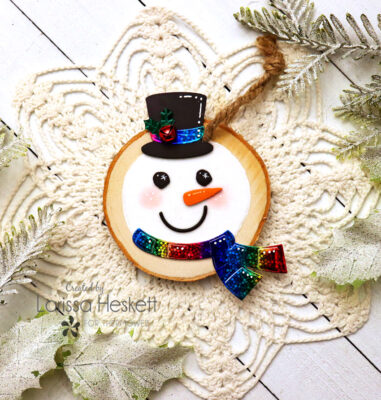
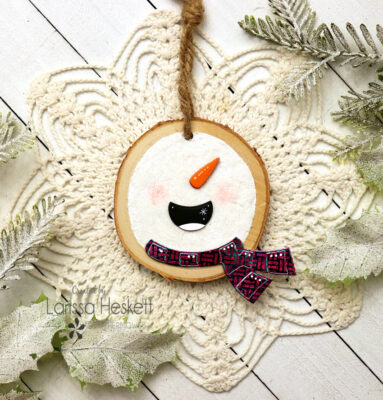
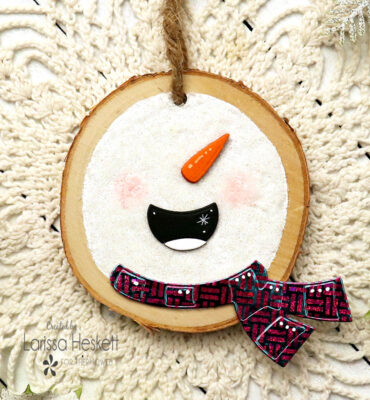
For the Second Snowman, I wanted to add some other elements to bring him to LIFE!! The Black Hat and Scarf are also both Dies from the Trinity Stamps Slimline Series Happy Snowman Die Set!!

I wanted a Flocked Carrot Nose so I adhered an Orange Glow Deco Foil Transfer Sheet to a piece of Orange Cardstock using the Easy Cut Adhesive Sheets!! Then burnished the Deco Foil Flock into the Adhesive and this reveal NEVER gets Old!! Then I Die Cut the Carrot Nose from the Deco Foil Flocked Cardstock!!
For the Scarf and Hat Band, I Foiled a Piece of Brutus Monroe Rainglow Deco Foil to a piece of Toner Sheets!! Then I Die Cut the Hat Band and Scarf from the Deco Foil Sheets!! I added the Hat Band to the Die Cut Black Cardstock Top Hat and added some Trinity Stamps Boughs of Holly Confetti Embellishments and a Mini Red Metallic Jingle Bel using Zots Bling adhesive Dots!! I LOVE the added touch it adds to the Top Hat!!
Next, I adhered the Black Cardstock Die Cut Eyes and a Sweet Mouth again from the same Trinity Stamps Die Set using some Ultra Bond Adhesive!! I wanted to add some Pink Checks so I used a Q-Tip to apply some Spun Sugar Distress Oxide Ink!! I Finished off the Design with some White Gel Pen Highlights and adhered the Scarf to the Ornament using some Zots Bling Adhesive Dots!! How ADORABLE is he!!?? I LOVE how the Elements add a Personality to Snowman!! These would be PERFECT for Personalizing for Teachers, Friends or Family Members!!
For the Third Snowman, I wanted to use a different design, so I used the other Mouth Die in the Trinity Stamps Slimline Series Happy Snowman Die Set!! Then I adhered the Black Cardstock Die Cut Mouth and a Deco Foil Die Cut Carrot Nose using some Ultra Bond Adhesive!! I add some Pink Checks using a Q-Tip to apply some Spun Sugar Distress Oxide Ink!!
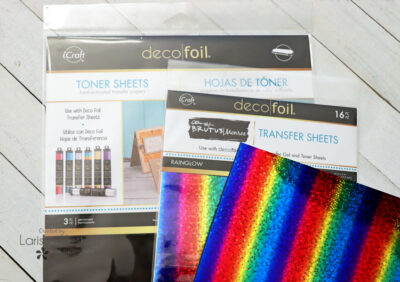
 I chose to use the Negative Twinkling Pink Fancy Foil and placed it over a piece of Deco Foil Toner Sheets and ran it through my Laminating Machine!! Then I removed the Film and cut a piece of the Gina K. Designs Glittering Green Fancy Foil and placed it over the Foiled Deco Foil Toner Sheet and ran it through my Laminating Machine!! Then I Die Cut the Scarf Die from the FUN Patterned Deco Foil Toner Sheet!!
I could NEVER get tired of being able to use the Negative Foil Sheets in order to create CUSTOMIZED Deco Foil Toner Sheets in ANY Color Combo in order to match your Project!! I Finished off the Design with some White Gel Pen Highlights and adhered the Scarf to the Ornament using some Zots Bling Adhesive Dots!! Such a SWEET Design right!! SQUEAL!! I could NEVER get tired of creating these with ALL of the different possibilities available for making them their OWN Snowman!!
For the Next 2 Ornaments, I wanted to change things up and add Texture and Sparkle by using the Gina K. Designs Glitz Glitter Gel!! It’s a COMPLETELY different Look and Feel and is just another AWESOME way to create the look for Realistic Snow!!
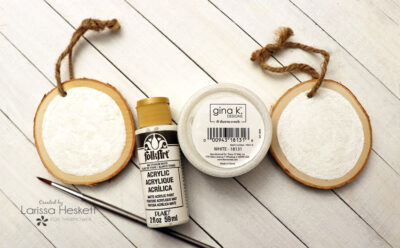
To start I’ve painted a White Circle using some Acrylic White Paint and a Paint Brush to follow the Edge of the Wood Slice Ornaments!! I let the paint dry completely and then I used the same Paint Brush and painted over the Dry White Paint Circle with some Gina K. Designs Glitz Glitter Gel in White!! Then I set them aside to dry completely!!
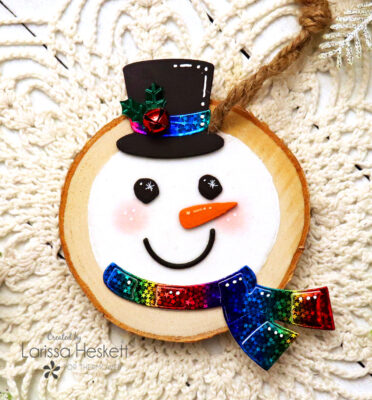
For the Forth Snowman, I wanted to use the same Design as the last Snowman, but I wanted to change up the Scarf Design!!
 I started with the negative to the Gina K. Designs Turquoise Sea Fancy Foils that was a Negative leftover from one of her older Basket Weave Foil-Mates!! I placed it over a Deco Foil Toner Sheet and ran it through my Laminating Machine!!
 I removed the Film and then cut a Piece of the Gina K. Designs Twinkling Pink Fancy Foil and placed it over the Foiled Deco Foil Toner Sheet and ran it back through the Laminating Machine!!
 SWOON!! I LOVE this Color Combo and the FUN Pattern!! Again, KEEP that Negative Foil and repeat the process to create the reverse of this Design, or switch it up by using a different color for a completely different look!! ENDLESS Possibilities!!
I used the same Mouth Die from the Trinity Stamps Slimline Series Happy Snowman Die Set!! Next, I adhered the Black Cardstock Die Cut Mouth and a Deco Foil Die Cut Carrot Nose using some Ultra Bond Adhesive!! I add some Pink Checks using a Q-Tip to apply some Spun Sugar Distress Oxide Ink!!
For the Fifth Ornament, I adhered the Black Cardstock Die Cut Eyes, the Deco Foiled Carrot Nose and a Sweet Mouth again from the same Trinity Stamps Die Set using some Ultra Bond Adhesive!! I added some Pink Checks using a Q-Tip to apply some Spun Sugar Distress Oxide Ink!!
White Gel Pen Details add some Highlights and then finish off the Design by adding a Trinity Stamps Die Cut Bow from the Bunch of Bows Die Set!! I used Patterned Paper and then added an extra Outline Bow to POP Up for a 3-D look finishing it off with Large Trinity Stamps Pearl adding it to the center of the Bow using Zots Bling Adhesive Dots!!
Such a SWEETIE Right!!?? I think he’d make a PERFECT 1st Christmas Ornament for a Baby!! You could just add the details on the backside of the Ornament and add to ANY Christmas Gift!!
How SWEET are these Deco Foiled Flock and Glitz Glitter Gel Snowman Ornaments with Deco Foiled and Deco Flocked Carrot Noses!!?? They make me HAPPY and I look forward to the Teacher’s reactions when they receive them this Holiday Season with their Holiday Gifts!!
Products Used:
Therm O Web:
Deco Foil Transfer Gel Duo
Deco Foil Flock Sheets in White Latte
Deco Foil Flock Sheets in Orange Glow
Deco Foil Toner Sheets
Brutus Monroe Deco Foil Sheets in Rainglow and Orange Sketch
Gina K. Designs Glitz Glitter Gel in White
Ultra Bond Adhesive
Zots Bling Adhesive Dots
Other:
Trinity Stamps Slimline Series Happy Snowman Die Set
Trinity Stamps Boughs of Holly Confetti Embellishments
Trinity Stamps Icy Aqua Satin Baubles
Wood Slice Ornaments
White Acrylic Paint
Paint Brush
Black Cardstock
White Gel Pen
Mini Jingle Bells
So there you have it, a couple different ideas on how to create some really Easy and Adorable Snowman Ornaments to give to anyone SPECIAL this Holiday Season!! They’d be PERFECT as Gifts ALL on their own, or you can adhere them to a Gift Bag/ Box to Dress up the Package and make them Super Festive!! The possibilities are ENDLESS on ways that you can add Personality to them with extra Elements, or keep them Simple!! Either way, they’re SURE to STEAL the Show!!
THANKS SO MUCH for stopping by!! If you create something please share it with us on Social Media using the hashtags #decofoil #thermoweb #ginakdesigns as we LOVE to see what you create!!
Larissa Heskett