


Have you heard the news!
The news about our new collaboration with our friends at Unity Stamp Co?
We’re excited …like really excited about this new relationship and fun products it brings!

Unity Stamp Co. is more than just another stamp company; they base their company values on inspiration, Motivation, Positivity, and enjoying the creative side of life!
Deco Foil is proud to partner with Unity to create an exclusive line of Toner Card Fronts that reflects the style of Angela and Whitney Magnuson.
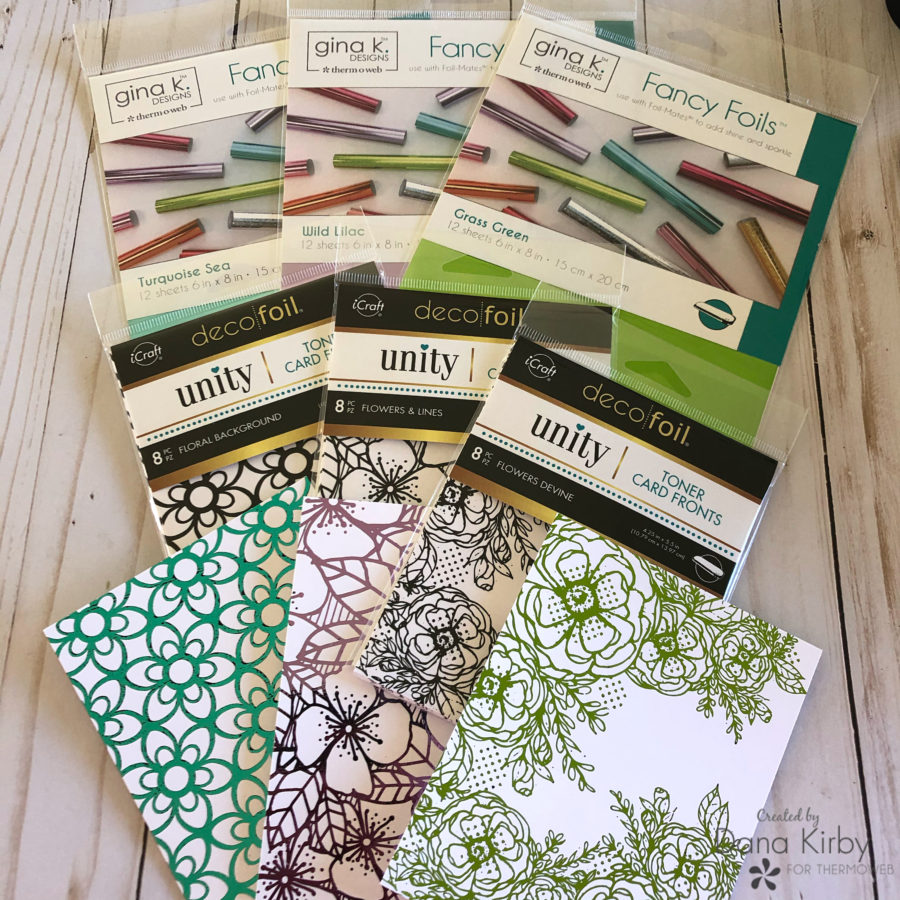
Unity Card Fronts
We hope you find yourself reaching for these again and again as there are so many wonderful ways to use them! First…let us introduce you to the SIX incredible designs:
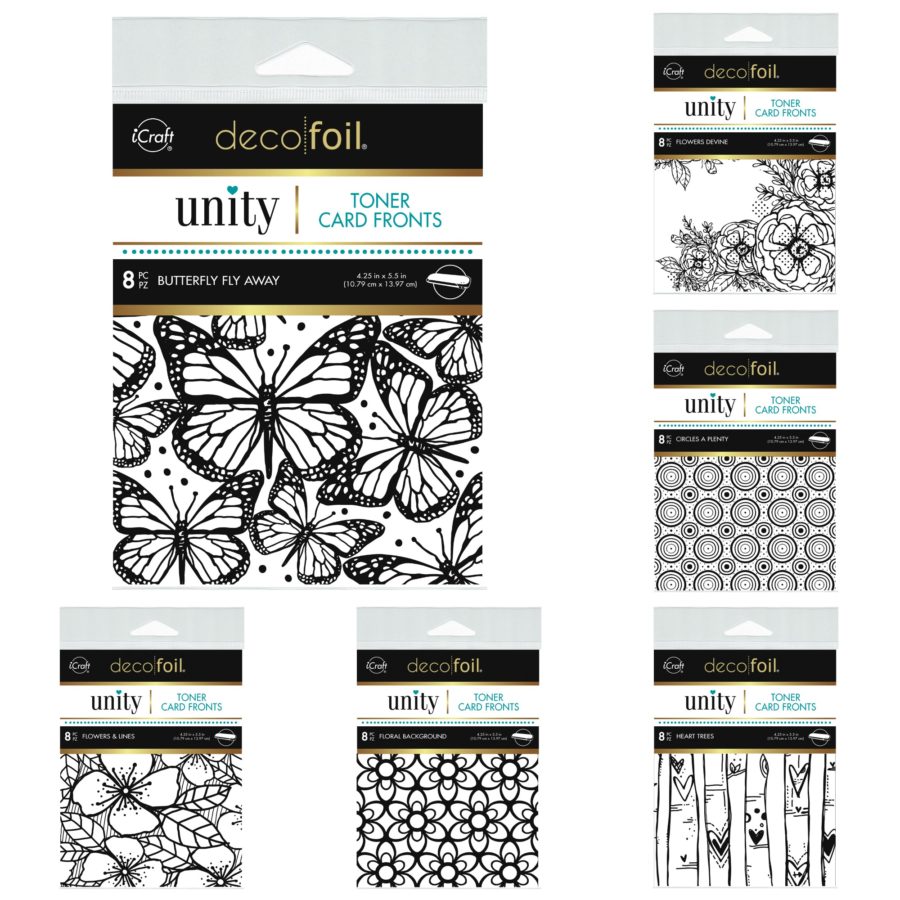
LtoR: Butterfly Fly Away, Flowers Devine, Circles A Plenty, Flowers & Lines, Floral Background, and Heart Trees.
Card Fronts are just one of the many options! Cut out the designs for unique embellishments, use them on your papercrafts or scrapbook pages and don’t forget mixed media and home decor!
Kicking off this week of creativity is Dana Kirby with a colorful set of cards we know you’ll love!
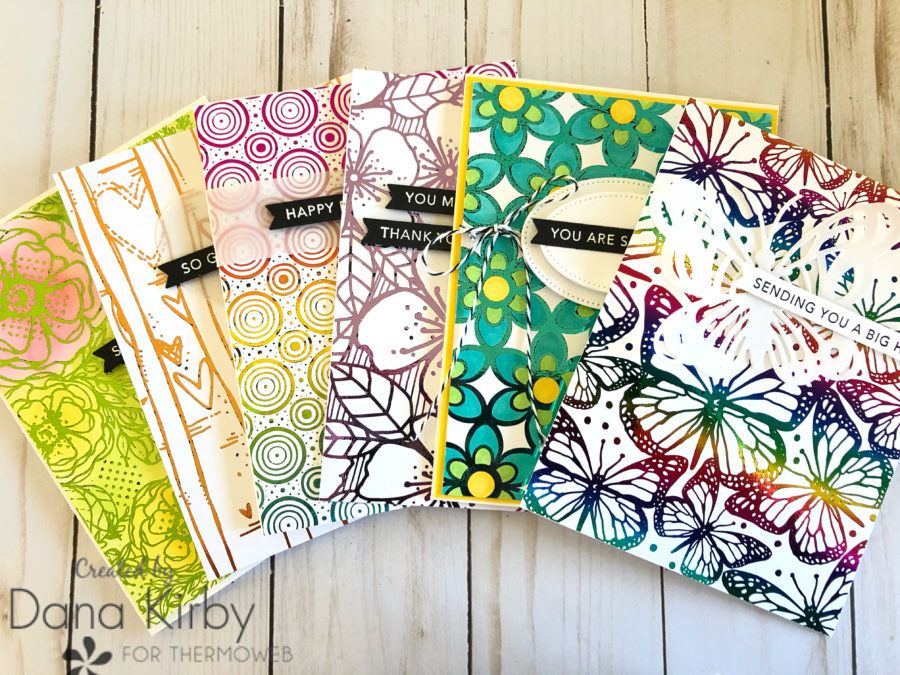
Hello Friends! It is Dana here today sharing Six cards with you all!! I started creating with the Unity Toner Card Fronts and got a little carried away. So grab something to drink and we will get started.
Deco Foil for Unity Stamps Card Fronts
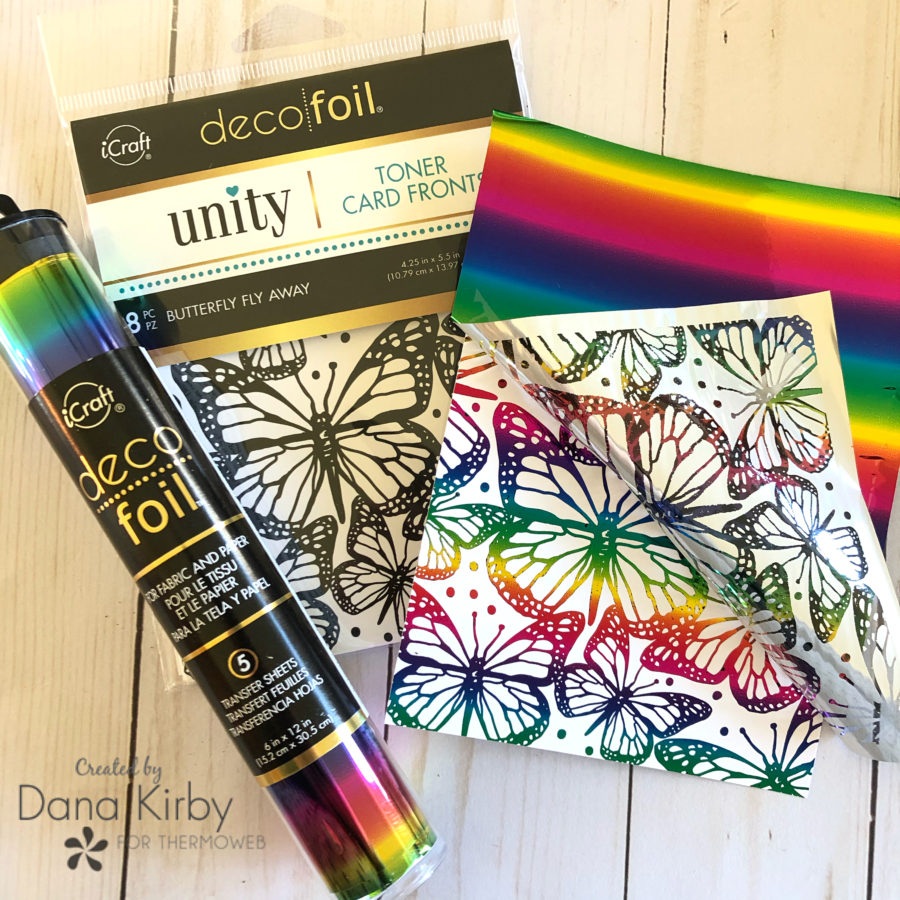
I started my cards by running the Unity Toner Card Fronts through my laminator with foil. On my first three panels, I used Deco Foil Transfer Sheets. It is a simple as cutting the toner paper down to size, placing it in a piece of parchment (that is included in the card front packs) and running it through your laminator.
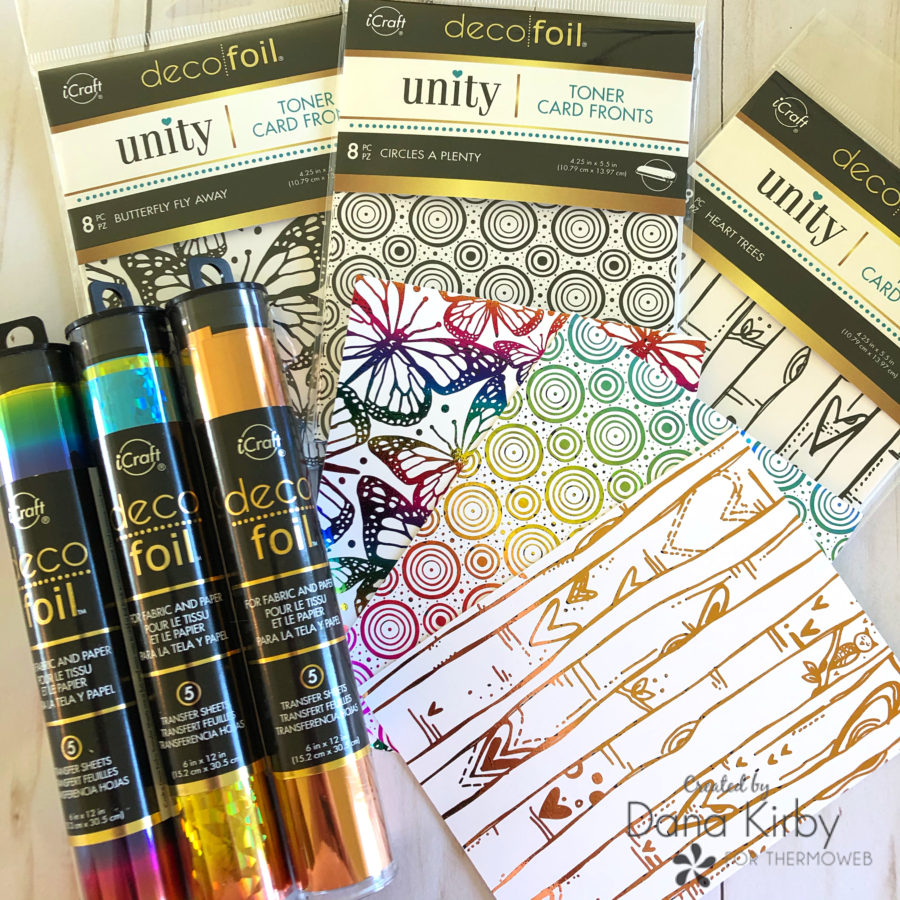
The really magic happens when you remove the Foil Transfers Sheets from the Toner Card Fronts. Just look at the beautiful color!!
For my next set of card fronts, I used Gina K Designs Fancy Foils. I once again trimmed the Fancy Foils down to size and ran them through my laminator.
Once I had all my card fronts made, I began working on my card designs.
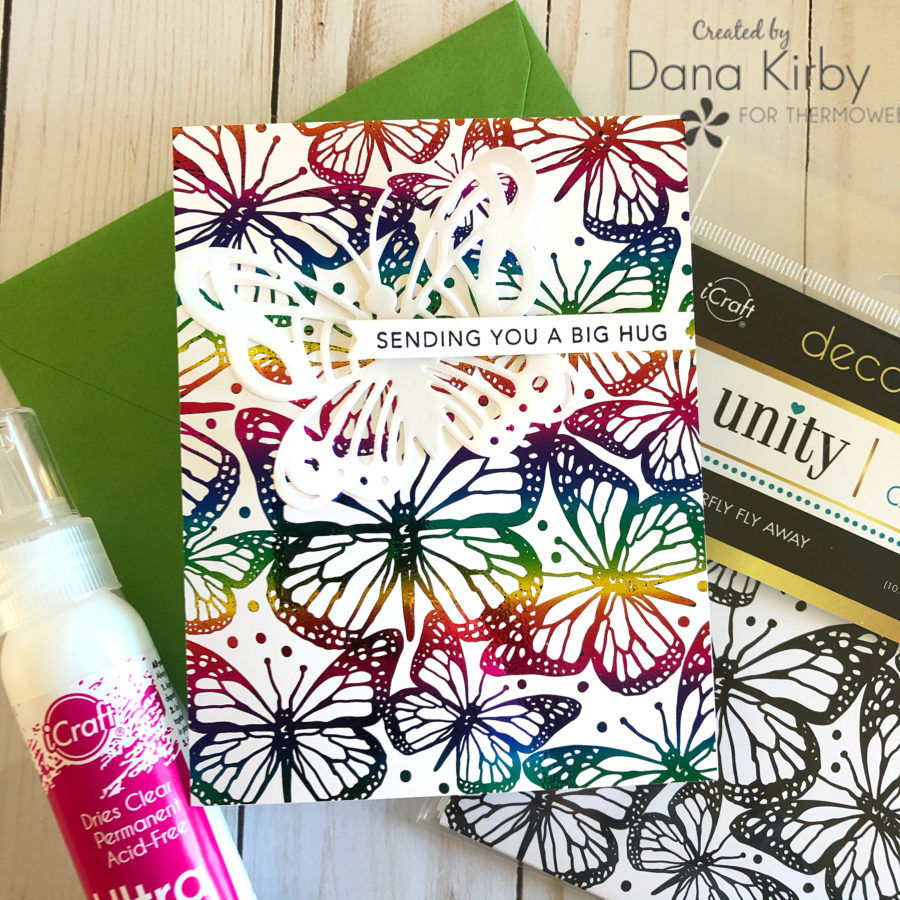
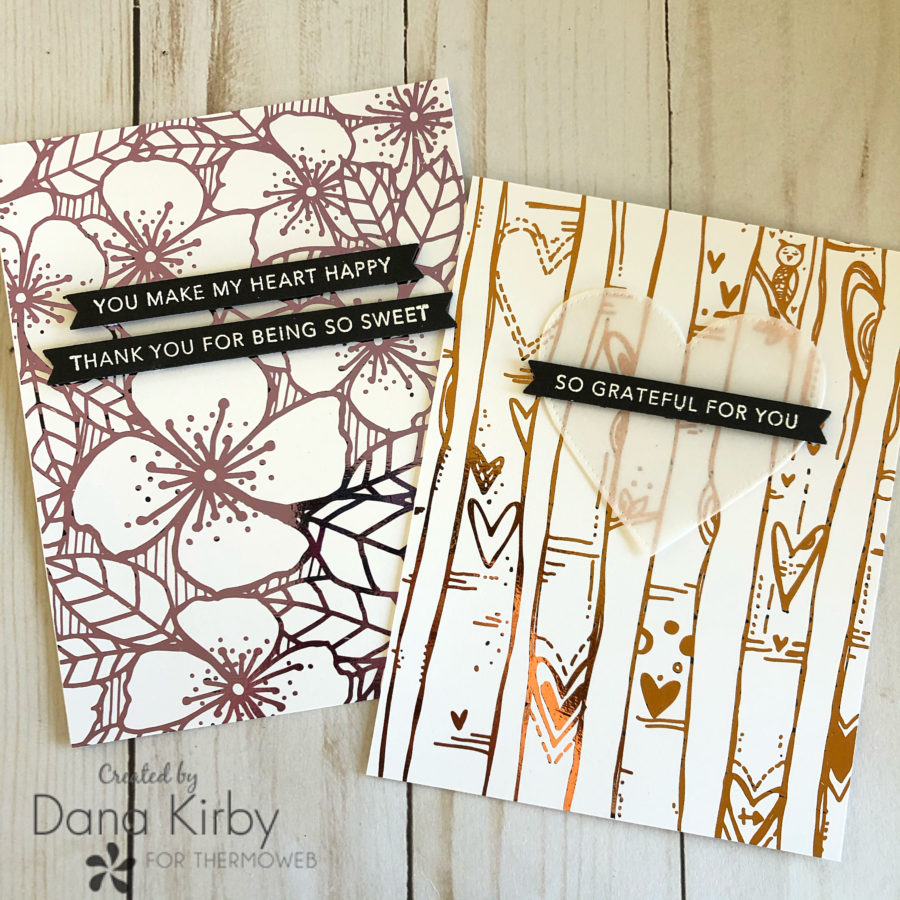
For my first card. I used the Butterfly Fly Away Toner Card Front along with the Deco Foil Transfer Sheets in Rainbow. I die cut the Bold Butterfly Die from Pretty Pink Posh in both vellum and white cardstock. I layered the two butterflies together with Ultra Bond Adhesive and then attached them to my card front. Lastly, I added my sentiment from the Taylored Expressions Simple Strips Stamp and Die Set with Gina K Foam Squares that I cut in half.
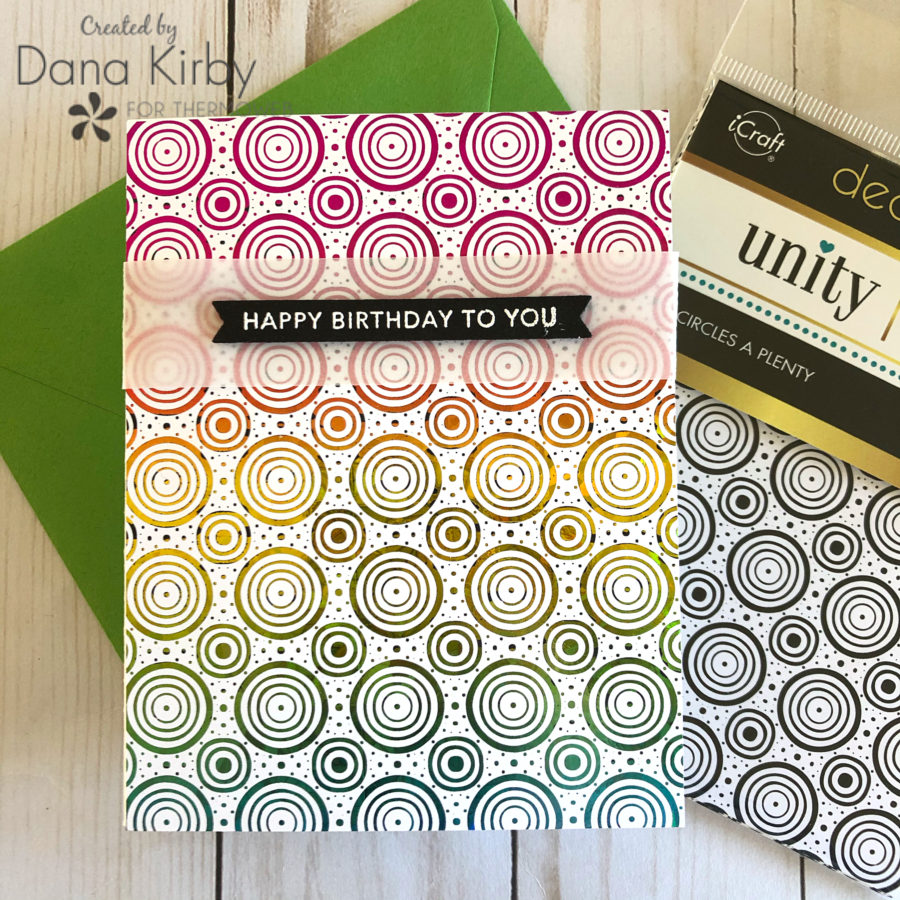
For my next card, I used the Unity Toner Card Front in Circles A Plenty. I transferred the Deco Foil Rainbow Shattered Glass Foil onto the card front. I love this design! So graphic and fun!! I wrapped a one-inch piece of vellum around my card front and then attached my sentiment strip with foam adhesive. I attached all of my card fronts to A2 card bases with Gina K Designs Permanent Adhesive Dot Runner.
For my next two cards, I kept the designs very similar. I used the Unity Heart Trees Toner Card Front along with Deco Foil Transfer Sheets in Copper. And the Flowers & Lines Toner Card Front with Gina K Fancy Foils in Wild Lilac.
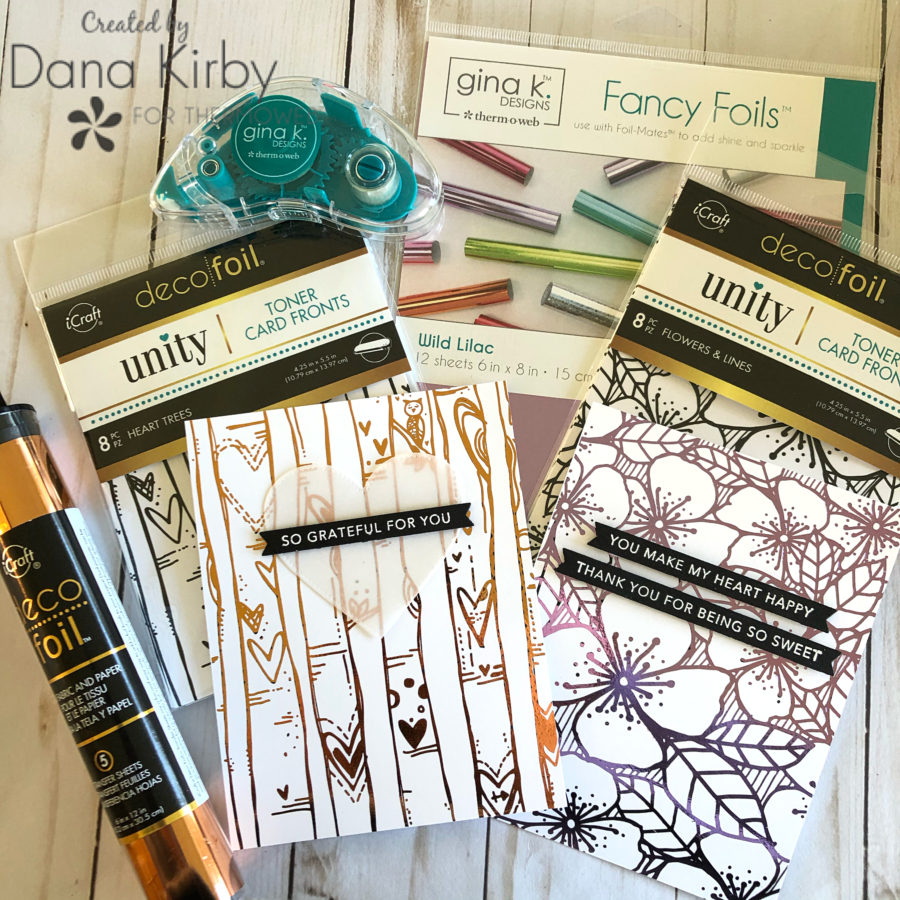
For my Heart Trees card, I die cut a heart from vellum with the MFT Stamps Pierced Heart Die. I used the iCraft Ultra Bond Adhesive and then attached my sentiment strip over the top. I once again, attached both card panels to my A2 card base with Gina K Permanent Adhesive. Very quick to create, but the toner card fronts along with foil really make a beautiful card.
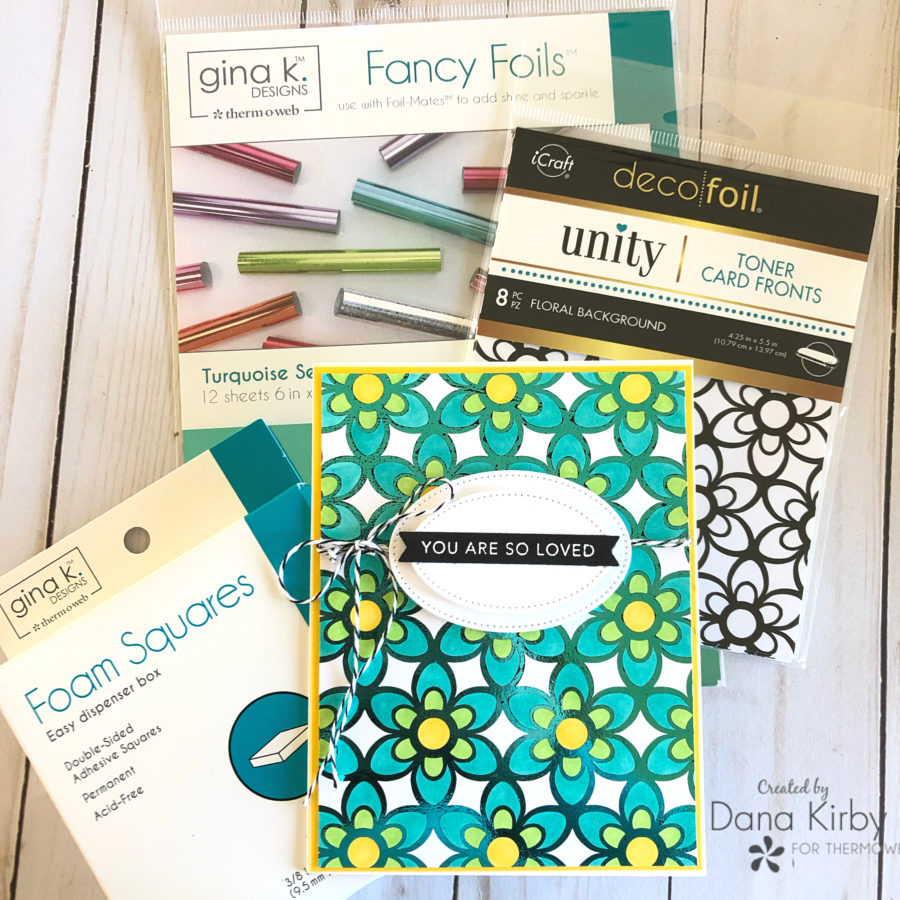
My next, card uses the Unity Toner Card Front in the Floral Background pattern. I applied Gina K Fancy Foils in Turquoise Sea to create my panel. I trimmed my panel down and colored the flowers with Copic markers. (Y15, YG13 and BG13) I wrapped baker’s twine around my panel and mounted it onto a yellow card mat with Gina K Permanent Adhesive. I then used the MFT Stamps Pierced Oval dies to mount my sentiment on. I attached my ovals to my card panel with Gina K Foam Squares to finish my card.
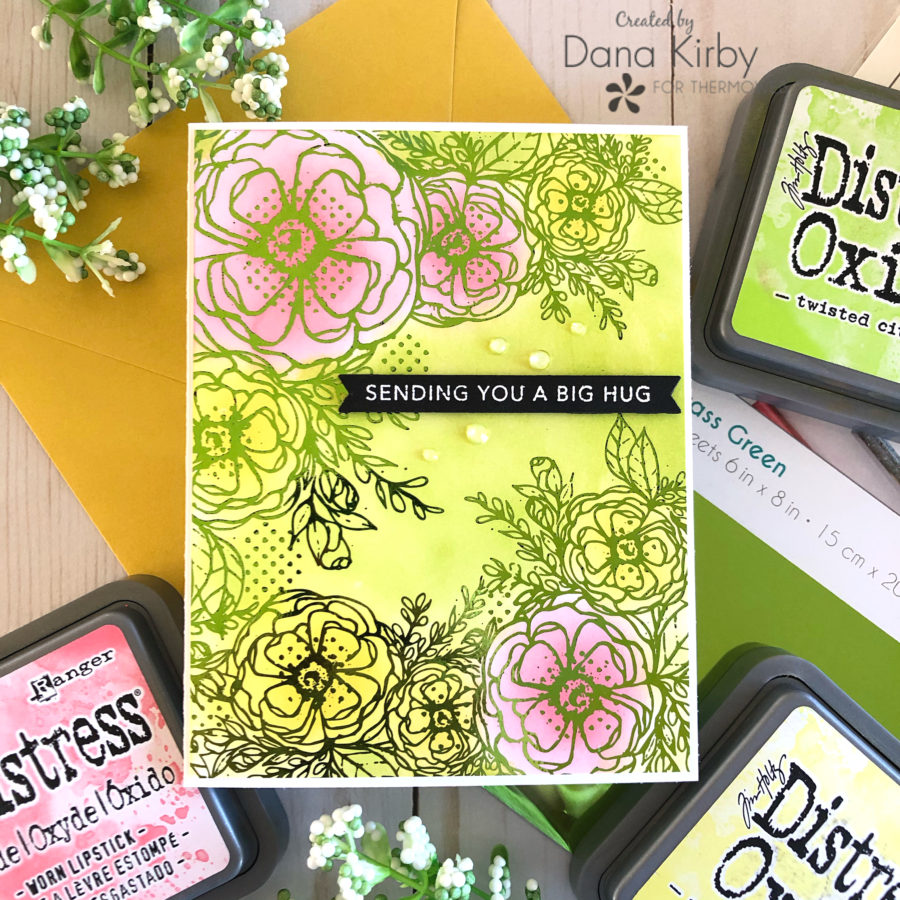
Are you still with me? My last card used the Unity Toner Card Front in Flowers Devine. I added Gina K Fancy Foils in Grass Green. This time I colored the floral images and background with Distress Oxide Ink and a finger dauber. I used Worn Lipstick, Squeezed Lemonade, and Twisted Citron Ink. This is a super easy technique and the ink works really well on the Toner Card Fronts. To finish my card I attached my sentiment with Gina K Foam adhesive and added a few Sparkling Clear Jewels from Pretty Pink Posh. I once again used iCraft Ultra Bond Adhesive to attach my jewels.
Did you make it all the way to the end? This is definitely the longest post I have ever written but I wanted to show you all the different ways you can use the Unity Toner Card Fronts. They are a great supply to have in your card making stash.
Enjoy your day and I will be back soon to share another project with you all.
Dana
Therm O Web Supplies:
Unity Toner Card Fronts: Butterfly Fly Away, Circles A Plenty, Floral Background, Flowers Devine, Flowers, and Lines, Heart Trees
Deco Foil Transfer Sheets:
Rainbow Shattered Glass
Rainbow
Copper
Gina K Designs Fancy Foils:
Grass Green
Turquoise Sea
Wild Lilac
iCraft Ultra Bond Adhesive
Gina K Foam Squares White
Gina K Designs Permanent Adhesive Dot Runner
Other Supplies:
Pretty Pink Posh: Bold Butterflies
Taylored Expressions Simple Strips Stamp and Die Set
MFT Stamps: Pierced Heart STAX Die Set
MFT Stamps: Pierced Oval STAX Die Set
Copic Markers: Y15, YG13 and BG13
Distress Oxide Ink: Worn Lipstick, Squeezed Lemonade and Twisted Citron
Pretty Pink Posh: Sparkling Clear Jewels
And before you go…be sure to join us on our IG Blog hop with our friends at Unity Stamp Co!

We’ve paired up with our two education teams to bring you more ideas and inspiration along with chances to win as well! CLICK HERE to JOIN IN ON THE FUN!
Andre M.
March 9, 2020 at 10:29 am (4 years ago)Beautiful foiled designs on these gorgeous cards!
debbie
March 9, 2020 at 10:42 am (4 years ago)WOW these are pretty!
Sheila Lane
March 9, 2020 at 10:49 am (4 years ago)Wow! What beautiful cards! Thanks for sharing.
Lagene
March 9, 2020 at 12:42 pm (4 years ago)Very pretty, on your last card did you foil first or color with Distress Inks before foiling?
Dana Kirby
March 9, 2020 at 3:35 pm (4 years ago)Hello Lagene! I did all of my foiling first. I wanted to make sure I had good coverage with the foil before I added any ink. I hope that helps. Dana
Phaline Mays
March 9, 2020 at 2:29 pm (4 years ago)So pretty! It’s a easy way to really bling up a project.
Marcy H.
March 9, 2020 at 3:32 pm (4 years ago)Gorgeous foiled cards! Love them all ~
BECCA YAHRLING
March 9, 2020 at 5:47 pm (4 years ago)These are all so pretty! I would love to try foiling one of these days.
Jeanne Beam
March 9, 2020 at 6:10 pm (4 years ago)Such pretty cards! Love the foiling…
Dana M
March 9, 2020 at 10:11 pm (4 years ago)Wow, amazing designs – beautiful, whimsical and fun!
Brenda Kuder
March 11, 2020 at 9:50 am (4 years ago)I am very excited about these new foil designs. I am always looking for new ways to use my beautiful foils.
JoSi
March 12, 2020 at 3:02 pm (4 years ago)Beautiful cards! The Toner Card Front designs are fantastic! I look forward to trying these soon.
Maggie Miller
June 10, 2020 at 5:16 am (4 years ago)I love these cards! So beautiful and inspiring!