


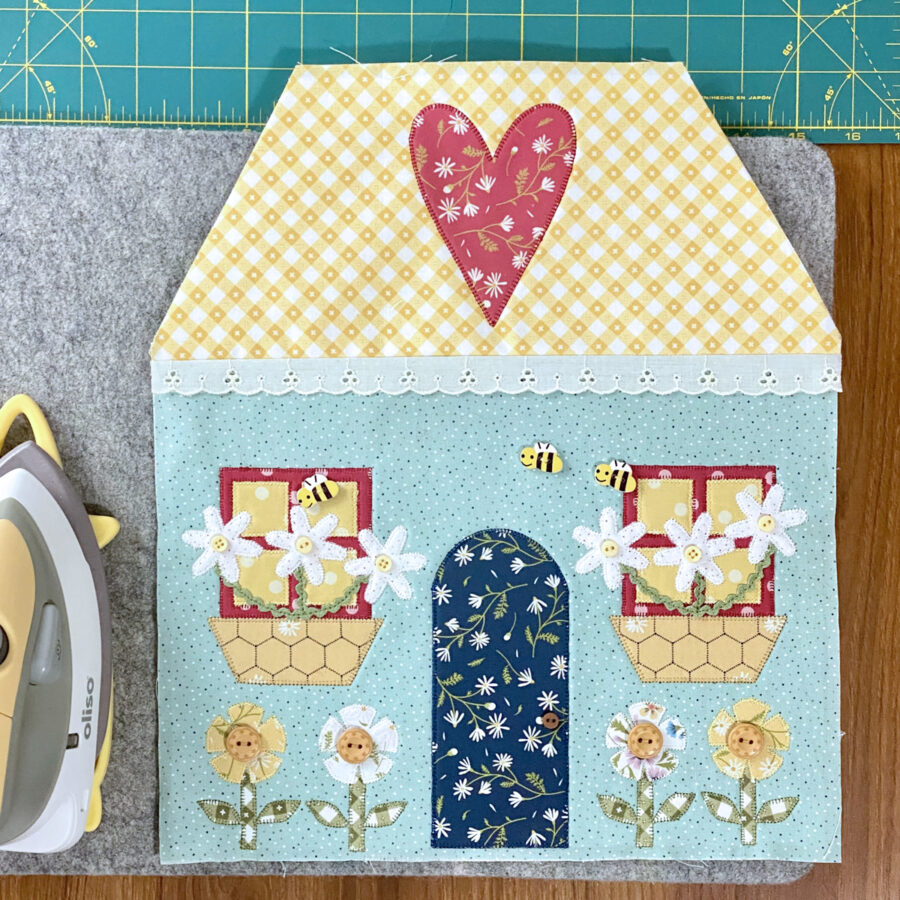
Carnation Cottage Mini Quilt featuring HeatnBond Products
Greetings! It’s Belinda Karls-Nace from Blue Ribbon Designs, here today with a brand new project tutorial. It is Houses Make a Home Week on the ThermOWeb Blog, and I am excited to share my “Carnation Cottage Mini Quilt” with you. 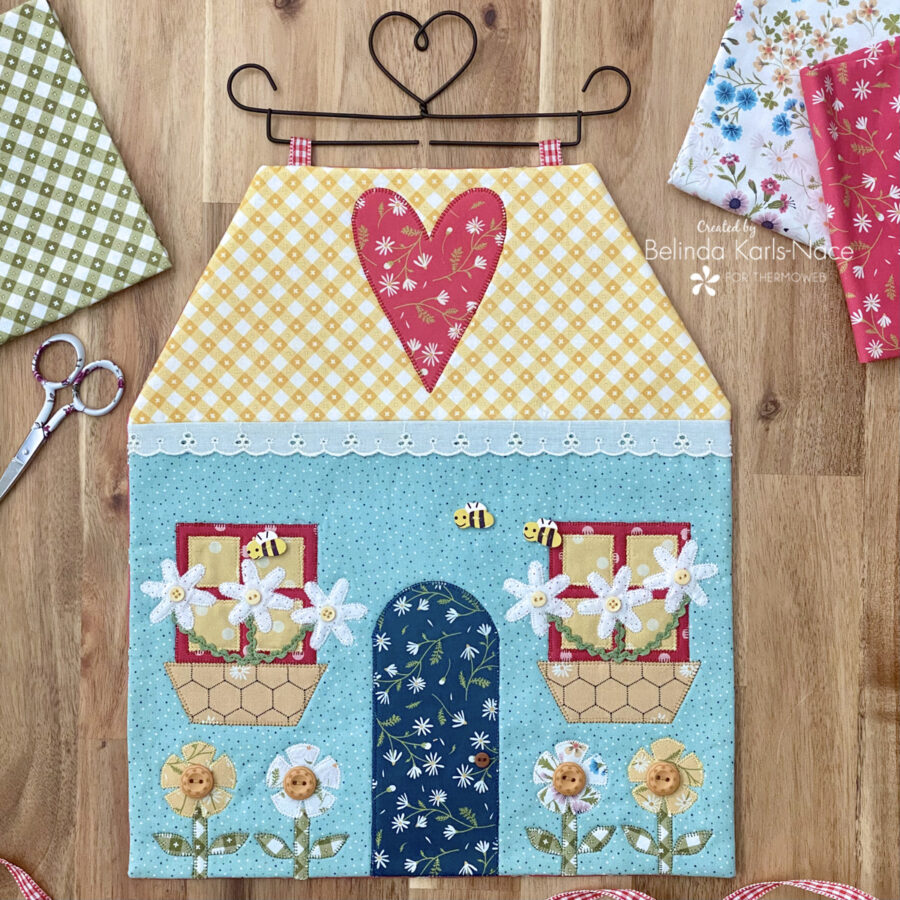
For most, home is not simply a place, it’s a feeling. A house becomes a home when love, connections, memories, personal touches, and happiness evolve into a space that genuinely reflects the person or family that lives there. Today’s project is perfect to make your own – I designed it to easily be adaptable to the person creating it. Try not to focus on the exact materials I have used, but materials that you have on hand that are personally pleasing to you…in other words, make this cottage your own…make it feel like home.
Let’s get creative! Simply gather the materials/supplies listed below, then download the PDF templates and layout diagram.
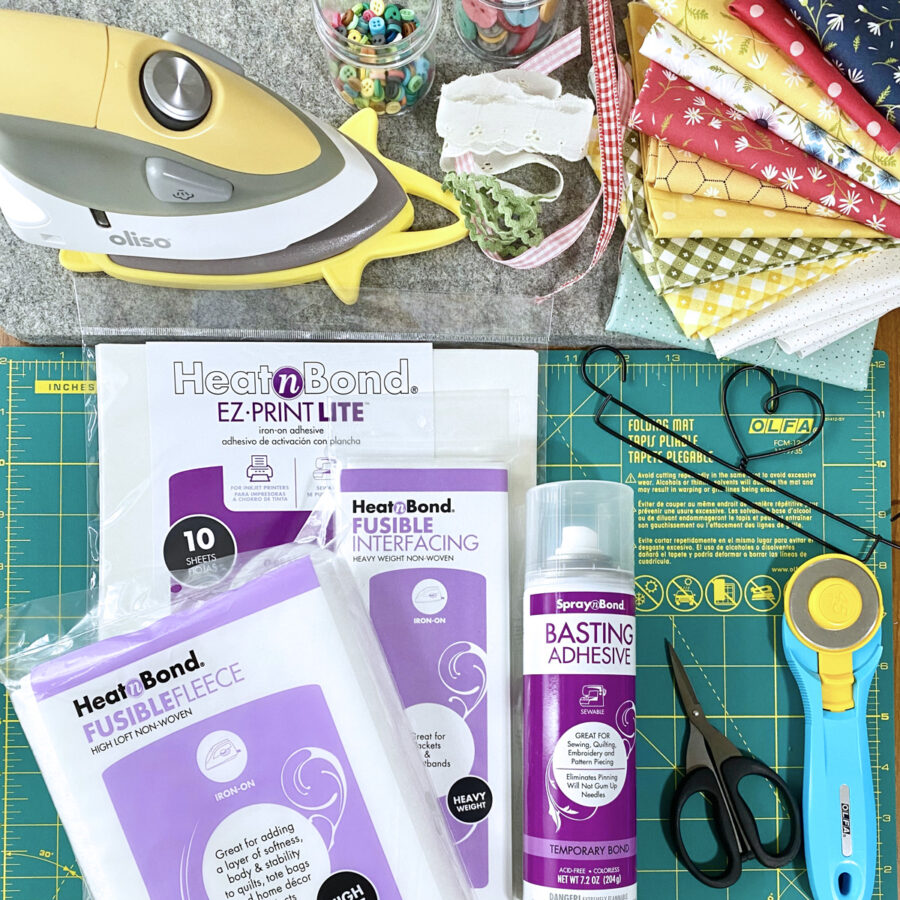
What you need:
- HeatnBond Lite EZ-Print Iron-On Adhesive
1 Sheet - HeatnBond Fusible Fleece
12” x 9”
12” x 5” - HeatnBond Heavy Weight Non-Woven Fusible Interfacing
12 ½” x 14 ½” - SpraynBond Basting Adhesive Fabric Spray
- Pressing Paper Fabric and Craft Sheets
1 Sheet - Cotton Fabrics: model uses an assortment of fabrics from Poppie Cotton (Sunshine and Chamomile, Country Confetti, and Gingham Picnic) – I encourage you to use fabric and scraps you have on hand)
- House front fabric – 12 ½” x 9 ½” (Country Confetti Sea Glass – CC20185)
- Roof front fabric – 12 ½” x 5 ½” (Gingham Picnic Dandelion – GP21215)
- Backing fabric – 12 ½” x 14 ½” (Tossed Daisies Red SC23503)
- Applique shapes (these all use small pieces or scraps):
- Heart – Chamomile Red (SC23512)
- Windowpanes – Dots Red (SC23515)
- Window glass – Dots Yellow (SC23516)
- Flower boxes – Honeycomb Yellow (SC23510)
- Door – Chamomile Navy (SC23514)
- Daisies – Country Confetti Marshmallow White (CC20190)
- Carnations – Sunshine Bouquet White (SC23518) and Chamomile Yellow (SC23513)
- Carnation stems and leaves – Gingham Picnic Grass (GP21214)
- Optional – templates are provided for flower centers and doorknob – I chose to use buttons for these shapes.
- Optional: Coordinating Buttons – model used:
- 7 – ¼” Round (model uses Little Buttons from Lori Holt of Bee in my Bonnet)
- 4 – 5/8” Floral Round (model uses Little Buttons from Lori Holt of Bee in my Bonnet)
- 3 – Wooden Buttons – Yellow Bees
- Assorted trims, ribbon, rick rack – model used:
- Hand-Dyed Rick Rack – Grace Green – 7/32″ from Lady dot Creates
- Red Gingham Ribbon, 3/8”
- Vintage eyelet trim
- Ackfeld Mini Quilt Stand or Split Hanger
- Oliso Iron
- Olfa Cutting Tools (cutting mat, rotary cutter)
- Sewing Machine
- Basic Sewing Supplies/Tools (small sharp scissors, rulers, sewing thread, hand sewing needle, pencil, etc.)
How to Make a Carnation Cottage Mini Quilt
(12” W x 14”H)
1. Download and Print the Carnation Cottage Mini Quilt PDF.
Carnation Cottage Mini Quilt – A Project for the Therm O Web Blog
Print to actual size – do NOT “fit to page” or “shrink to fit.” Page one (layout) is printed on regular printer paper. Print pages two and three (applique templates) on HeatnBond Lite EZ-Print Iron-On Adhesive (Inkjet printer friendly – no tracing required).
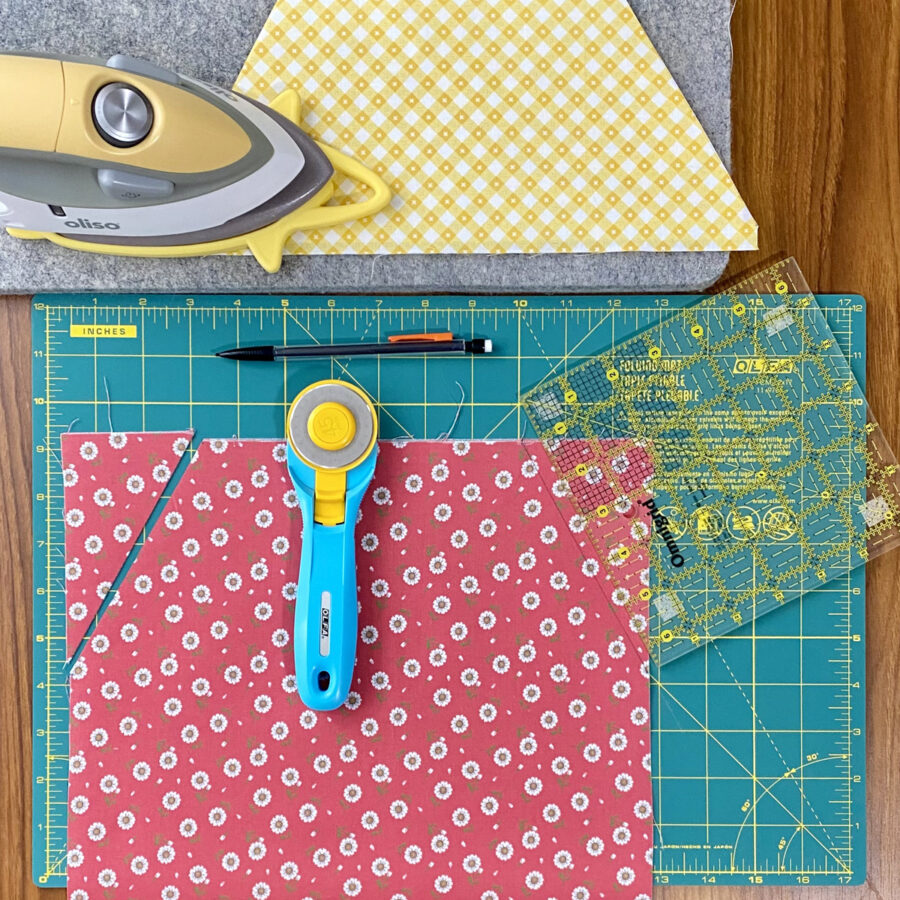
2. Center and fuse the 12” x 9” piece of HeatnBond Fusible Fleece to the wrong side of the 12 ½” x 9 ½” house front fabric, following the package instructions. Set aside.
Center and fuse the 12” x 5” piece of HeatnBond Fusible Fleece to the wrong side of the 12 ½” x 5 ½” roof front fabric, following the package instructions. Set aside.
Center and fuse the 12 ½” x 14 ½” piece of HeatnBond Heavy Weight Non-Woven Fusible Interfacing to the wrong side of the 12 ½” x 14 ½” backing fabric, following the package instructions. Set aside.

3. Measure up ½” from the lower left corner of the roof front fabric unit and make a small pencil mark. Measure over 2 ¾” from the top left corner and make a small pencil mark. Draw a line connecting the two marks and cut on the line to make the left-side slant for the roof.
Measure up ½” from the lower right corner of the roof front fabric and make a small pencil mark. Measure over 2 ¾” from the top right corner and make a small pencil mark. Draw a line connecting the two marks and cut on the line to make the right-side slant for the roof. Set aside.

4. Measure down 5” from the top left corner of the backing fabric and make a small pencil mark. Measure over 2 ¾” from the top left corner of the backing fabric and make a small pencil mark. Draw a line connecting the two marks and cut on the line to make the left-side slant for the roof.
Measure down 5” from the top right corner of the backing fabric and make a small pencil mark. Measure over 2 ¾” from the top right corner of the backing fabric and make a small pencil mark. Draw a line connecting the two marks and cut on the line to make the right-side slant for the roof. Set aside.
5. Loosely cut apart the applique templates printed on HeatnBond Lite EZ-Print Iron-On Adhesvie and apply to the back of selected fabrics following the package instructions. Cut out all shapes on the solid lines, leaving the paper in place. NOTE: I have provided a doorknob and flower center templates, should you want to use fabric – this is optional – the model used coordinating buttons.
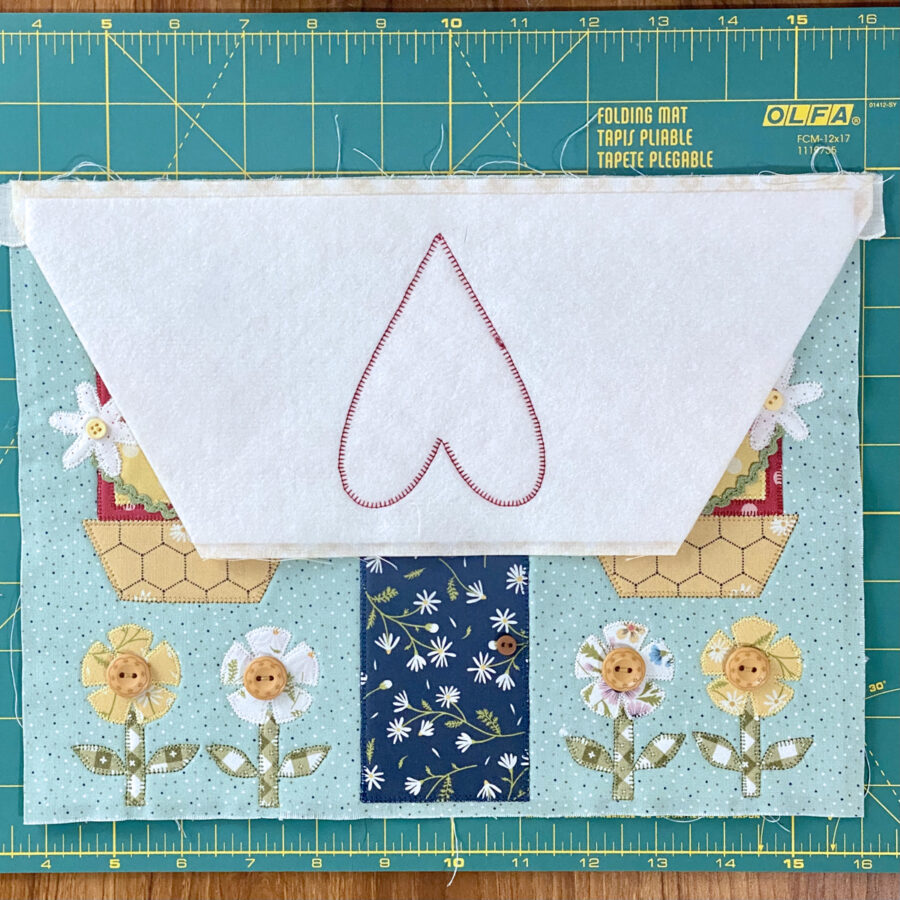
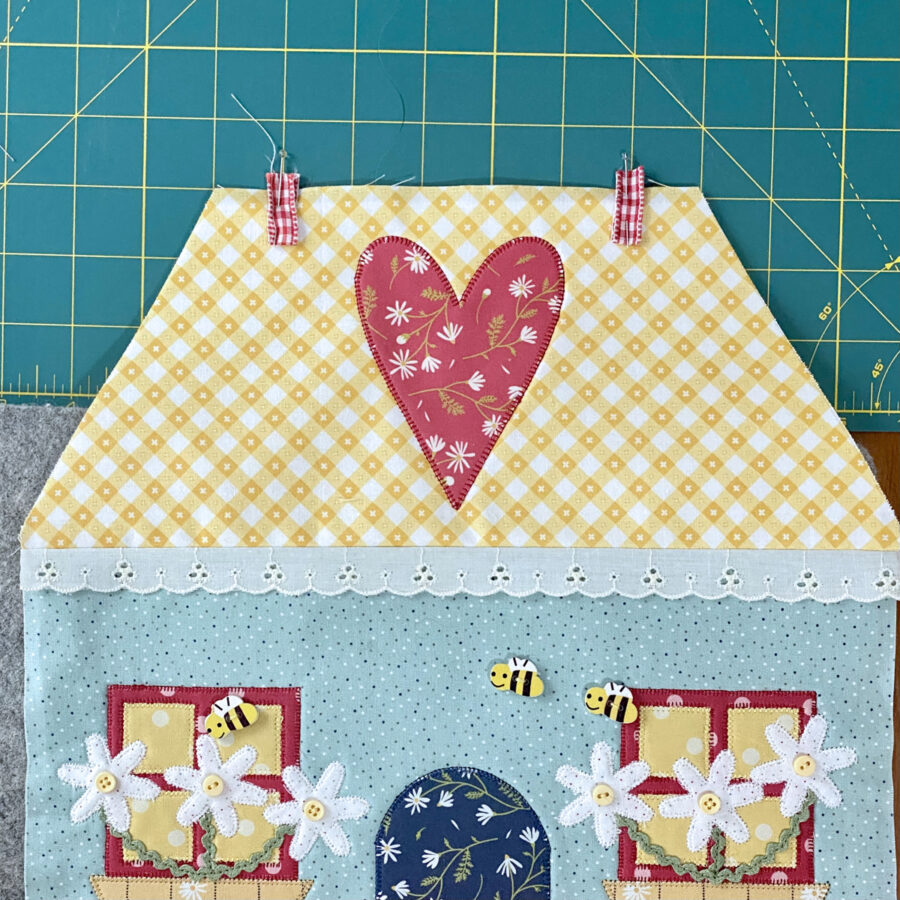
6. Using the Appliqué Layout Guide (page 1 of PDF), remove the paper back from the heart and center and fuse into place on the roof front unit, following the package instructions.
7. Using the Appliqué Layout Guide (page 1 of PDF), remove the paper backs from remaining pieces (except the six window box daisies) and fuse into place on the house front unit, following the package instructions. Make sure to leave at least ¼” seam allowance around the entire perimeter, so the applique pieces are not sewn into the seams.

8. Using your favorite appliqué stitch (machine or hand) and coordinating sewing thread, sew the pieces in place (or leave them without sewing for a fast project! – the HeatnBond fusible adhesive will hold them in place). I chose to use a machine blanket stitch.
9. Using a piece of pressing paper to protect your surface, use SpraynBond Basting Adhesive Fabric Spray to hold mini rick rack or trim of your choice in place for stitching. I sprayed one side of a couple small pieces of rick rack for each side and formed them into a shape/place that was eye pleasing for the daisy stems. You may chose to embroider or stitch small stems, instead of using the rick rack.

Stitch the rick rack (trim) stems in place. I used a machine straight stitch.
10. Using the Appliqué Layout Guide (page 1 of PDF) as a guideline, remove the paper backs from the daisies and fuse into place, following the package instructions.
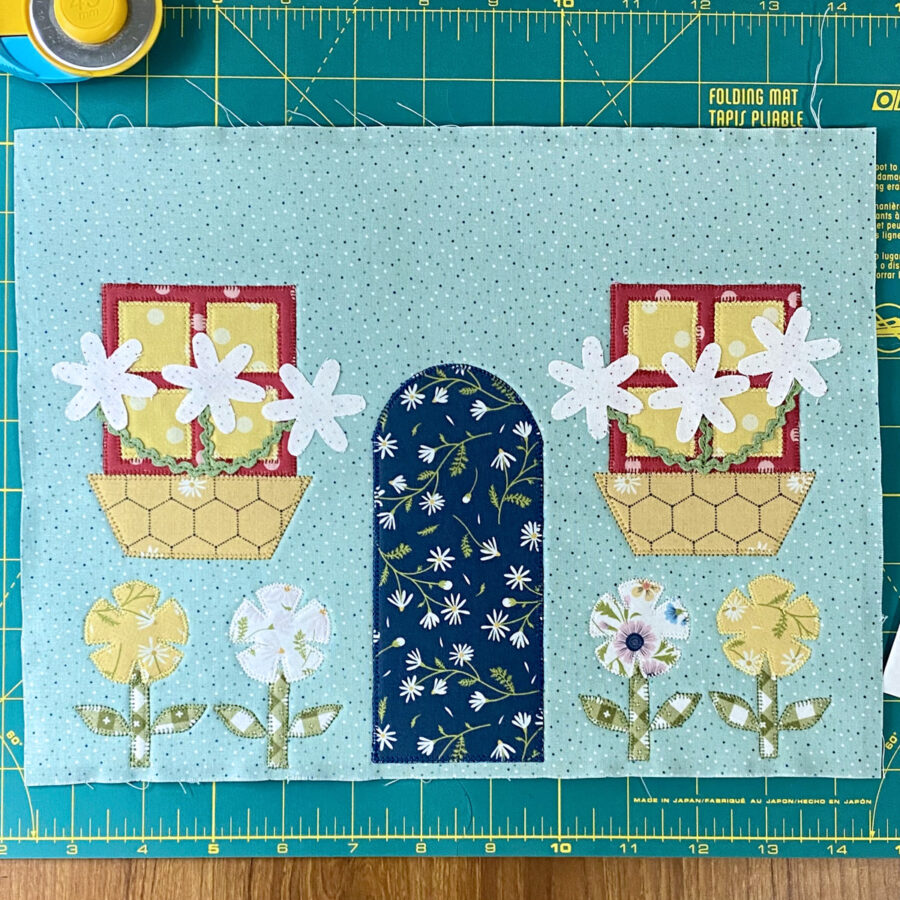
Using your favorite appliqué stitch (machine or hand) and coordinating sewing thread, sew the daisies in place. I chose to use a machine blanket stitch.
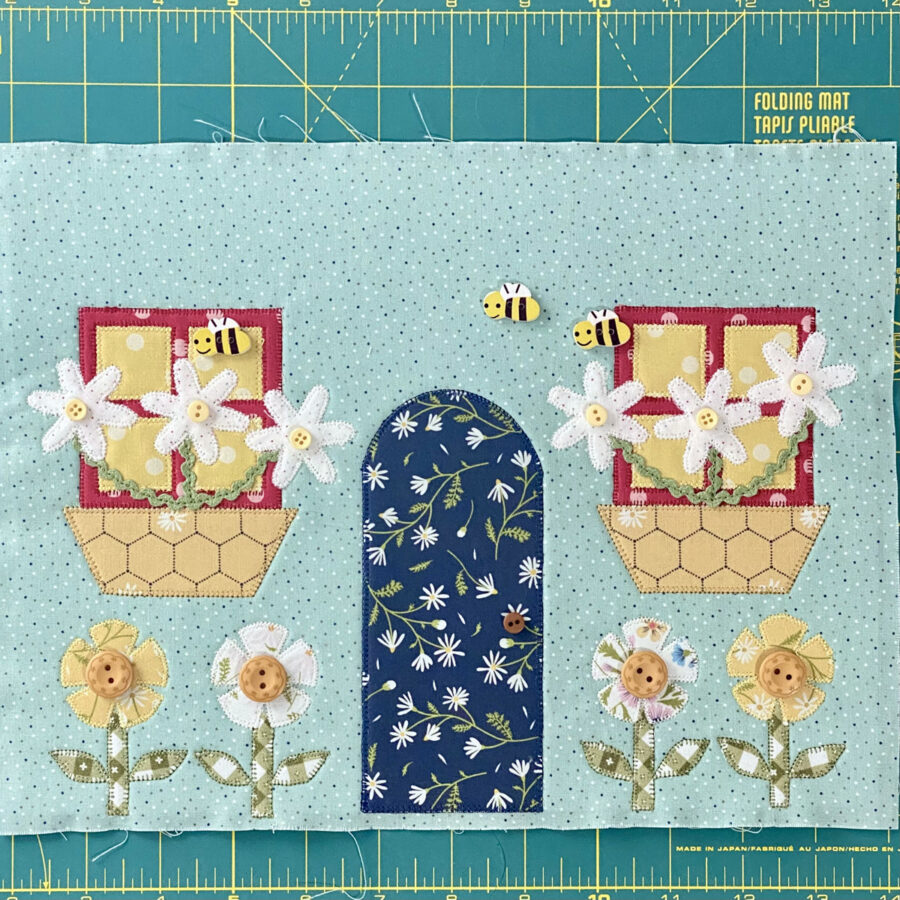
11. Layout and attach all buttons. Omit this stem if you used the fusible appliqué shapes.
12. Baste a 13” piece of trim or lace across the top of the house front unit, if desired.
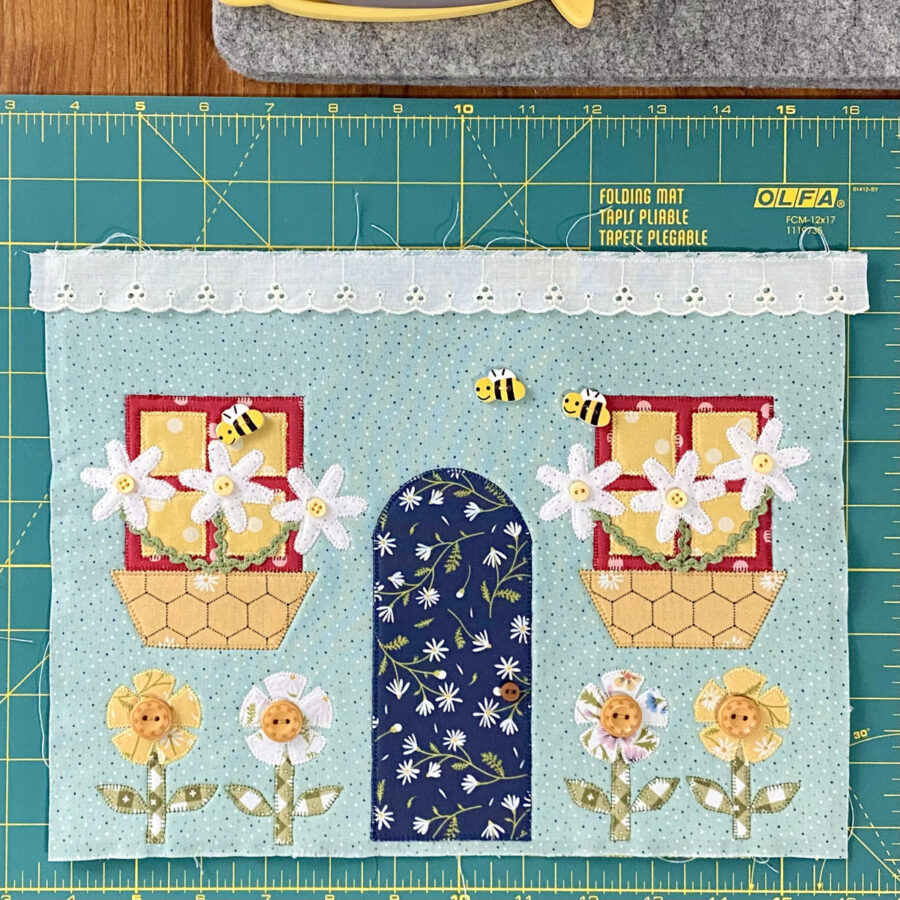
13. Place the roof front unit and the house front unit right sides together and sew across the top width using a ¼” seam allowance. Press seam open.
14. Fold a 2” piece of ribbon in half. Pin in place 1” from the top left corner of the roof and baste in place. The raw edges should be facing up, the fold should be facing towards the lower part of the house. Repeat for the right side of the roof. These will be the hang tabs for the mini quilt.
15. Place front house unit and backing fabric right sides together and pin or clip in place.

16. Sew around the entire perimeter (all six sides), using a ¼” seam allowance and leaving an opening for turning.
17. Clip corners and turn right side out. Press. Sew or fuse the opening shut.

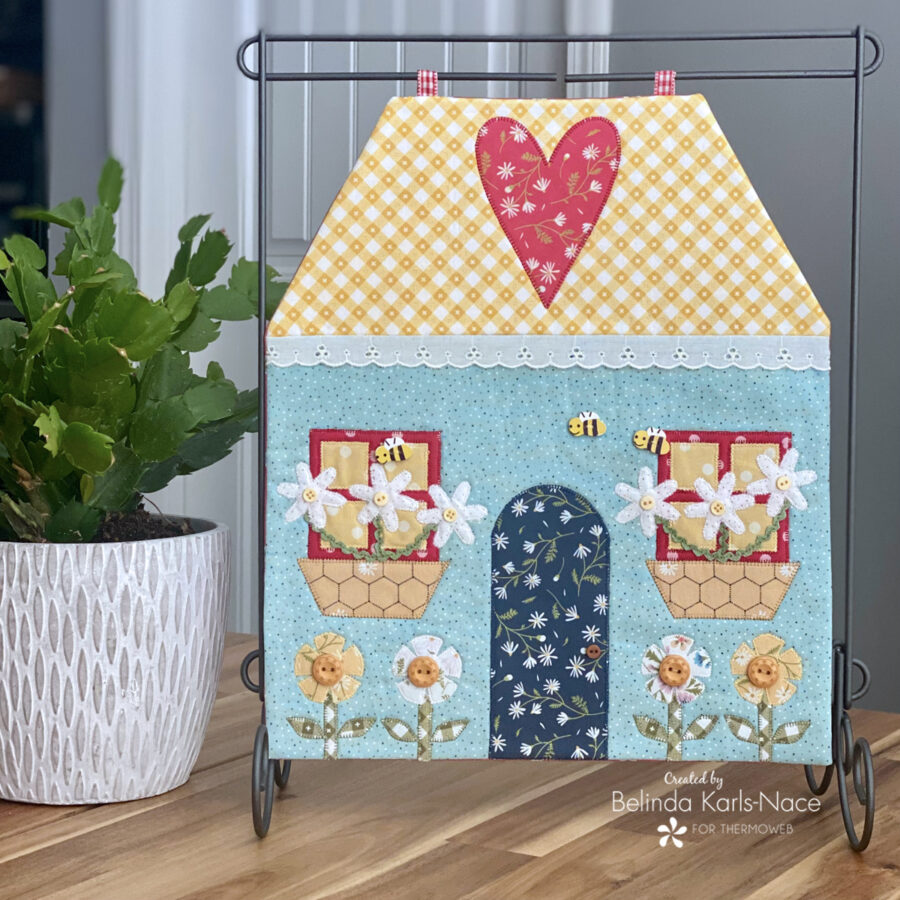
18. Use a mini quilt stand or hanger to display the mini quilt.
19. Your Carnation Cottage Mini Quilt is now complete. Enjoy!
Thank you for joining me today for my ThermOWeb Houses Make a Home Week blog tutorial. I hope this post inspires you to create a cottage that matches your personality and style, using materials you have on hand. To see more of my projects, stop by my blog, website or Instagram – I would love to visit with you and see what you create!