


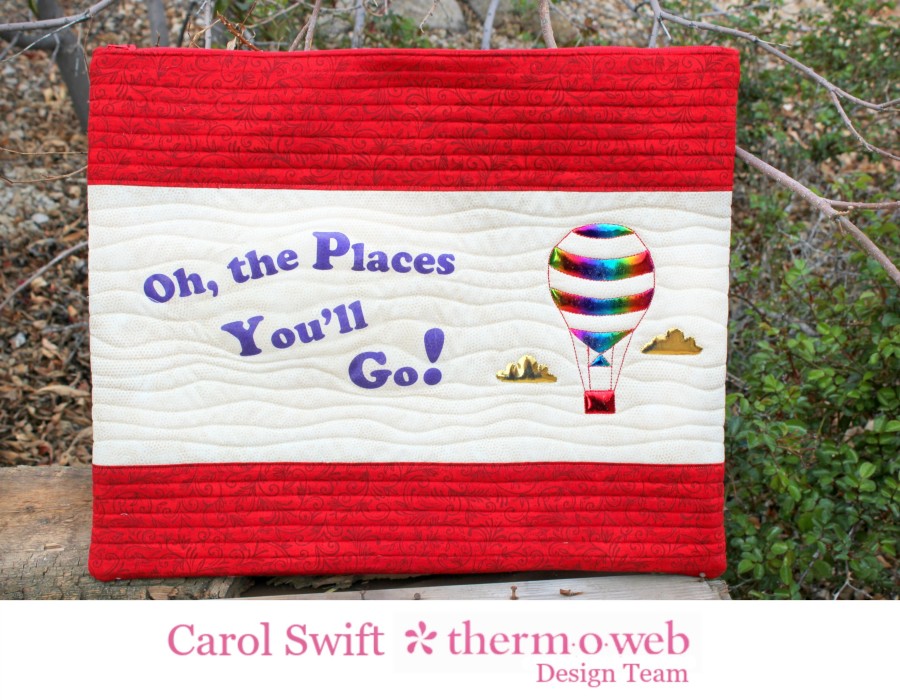
With graduation gift time fast approaching, I started thinking of what I could make for my favorite graduates that was quick and easy. I had the Dr. Seuss quote, “Oh, the Places You’ll Go” floating around in my head and knew it needed to land somewhere on whatever I created. That quote fit perfectly on this easy to make All Zipped Up Bag! It’s finished size is approximately 15″ x 18 1/2″, which is plenty of room for lots of goodies for the graduate.
What you’ll need:
1/2 yard fabric
1/4 yard coordinating fabric
20”-22” Polyester Zipper
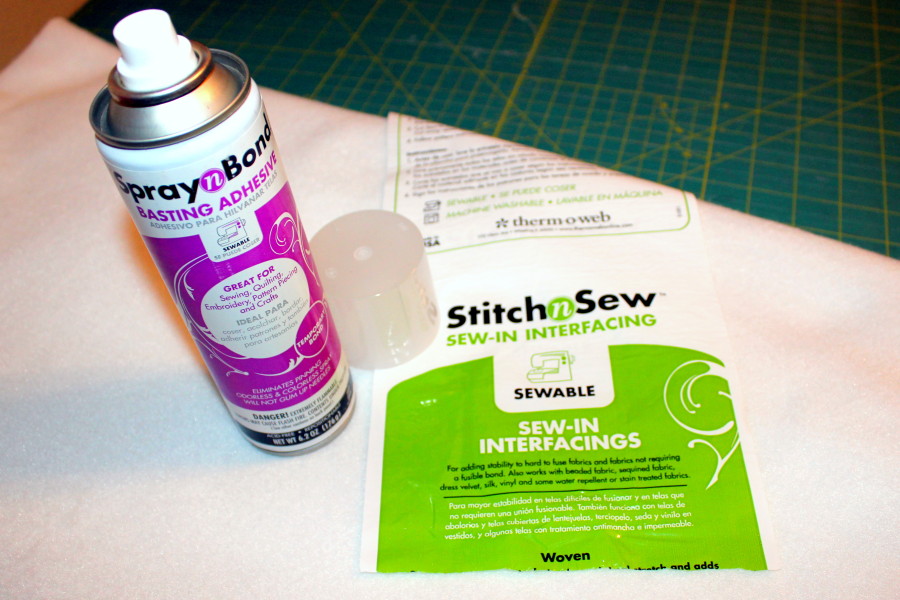
Therm O Web Stitch n Sew™ Fleece Sew-in High Loft/Batting
Spray N Bond Basting Adhesive
Heat N Bond® EZ Print Transfer Sheets or embroidery thread for lettering
iCraft® Deco Foil™ Transfer Sheets
iCraft® Deco Foil™ Hot Melt Adhesive
Iron or laminator machine
Cutting instructions:
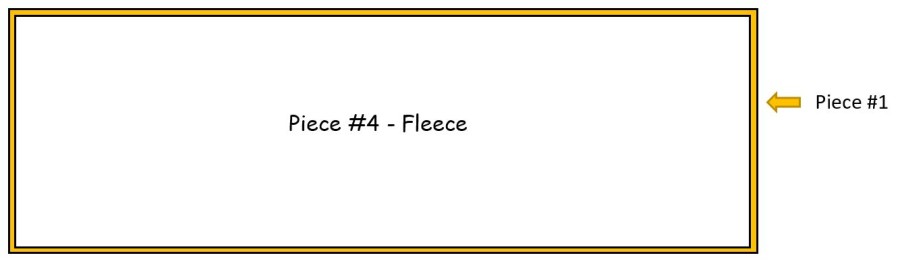
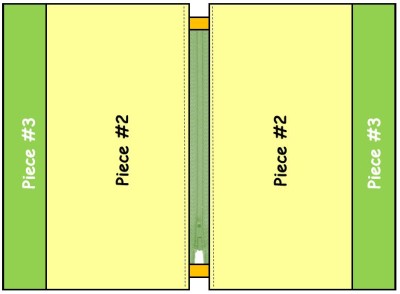
Piece #1 (the back of bag) – Cut one fabric piece 16½” x 40½”
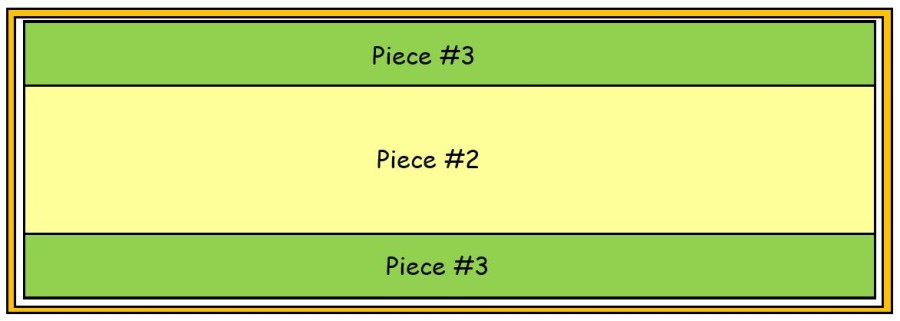
Piece #2 (the front of bag) – Cut one fabric piece 8½” x 40½”
Piece #3 (the front of bag) – Cut two fabric pieces 4½” x 40½”
Piece #4 – Cut one fleece/batting piece 16½” x 40½”
Piece #5 (tab) – Cut one 2½” x 5½” strip
Deco Foil™ Instructions:
Trace pattern pieces on smooth side of Therm O Web’s Deco Foil Hot Melt Adhesives and cut out, or use cutting machine. Position pieces on fabric according to design key. Iron on to fabric following package directions. Let cool. Remove paper backing from ironed adhesives.
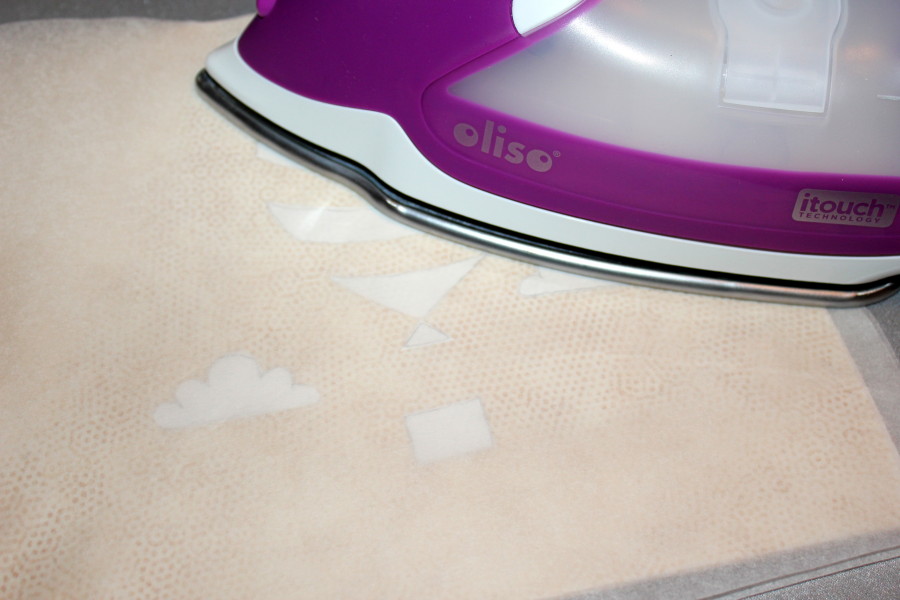
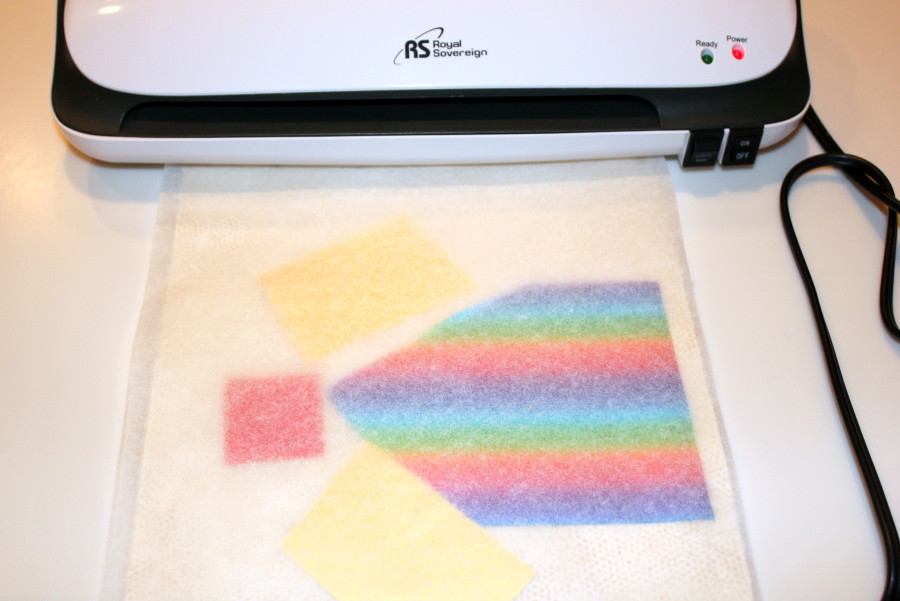
Position desired color(s) of Deco Foil over adhesives. Press with iron following Deco Foil’s directions or place fabric and Deco Foil between parchment paper and run through laminator following your machine’s directions. It’s important to be patient and let it cool completely. Gently rub over foiled area with a soft fabric to loosen the foil. Carefully remove foil and you’re ready to sew.
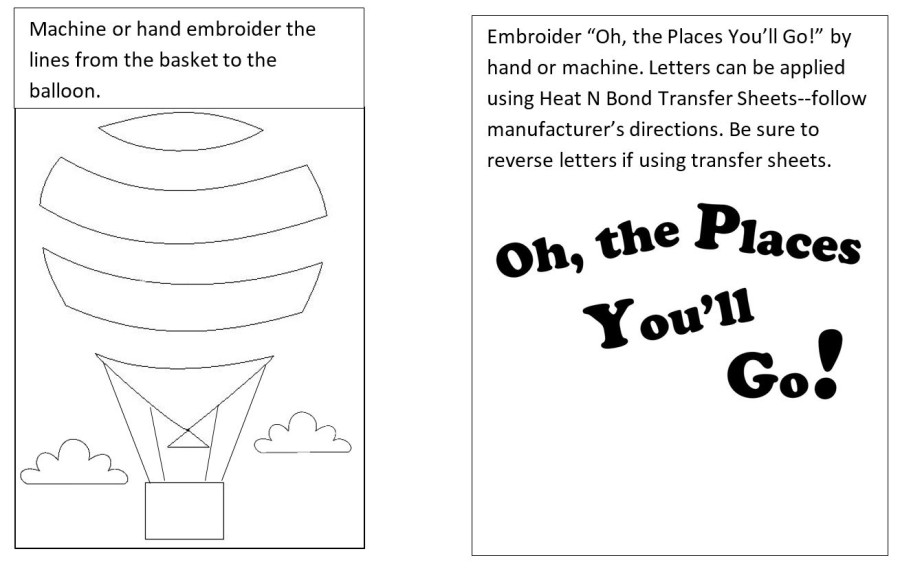
Before you start sewing the bag together, machine or hand embroider lines on the air balloon. I used HeatnBond Transfer Sheets for the quote, but you could hand embroider the lettering on it.
Sewing instructions:
Step #1: Lay Piece #1 right side down on flat surface. Lightly spray wrong side of Piece #1 with Spray N Bond Basting Adhesive. Carefully lay Piece #4 (fleece or batting) on top of sprayed fabric. Smooth and reposition if necessary to remove creases or wrinkles.
Step #2: Sew Piece #2 to Piece #3, right sides together, lengthwise, with ¼” seams. Press seams toward Piece #3. *Be careful not to touch the Deco Foil and/or transfer when pressing!

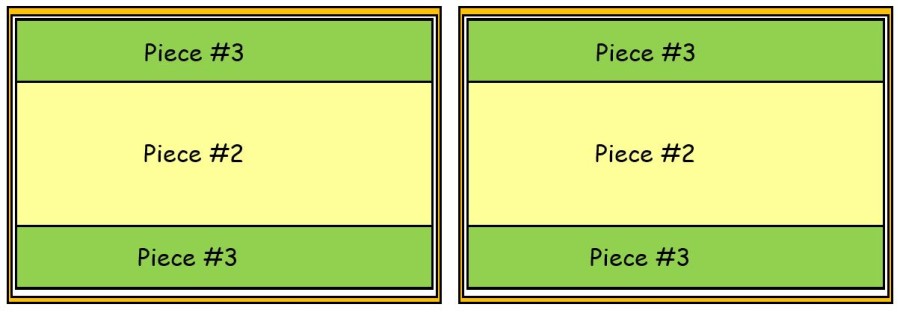
Step #3: Spray fleece/batting with Spray N Bond Basting Adhesive. Lay sewn Pieces #2 and #3, wrong side down, on to sprayed fleece. Smooth to remove creases and wrinkles.
You should have a sandwiched piece with right sides showing on both sides. If desired, you can do additional quilting designs on this piece before continuing. Straight line quilting works great for this.
Step #4: Cut in half and trim edges to square it up. Make sure both pieces are the same size.
Step #5: Fold Piece #5 in half and press. Fold in lengthwise sides and press. Fold in half lengthwise to create narrow strip with no raw edges showing. Cut strip in half to make two pieces.
![]()
Step #6: Cut end off zipper (not pull tab end) to make the zipper 1” shorter than bag. Slide zipper ends in between folds of cut tab strip. Sew across folded end to secure tab to zipper. Make sure it catches both sides of fabric tab.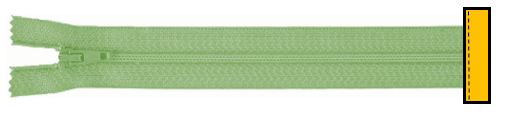
Step #7: Slide the second tab strip over the end of the pull tab side of zipper, pushing tabs together before sewing. Sew across folded end to secure tab to zipper. Check to make sure your stiches caught both sides of fabric tab. Trim tabs to same size as zipper.
Step #8: Lay the zipper face down on the right side of one Piece #2. Center zipper (it will be 1/2” in from both edges.) Sew close to the zipper teeth. As you reach the end near the pull tab, lift presser foot and open the zipper to enable sewing. Fold back Piece #2 and press on right side. Sew the other Piece #2 to the wrong side of the zipper just as you did on the other side. Open and press. Stitch a 1/4” along seam lines on both sides of zipper.
Step #9: A really important thing to remember for this step is to unzip the zipper before sewing. If you don’t, you won’t be able to turn the bag inside out (this MAYBE happened to me and it MIGHT have been no fun ripping out seams!) Once the zipper is unzipped, fold right sides together matching seams. Sew around the three edges (not the zipper side) with a 1/2” seam. Finish raw edges with a zig-zag stitch or serger.

Step #10: Turn bag inside out. Press edges being careful not to touch Deco Foil and/or transfer with hot iron. Load the bag with items that would be needed by a college-bound student like pot holders, towels, can opener, and other kitchen items.
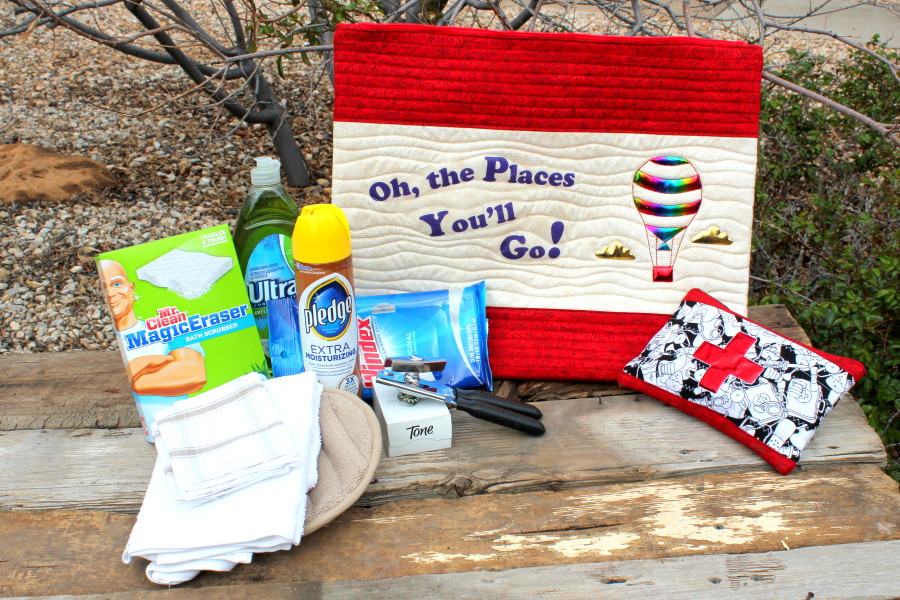
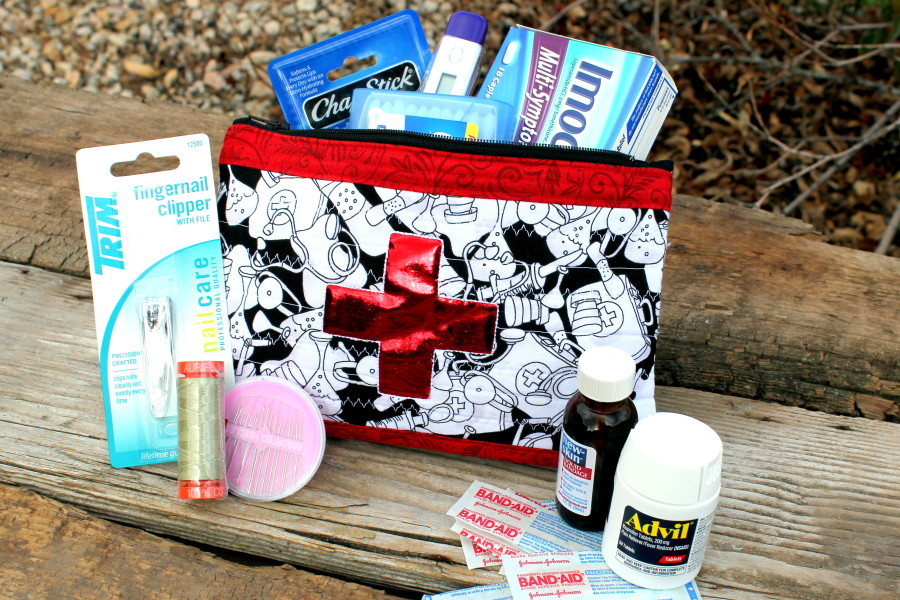
Including a first aid kit (pattern found on my Craftsy page HERE) would be a sweet idea, too! It’s sewn with the same directions of the All Zipped Up Bag, just smaller (5 1/2″ x 8 1/2″.)
Another fun thing about this bag is that once the goodies you included are removed by the graduate, it makes a great computer bag.
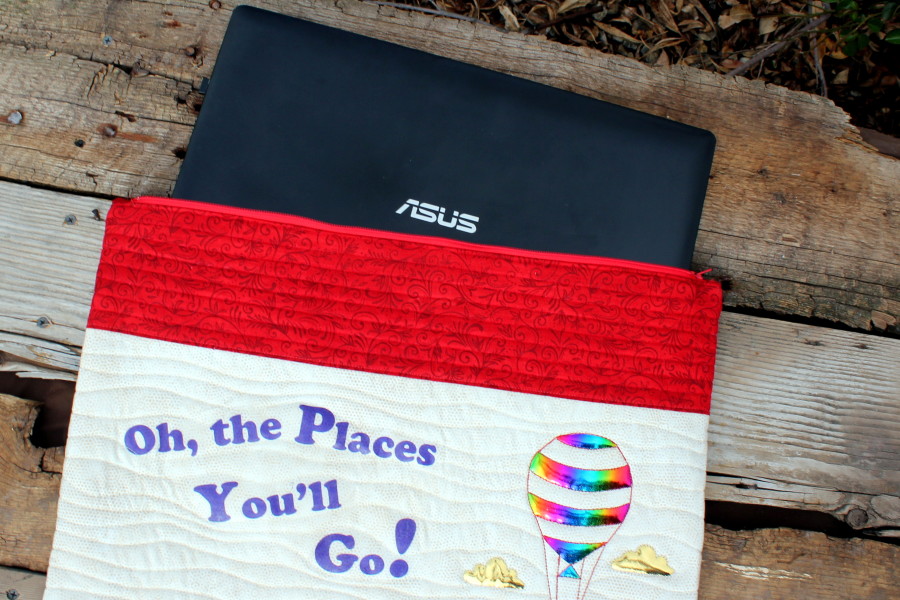
Ready to make your own zippered bag? You can find the PDF pattern for the All Zipped Up Bag at my Craftsy store HERE that will include the hot air balloon and lettering graphics. ~ Carol Swift
QuiltShopGal
April 1, 2016 at 10:38 am (8 years ago)Super fun project and great tutorial/free pattern. Total #CreativeGoodness.
QuiltShopGal
http://www.quiltshopgal.com
Marcy
April 2, 2016 at 9:01 am (8 years ago)Great tut. Easy to follow doer toons with pictures/illustrations. Will try. I love hot air balloons and zip bags and these are great.
Sandy Wootten
April 3, 2016 at 8:28 am (8 years ago)This is so cute. I really want to try this. I’m hopeful that the stores in my area start carrying this product.