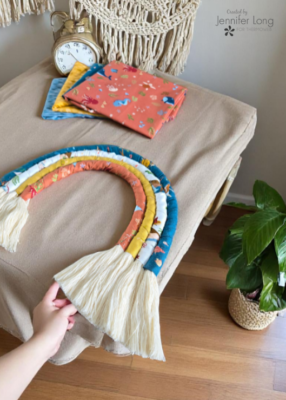
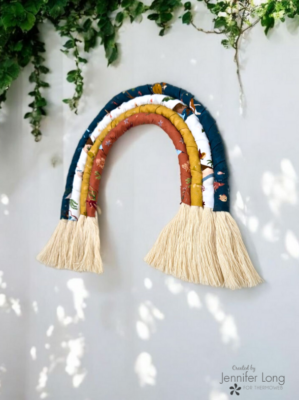
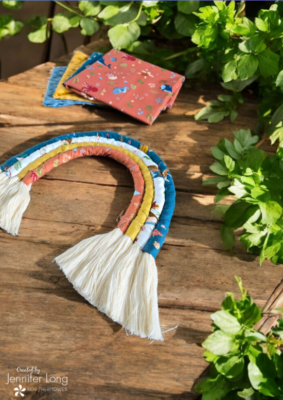
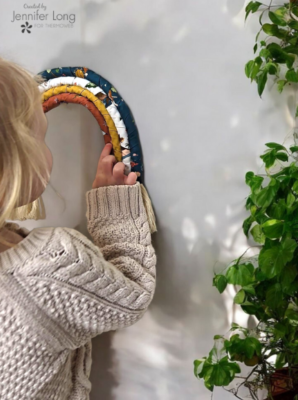
There’s something magical about blending fabric and fiber to create a piece that feels both handmade and heartwarming. This month, I’m thrilled to share a soft and colorful Macramé Rainbow project that makes a beautiful decoration for a nursery, classroom, or craft space. Whether you hang it on a wall or gift it to someone special, this cheerful rainbow is a lovely reminder that creativity connects us.
To bring this project to life, I’ve used some of my favorite Therm O Web products, including HeatnBond Fabric Fuse Liquid Adhesive for precise, mess-free assembly. Let’s dive in!
Materials You’ll Need
Fabric + Supplies
- (1) RP-15970-40 Created With Love Rolie Polie (or similar precut strips)
- 2¼ yards of ½” macramé rope
- (5) 16″ lengths of floral wire
- Basic sewing supplies (scissors, sewing machine, thread, clips or pins, hand needle)
ThermoWeb Products
- HeatnBond Fabric Fuse Liquid Adhesive – for securing fabric to rope cleanly and easily
- Optional: SpraynBond Fabric Stiffener – if you’d like to add structure to your finished rainbow
Tools (Optional but Helpful)
- Quilty™ Hemostat for precise gripping and holding
- Design board or pinning surface for drying layout
Step-by-Step Instructions
1. Arrange the Rope
Start by laying out your rope in soft arcs to determine the final size of your rainbow. Each arc represents a color band. Once you’re happy with the shape, trim each rope piece to be 2–3″ longer than your desired finished length.
2. Insert the Floral Wire
Bend a piece of floral wire to follow the shape of each arc. Cut to match. Center the wire on the back of the rope and use a strong thread or string to secure the wire at both ends.
3. Prep the Fabric Strips
Select a fabric strip from your Rolie Polie. Fold both raw edges wrong sides together (WST) toward the center, like a single-fold binding. Press to hold the shape.
4. Wrap the Rope
Starting at one end of your floral-wired rope:
- Wrap the prepared fabric strip tightly around the rope and wire.
- Use small drops of HeatnBond Fabric Fuse every couple of inches to hold the fabric in place.
- Secure the beginning and end with pins or clips.
- Continue wrapping, overlapping each round slightly (at least ¼”) for smooth coverage.When you reach the end of the strip, fold the edge under ¼”, add adhesive, and clip it in place to dry. Repeat with new strips until each arc is covered.
5. Let It Dry
Lay your completed arcs side by side on a flat surface or design board. Let the glue dry completely—pin in place if needed.
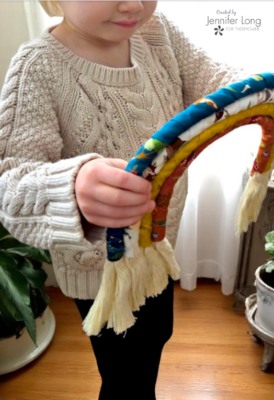
6. Sew the Arcs Together
Once dry, use a wide zigzag stitch on your sewing machine to stitch the arcs together along their shared edges. Use matching or contrasting thread, and don’t forget to backstitch for security.
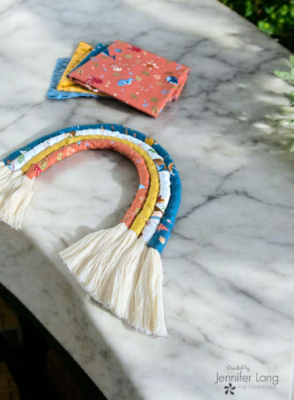
7. Finish the Fringe
Unravel the ends of the rope to form a soft fringe. Trim to your desired length. Add a loop of floral wire or string to the top if you want to hang your rainbow.
Optional Embellishments
Want to make your rainbow even more whimsical?
- Try adding Sparkle Paste to the fringe or top arc for a touch of shimmer.
- Use ThermoWeb’s Sparkle Stencils to apply subtle patterns across the fabric-wrapped arcs before assembly.
- Add a name tag, pom-poms, or charms to personalize it for gifting.
✂️ Try the Pattern Club FREE!
ThermoWeb readers can enjoy one FREE month in the Sew A Story Pattern Club to access SVG cut files, printable templates, and more bonus content that brings your projects to life.
JOIN HERE
Use code: THERMOWEBRAINBOW
Join the Sew A Story Community HERE
At Sew A Story, we believe every handmade project has the power to inspire connection, spark imagination, and bring families closer together. We’re so glad you’re here—let’s make something meaningful, together.