Floss Folio
Greetings friends! It’s Belinda from Blue Ribbon Designs, here with a brand new project tutorial featuring StitchnSew EZ Print Foundation Piecing Stabilizer and an assortment of my favorite HeatnBond products. Today, I am excited to share my “Floss Folio” with you.
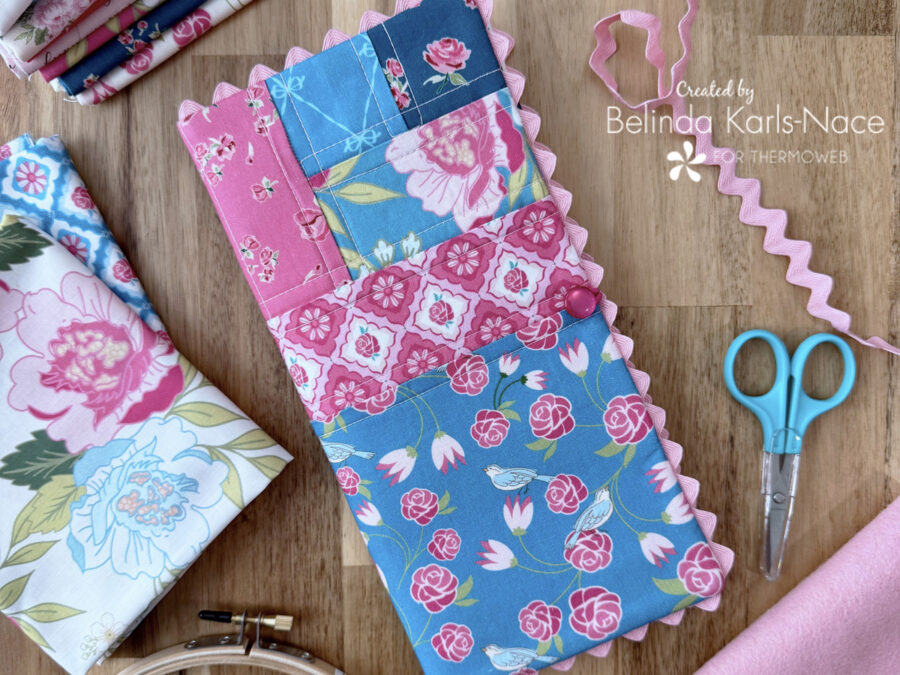
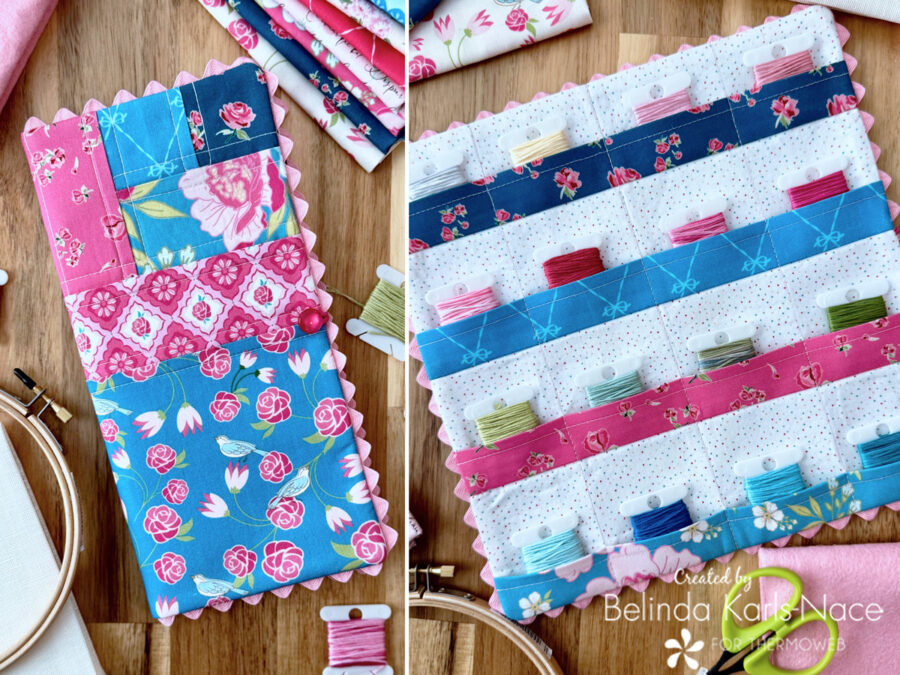
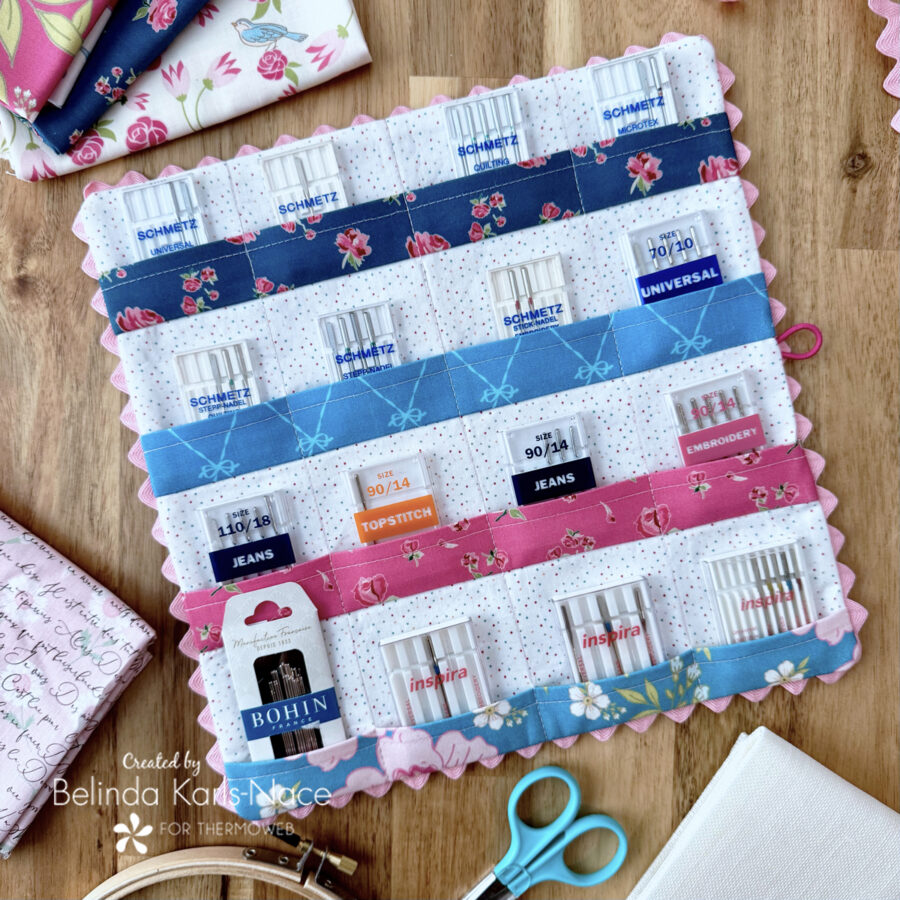
As an avid maker, I am always looking for projects that travel well and easy ways to take my needlework on the go. I do a lot of hand stitching and wanted a pretty and practical way to store my floss bobbins for easy transport. This “Floss Folio” fits that need perfectly! With sixteen small pockets, you can keep your floss nice and neat for an entire project. Plus, if you are a machine sewist, it works great for storing sewing machine needles (hand needles too).
Let’s get creative! Simply gather the materials/supplies listed below, then download the pattern with PDF foundation quilt blocks.
*NOTE*: This tutorial requires foundation quilt block piecing and sewing knowledge. If you need additional assistance, search/visit the Internet, or look at a basic foundation quilting book to learn the fundamentals.
What you need:
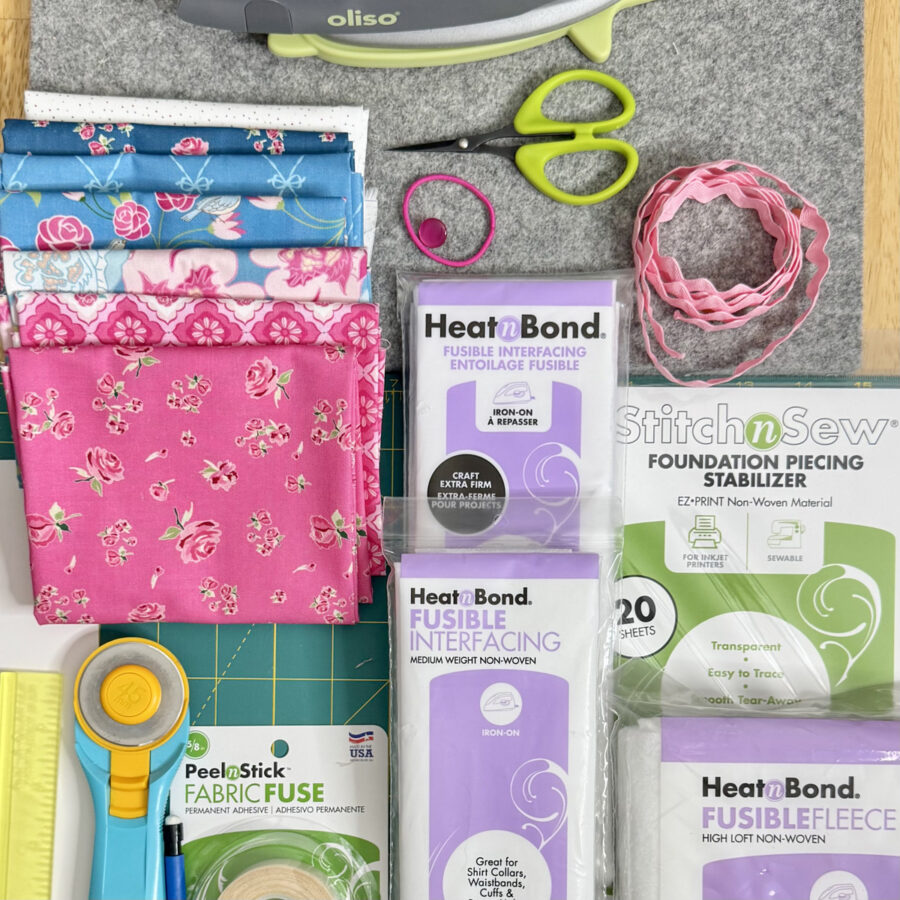
- StitchnSew EZ Print Foundation Piecing Stabilizer, 8.5” x 11”
- 2 sheets
- HeatnBond Fusible Fleece
- 1 – 10½” x 10½”
- HeatnBond Craft Extra Firm Non-Woven Fusible Interfacing
- 1 – 10½” x 10½”
- HeatnBond Medium Weight Non-Woven Fusible Interfacing
- 4 – 10½” x 2½”
- HeatnBond Fabric Fuse PeelnStick Fabric Adhesive Tape, 5/8 in
- approximately 3”
- Cotton Fabrics: model uses Stolen Moments by Lori Woods for Poppie Cotton
Use your favorite fabric collection!
-
- Navy Blue Rose (Tossed Roses Bleu SM25314)
- 2 – 2½” x 2½” Foundation Block A1
- 1 – 10½” x 2½” Top Inside Pocket
- Medium Blue Ribbon (Ribbons Bleu SM25320)
- 2 – 2½” x 2½” Foundation Block A2
- 1 – 10½” x 2½” 2nd Inside Pocket
- Medium Blue Large Rose (Alexis Bleu SM25302)
- 2 – 4” x 2½” Foundation Block A3
- 1 – 10½” x 2½” Bottom Inside Pocket
- Dark Pink Rose (Tossed Roses Rose SM25312)
- 2 – 2½” x 4” Foundation Block A4
- 1 – 10½” x 2½” 3rd Inside Pocket
- Medium Pink Rose Diamonds (Wallpaper Rose SM25303)
- 2 – 6” x 2½” Foundation Block A5
- Bright Blue Focal Fabric – Birds and Roses (Vintage Vines Bleu SM25317)
- 1 – 10½” x 5½” Lower Section Front Cover
- White (Country Confetti Marshmallow New White CC20190)
- 1 – 10½” x 10½” Inside Background Fabric
- Navy Blue Rose (Tossed Roses Bleu SM25314)
- Optional – Rick Rack (model uses ⅝” pink)
- Elastic (model uses a Goody pink hair elastic)
- Shank Button
- Oliso Iron
- Olfa Cutting Tools (cutting mat, rotary cutter)
- Sewing Machine
- Tools for Foundation Block Piecing
- Add-A-Quarter Ruler (optional, but extremely helpful)
- Flathead Pins
- Fabric Glue Stick/Pen
- Postcard or Piece of Cardstock
- Basic Sewing Supplies/Tools (small sharp scissors, wonder clips or pins, sewing thread, wooden presser or spoon, pencil, hand sewing needle, etc.)
How to Make a Floss Folio
Closed: 5” x 10” (plus rick rack)
Open: 10” x 10” (plus rick rack)
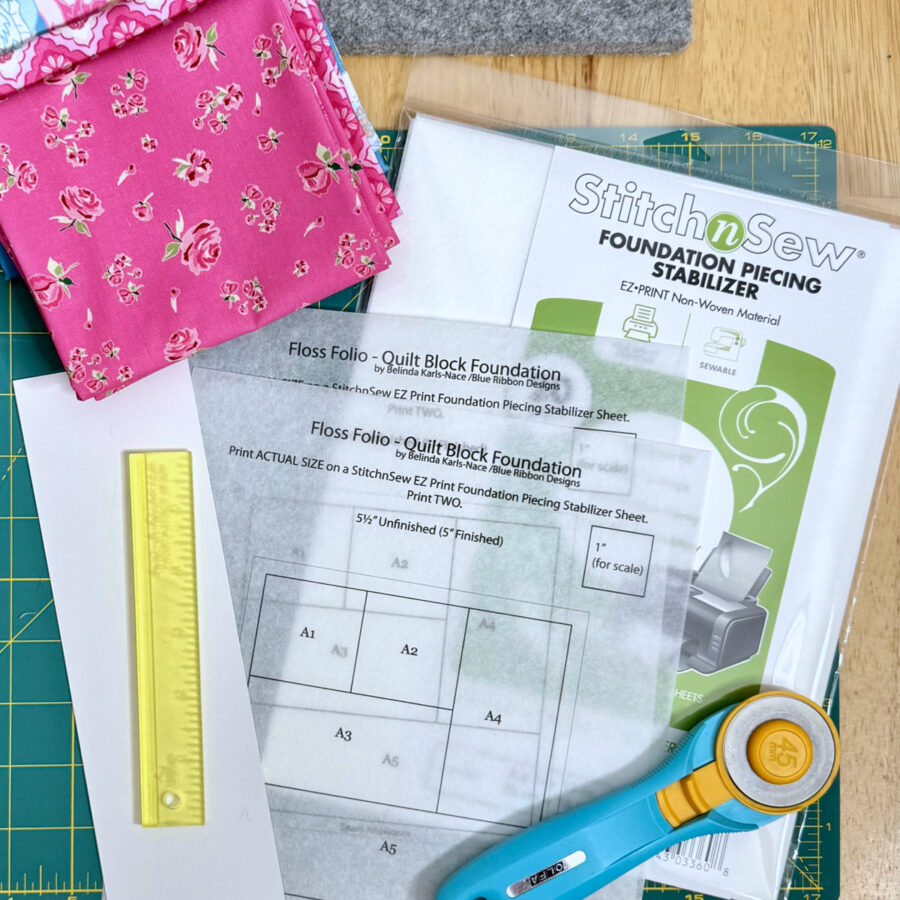
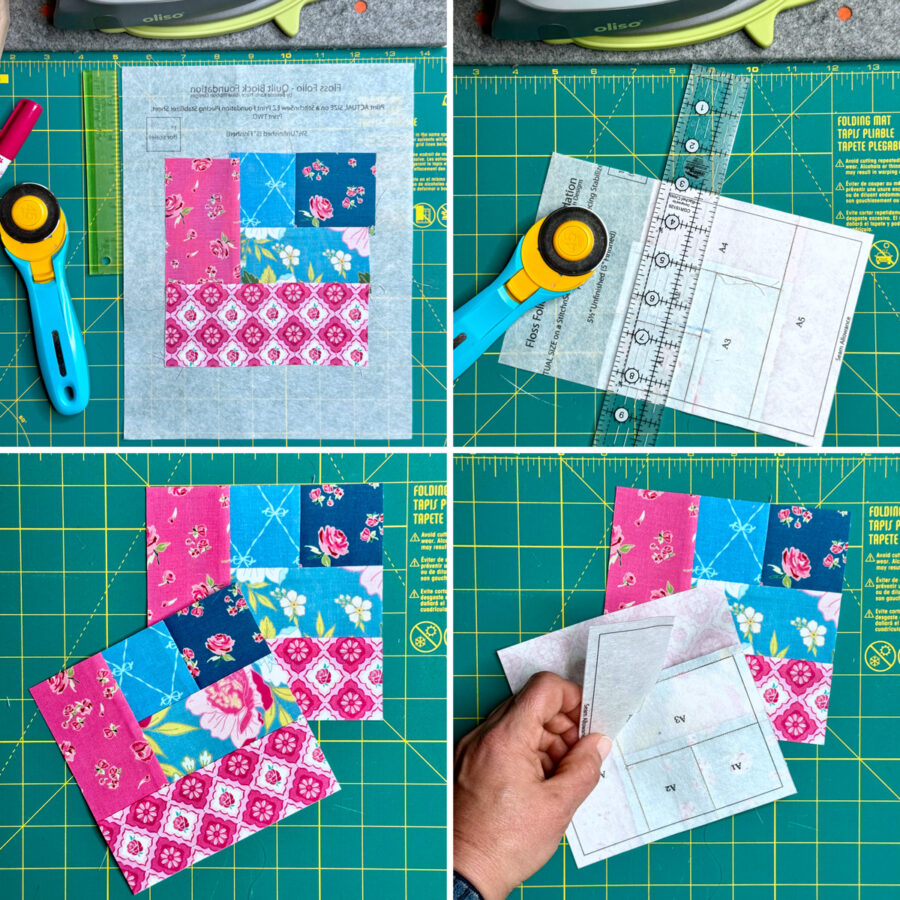
1. Download and print the Floss Folio PDF
Floss Folio – A Project for the Therm O Web Blog
Print actual size – do NOT “fit to page” or “shrink to fit.”
- Print page 1 (cover/layout) on regular printer paper.
- Print TWO copies of page 2 (foundation quilt block) on StitchnSew EZ Print Foundation Piecing Stabilizer.
2. Create Foundation Quilt Blocks
- If you are new to foundation quilt piecing, there are countless tutorials available. Do an Internet search or YouTube search to learn more about the technique. You can find a great tutorial here on the Therm O Web blog to get you started: Foundation Paper Piecing Basics.
- Gather printed foundations for the log cabin blocks (2), fabric pieces, flathead pins, Add-A-Quarter Ruler (or ruler with a ¼” line), rotary cutter, cutting mat, postcard or cardstock, and an iron or wooden presser.
- StitchnSew EZ Print Foundation Piecing Stabilizer is my foundation of choice.
- 8.5″ x 11″ sheets are easy to use. Print your patterns using any inkjet printer or simply trace pattern (sheet is transparent).
- Easy to tear away without distorting stitches.
- Soft to the touch.
- StitchnSew EZ Print Foundation Piecing Stabilizer is my foundation of choice.
- Create a Quarter 3 Log Cabin Quilt block using the foundation provided in the PDF pattern, using your favorite foundation quilt piecing techniques and tools.
- Use a rotary cutter to trim off the excess foundation stabilizer and excess fabric along the outer seam allowance (outer square) on the pattern. You want to leave the seam allowance in place. The block should measure 5½” x 5½” with seam allowance in place.
- Make two blocks (both 5½” square with seam allowance in place).
- Remove Paper
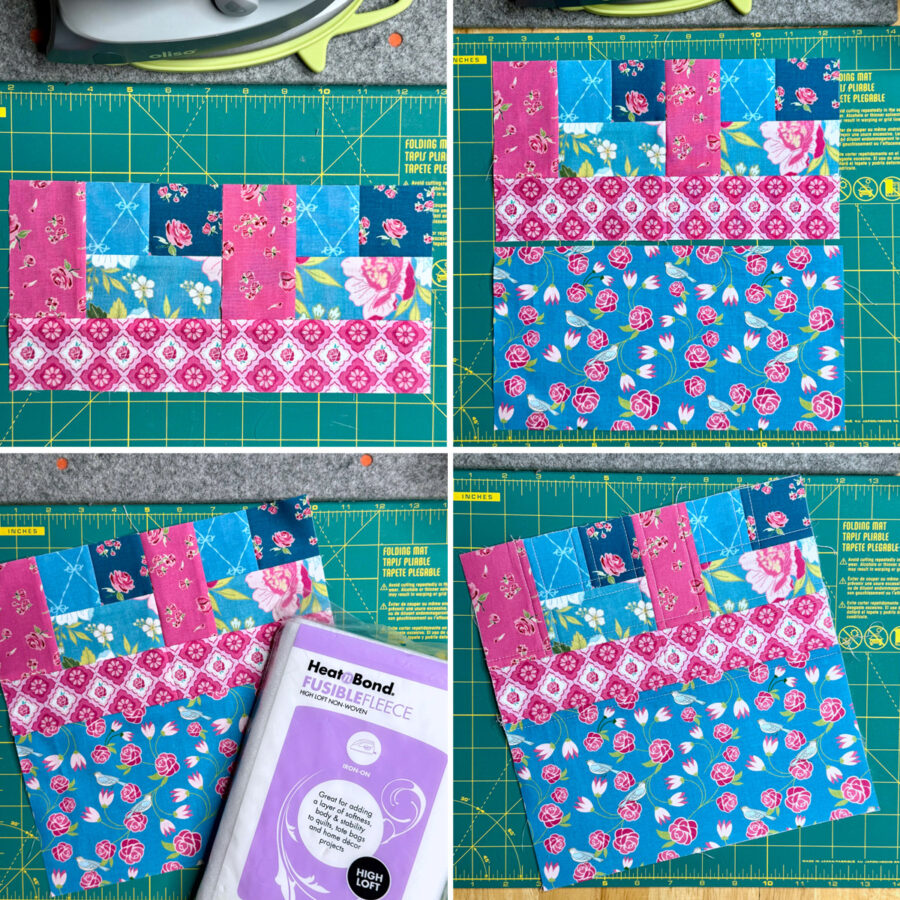
3. Create Cover
- All seam allowances are ¼”.
- Lay out, pin and sew the two foundation quilt blocks together as shown. Press seam open.
- Lay out, pin and sew the 10½” x 5½” focal fabric to the bottom of the combined block unit, as shown to create the cover. Press the seam toward the focal fabric. Combined cover block will measure 10½” x 10½”.
- Center and fuse the 10½” x 10½” piece of HeatnBond Fusible Fleece to the wrong side of the combined cover block, following the package instructions.
- Pre-heat iron to a cotton/high setting, no steam.
- Place the rough side of the Fusible Fleece on the wrong side of the fabric.
- Cover with a lightweight, dry pressing cloth.
- Press and hold iron with medium pressure for 10-15 seconds. Repeat by lifting iron to new area, slightly overlapping previous area until the entire surface is bonded.
- Allow it to cool.
- Quilt cover, if desired.
4. Create Inside Pocket Background
- Center and fuse the 10½” x 10½” piece of HeatnBond Craft Extra Firm Non-Woven Fusible Interfacing to the wrong side of the 10½” x 10½” piece of white inside background fabric.
- Pre-heat iron to a high setting, no steam.
- Place the rough side of the fusible interfacing against the wrong side of the background fabric.
- Cover with a lightweight, dry pressing cloth.
- Press and hold iron with medium pressure for 10-15 seconds. Repeat by lifting iron to new area, slightly overlapping previous area until the entire surface is bonded.
- Allow it to cool.
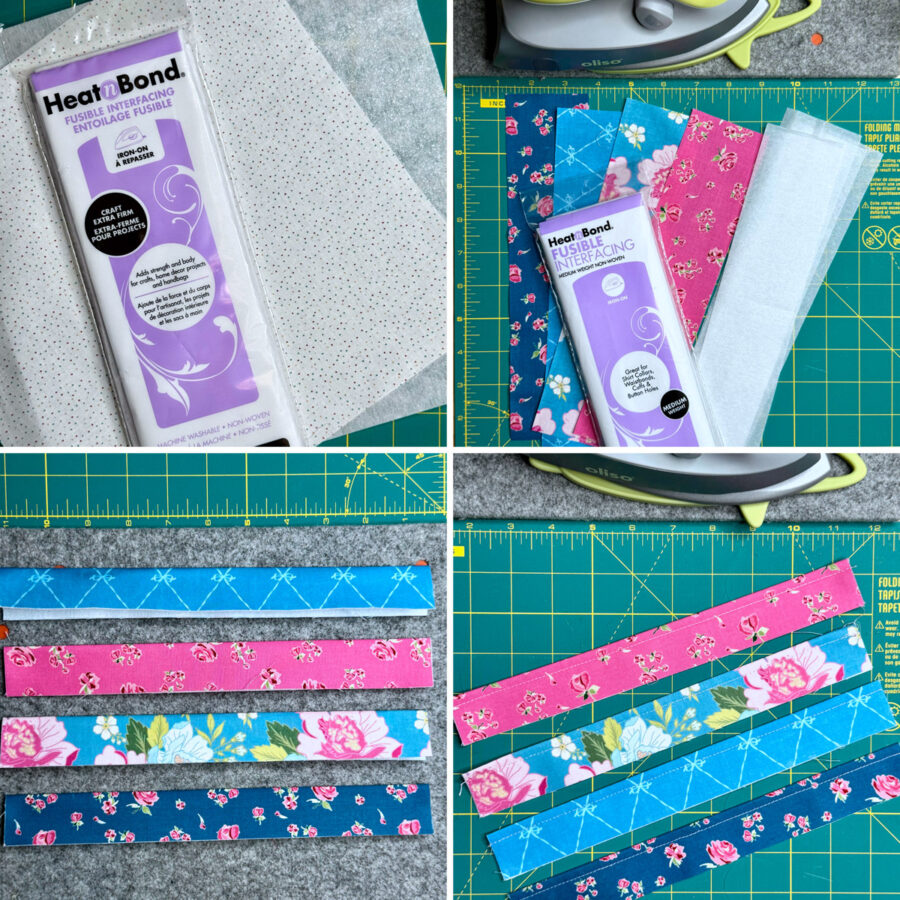
5. Create Pockets
- Center and fuse the 10½” x 2½” pieces of HeatnBond Medium Weight Non-Woven Fusible Interfacing to the wrong side of the 10½” x 2½” pieces of pocket fabrics.
- Pre-heat iron to a high setting, no steam.
- Place the rough side of the fusible interfacing against the wrong side of the pocket fabric.
- Cover with a lightweight, dry pressing cloth.
- Press and hold iron with medium pressure for 10-15 seconds. Repeat by lifting iron to new area, slightly overlapping previous area until the entire surface is bonded.
- Fold each pocket fabric in half lengthwise and press.
- Top stitch each pocket unit ¼” from the fold.
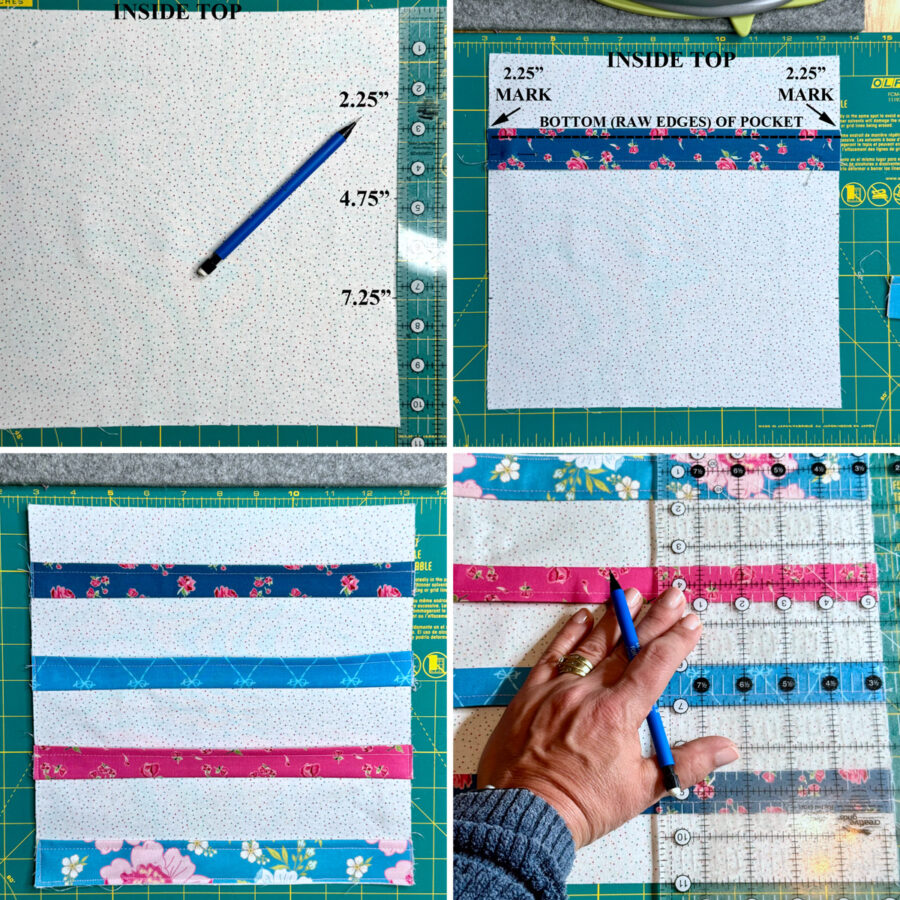
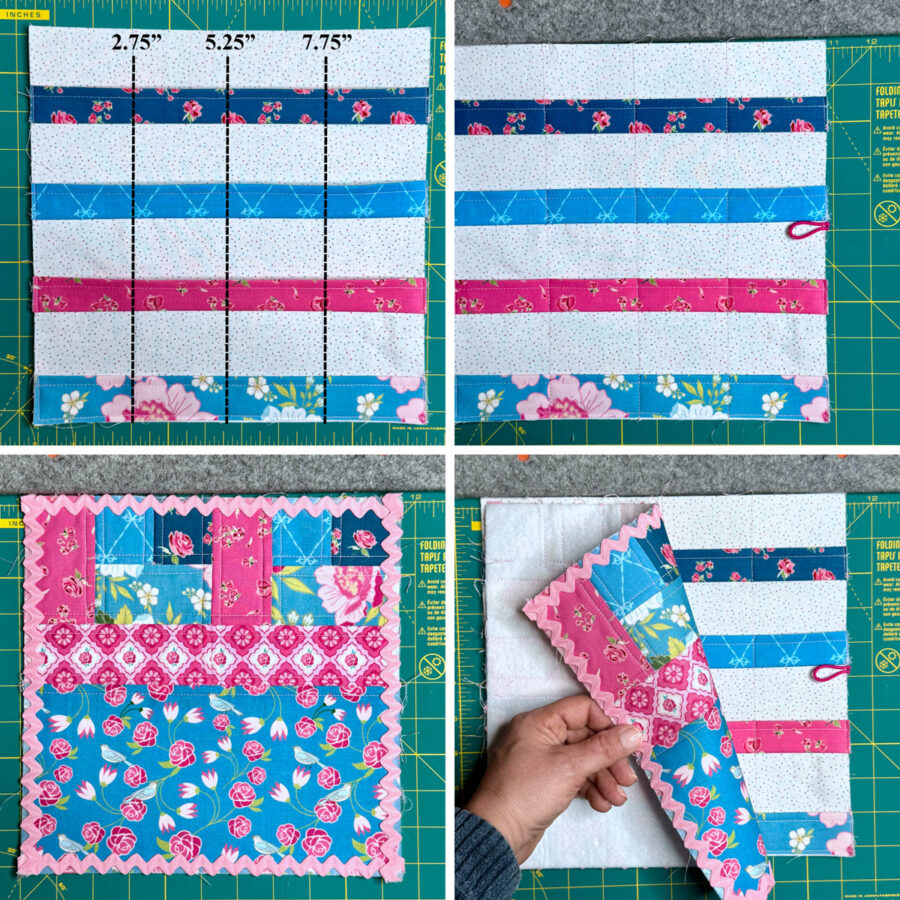
- Using a pencil, mark each side of the background fabric unit 2¼” from the top, 4¾” from the top, and 7¼” from the top, as shown.
- Line up the raw edges (bottom) of the top pocket on the 2 ¼” marks from step E, as shown. Sew across the length of the raw edge with a ¼” seam allowance, as shown.
- Fold up pocket, so the top stitched edge is now towards the top of the inside unit. Baste sides in place. This will bury the raw edges inside the pocket.
- Repeat steps F – H, to add the 2nd and 3rd pockets.
- For the bottom pocket, line up the raw edges with the bottom of the inside unit and baste bottom and sides. The raw edges from the bottom pocket will be buried inside the folio.
- Divide the Pockets.
- Use a pencil or frixion pen to lightly mark pocket divisions from top to bottom, as shown. Mark 2 ¾” from the left side, 5 ¼” from the left side, and 7 ¾” from the left side.
- Using a coordinating sewing thread, stitch over the drawn lines to divide the pockets.
5. Assemble the Folio
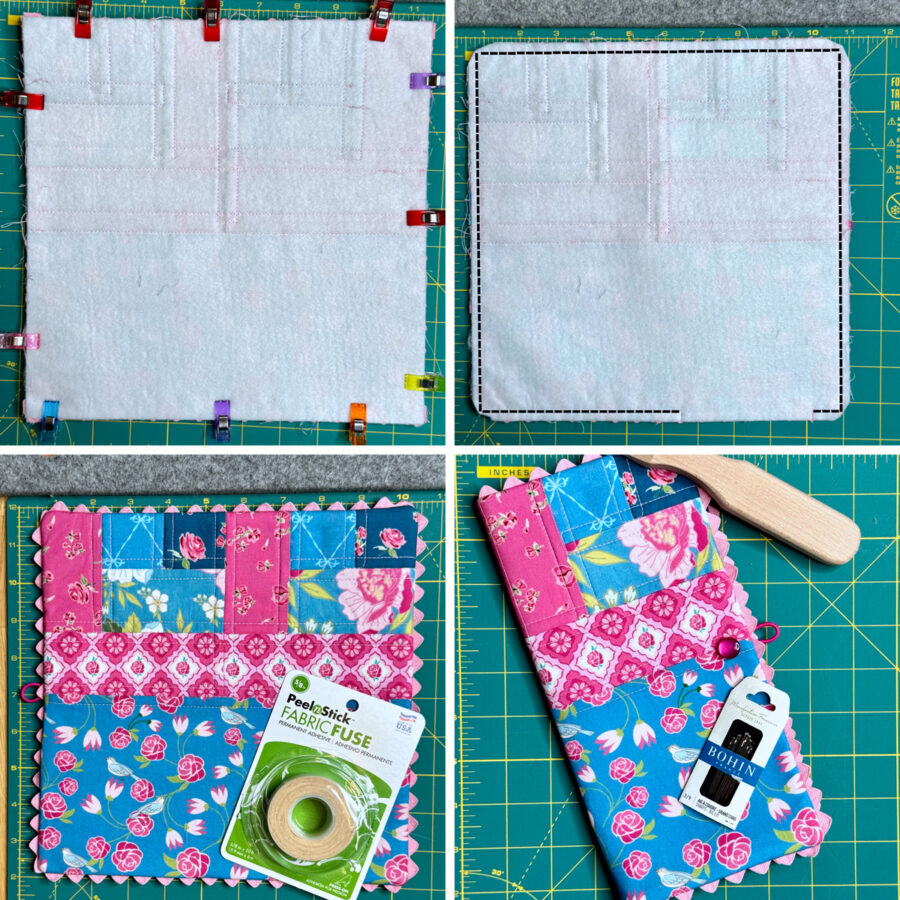
- Optional: baste rick rack in place on front cover unit (as shown), if desired.
- Center and baste elastic to the right side of inside pocket unit, as shown (elastic loop towards the inside of the pocket unit, raw edges to the outside edge of the pocket unit).
- Place the front unit and the inside unit right sides together. Sew around the perimeter, leaving an opening for turning.
- Clip corners and turn right side out through opening. Push out corners and press well.
- Use HeatnBond Fabric Fuse PeelnStick Fabric Adhesive Tape, 5/8 in, to seal the opening left for turning closed (no sew, no heat).
- Adhere the tape inside the opening along the edge.
- Peel off the paper liner.
- Press opening closed with firm pressure. Try using a wooden presser or the rounded side of a metal spoon and press down with your thumb while applying heavy, consistent pressure. The harder you press, the better the bond. Repeat steps on the back side of the item.
- Hand sew shank button in place.
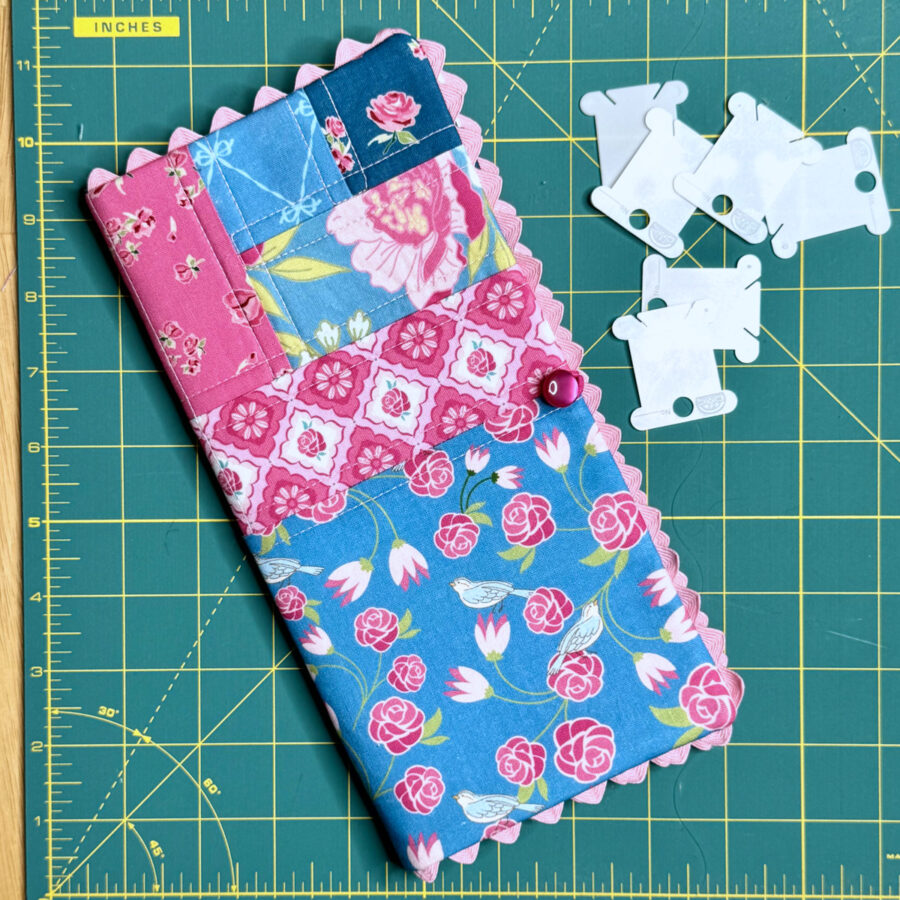
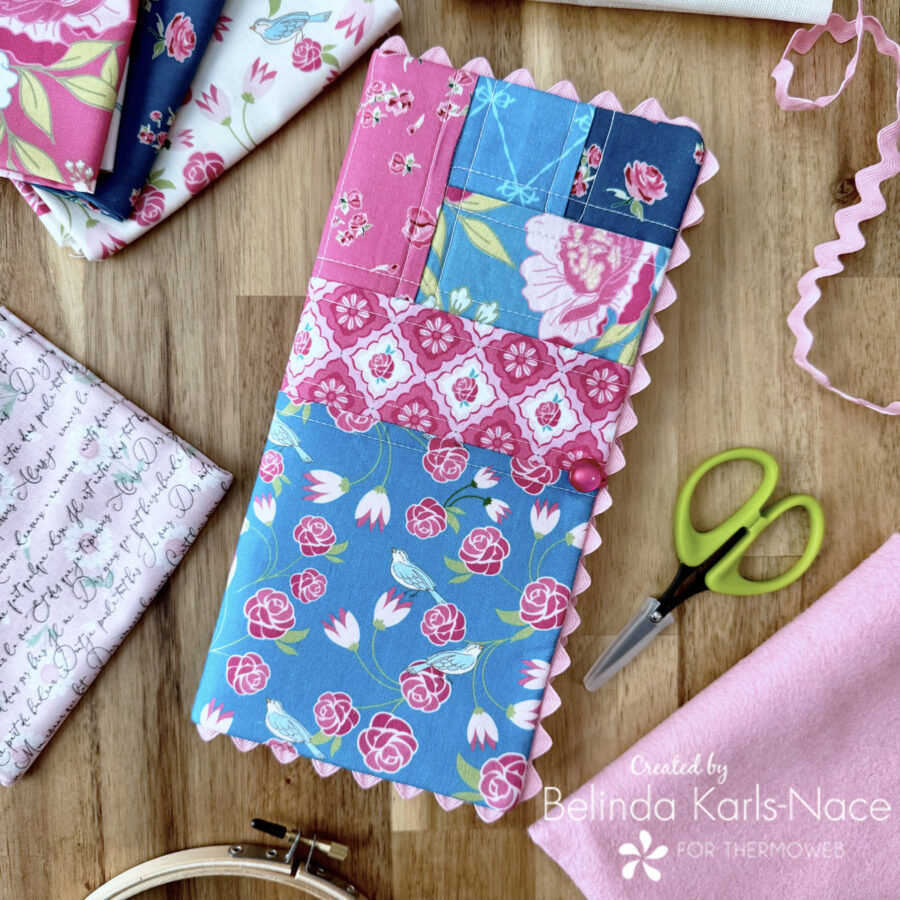
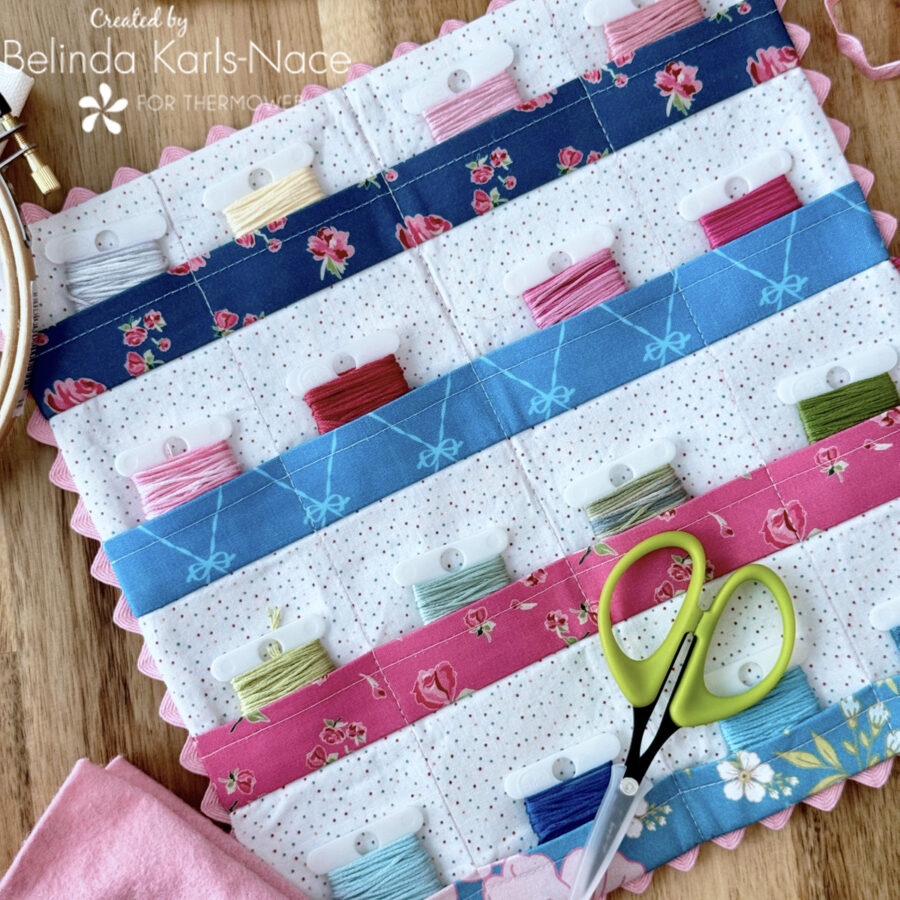
Your Floss Folio is now complete. This useful pocket folder will keep your floss or needles organized, protected, and ready for travel. Do you have another use for this quilted folio? Drop me a comment and let me know your idea – I would love to hear from you!
Thank you for joining me today for my Therm O Web blog tutorial. I hope this post inspires you to create a Floss Folio, using your favorite fabric collection. To see more of my projects and patterns, stop by my blog, website, and/or Instagram – I would love to visit with you and see what you create!