By Heather Tyler
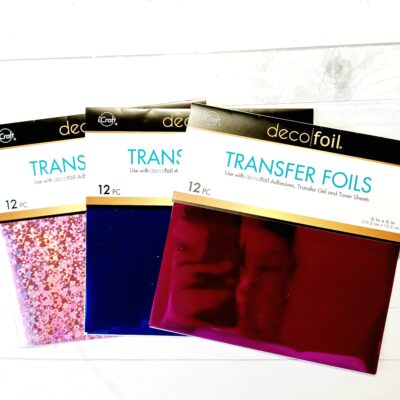
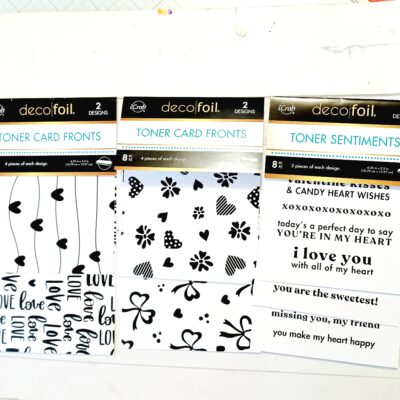
Hello Crafty Friends! Who doesn’t love sweets without all the calories? Today I will be using all of Therm O Web’s fabulous, new products to make sweet Valentine’s Day cards without all of the calories! Deco Foil has four new Valentine’s Day Toner Card Front designs, “Love All Ways” and “Heartstrings”. There are 2 designs in each package! Also, they have a new Deco Foil Toner Sentiments pack, “Lots of Love”. It has 8 different panels of adorable Valentine and love-themed sentiments (2 of each panel)! Lastly, they have three gorgeous new Deco foil Transfer Packs in, “Indigo”‘ “Berry Crush”‘ and “Candy Hearts”! You can find all of the new items on the Therm O Web’s new product page!
I had a request for a generic step-by-step process on the basics on getting foils and toner fronts ready for a card project. So, for this first part, I will focus on explaining the easy process of getting my foils prepared for die cutting the pieces needed (for both projects). As well as the basic processing of the Deco Toner Fronts with the color wanted for the cards. The only variables that will change is the color of the foil, and the toner front design.
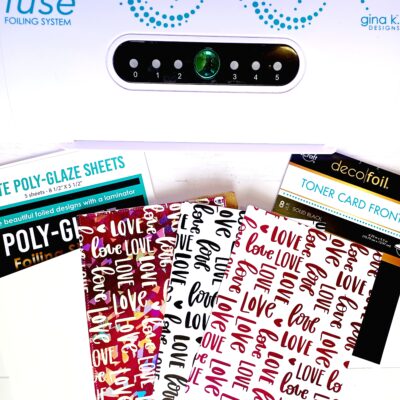
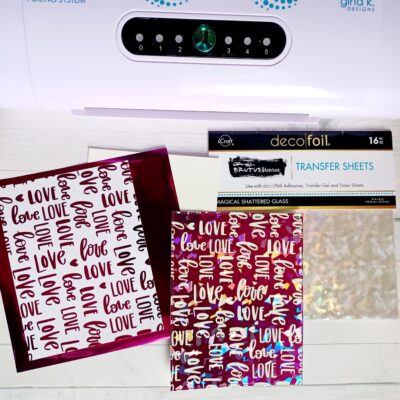
To get my Deco Foil Transfer Sheets ready for both cards, I gather all the colors I want to use for die cutting. I heat up my Gina K Fuse Foiling System to level four. While that is heating up, I place my Deco Foil Transfer Sheets on the Deco all black Toner Front and put them in the Deco Carrier Sheet (you can also use parchment paper). I then run it through the Fuse Foiling System, let it cool, and peel off the foil. Then that sheet is ready to use to die cut. I repeat this process for all the colors needed!
To get my Deco Foil Toner Card Fronts ready, I gather all the different designs and sentiments needed and colors of foil that I want my card fronts to be. I heat up my Gina K Fuse Foiling System to level four. While that is heating up, I place the foil (shiny side up) onto the card front design and place in the Carrier Sheet. I then run it through the Fuse Foiling System, let it cool (my preference), then peel off the foil. That design or sentiment is then ready to use as a background or to die cut. I repeat this process for the rest needed! After peeling off the foil, you will have a negative design on the foil, you can place this design on a Deco all black Toner Front and go through the steps again, it will come out as a reverse foiled form of your design!

So, for a brief description of my cards, I wanted to make a bag of candy using all of the new luscious Deco Foil colors, along with one of the adorable new Deco Toner Card Fronts and top it off with one of their new sentiments! I used The Sassy Club Chip Bag Die and I want Candy Dies for the candy bag and candy card I also used Brutus Monroe’s Foil Transfer Sheets in Magical Shattered Glass! This foil you can place over any other foil turning it into a truly magical piece

I always have so much fun spicing up my cards with Therm O Web’s new Deco Foil Transfers and Deco Toner Fronts! They always make my cards and projects stand out! Plus, I am always inspired by them! I hope you feel inspired to use these products for your next project or card! Have a fabulous, crafty day!
Therm O Web Supplies:
Deco Foil Transfer Sheets – Berry Crush
Deco Foil Transfer Sheets – Candy Hearts
Deco Foil Transfer Sheets – Indigo
Deco Foil Transfer Sheets – Pewter Lane
Deco Foil Transfer Sheets – Icy
Deco Foil Toner Sentiments-Lots of Love
Deco Foil Card Fronts – Love All Ways
Deco Foil Card Fronts – Heartstring
Deco Foil Plush Paper – Pink Carnation
Heat and Bond Sparkle Paste – Snowflake
Brutus Monroe Foil Transfer Sheets – Magic
iCraft 3D Double Sided Adhesive Foam Squares
iCraft Removable Pixi Tape Roll
Deco Foil Toner Card Front, Black
Gina K Designs Fuse Foiling System
Kathleen
February 7, 2025 at 7:45 pm (4 months ago)Thank you so much for all the ideas and information. I keep buying products, but then never get anything made . I’m inspired.
Twyla B
February 7, 2025 at 11:24 pm (4 months ago)Ordering was easy peasy. I am looking forward to receiving my order.
Dawn Gehring
March 18, 2025 at 2:01 pm (3 months ago)Thank you for your kind feedback, Twyla. Enjoy your new creative goodies!
Diana O
February 8, 2025 at 6:05 am (4 months ago)I love the new colors of foil and the toner papers are great. Thank you for sharing! Would love to be added to your email list… Blessings Diana O
Dawn Gehring
March 18, 2025 at 2:01 pm (3 months ago)Thank you, Diana! You can sign up for our email list at the bottom of our homepage at http://www.thermoweb.com. I’m sorry that’s not something we can do for you, but we are so happy you’d like to join our creative community! Appreciate your kind words about the new products.