Kiss of the Sun Decorative Pillow by Audrey Pettit
Supplies:
Therm O Web HeatnBond Fusible Fleece
Therm O Web SpraynBond™ Basting Adhesive
Muslin and Wool Fabric
DMC Embroidery Floss
Prickley Pear Rubber Stamps Kiss of the Sun Rubber Stamp
Kraft Outlet Cardstock
Stampin’Up Basic Brown Ink
Papertrey Ink Simply Chartreuse Topnotch Twill Tape (3/8-inch)
Pinking Shears
Safety Pin
Used Coffee Grounds
Polyfill Stuffing

Directions:
1. Cut muslin fabric to 4.5″ x 8″. Soak fabric in used coffee grounds and water to give fabric a stained and aged appearance. Allow muslin to dry completely.
*Note that the longer the fabric soaks in the grounds, the darker the staining will appear.
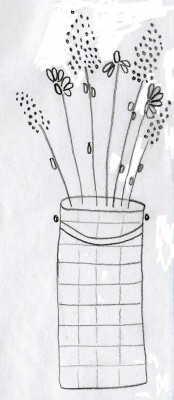
2. Draw or transfer embroidery pattern onto the muslin. For the project shown, the basket outline and flower stems were lightly hand-drawn with pencil as a general stitching guide. Embroider pattern as follows:
Basket Outline and Flower Stems: Outline Stitch
Basket Weave and Leaves: Satin Stitch
Flowers: French Knots, Satin Stitch, and Lazy Daisies

3. Lay fusible fleece and stitched muslin out on a large surface. Fold back one half of the muslin fabric and spray SpraynBond™ Basting Adhesive evenly on the back of the fabric and smooth it out onto the fleece (reposition as needed to avoid any wrinkles or bumps). Repeat with the other side.
4. Trim off any extra fleece.
5. Cut backing fabric to size. With right sides facing, machine stitch layers together using a 1/4″ seam allowance, leaving an opening on the bottom side. Flip fabric so that the right sides are out, stuff with polyfill stuffing, and stitch pillow closed using a slip stitch.
6. Stamp verse onto kraft cardstock with brown ink. Trim into a small tag. Cut decorative edge on bottom of the tag using pinking shears. Tie twill ribbon into a bow. Pin bow and tag to pillow.
Designer Notes:
I actually just free-hand drew my design onto the fabric in pencil first, and then added the stitching. The verse was a stamp from Prickley Pear Rubber Stamps, but all the stitching was free-hand. I just drew a rough rectangular outline for the basket, added a curved line for the handle, and then broke the inside of the basket into small grid squares in which I added the satin stitch. Stitched around the edge of the basket and handle with an outline stitch. Then I penciled in stems for the flowers and stitched in outline stitch. Last is to add French Knots, simple leaves, and Lazy Daisies for the flowers.
 (right click to save and then enlarge and print in a photo program)
3 Comments on Spring Basket Pillow – Featured Project
1Pingbacks & Trackbacks on Spring Basket Pillow – Featured Project
-
[…] Therm O Web has had so many requests for the directions and pattern, that they added this to their special feature projects, in case you’re interested in learning more. Just please don’t laugh at my sketch! I […]

Rowena Kerr
March 13, 2013 at 12:23 am (12 years ago)Adorable pillow…just may make it as love to hand embroider.
carol
June 25, 2014 at 3:54 pm (11 years ago)Great little project. Reading the note that accompanies this project is difficult to read. Any chance the words could be printed in text form?